How To Test Maf Sensor With Multimeter
So, you're looking to test your Mass Air Flow (MAF) sensor with a multimeter? You've come to the right place. This article will guide you through the process step-by-step, empowering you to diagnose potential issues with your car's engine without needing a mechanic.
Why Testing Your MAF Sensor Matters
The MAF sensor is a crucial component in your vehicle's engine management system. It measures the amount of air entering the engine, providing this data to the engine control unit (ECU). The ECU uses this information to calculate the correct amount of fuel to inject, ensuring optimal air-fuel ratio for efficient combustion. A faulty MAF sensor can lead to a variety of problems, impacting your vehicle's performance and fuel economy.
Here's why understanding how to test your MAF sensor is so important:
- Poor Fuel Economy: An inaccurate MAF sensor reading can cause the engine to burn too much fuel, significantly reducing your gas mileage.
- Rough Idling: A malfunctioning MAF sensor can lead to unstable or erratic idling, making your car sound and feel rough when stopped.
- Stalling: In severe cases, a faulty MAF sensor can cause the engine to stall, especially at low speeds or when decelerating.
- Hesitation During Acceleration: You might experience a noticeable delay or hesitation when you press the accelerator pedal.
- Check Engine Light: A faulty MAF sensor will often trigger the Check Engine Light (CEL) on your dashboard. Retrieving the error code with an OBD-II scanner will often reveal a MAF sensor-related code (e.g., P0100, P0101, P0102).
- Reduced Engine Power: The overall performance of your engine can suffer if the MAF sensor is not providing accurate readings.
By testing your MAF sensor, you can potentially identify and resolve these issues early on, saving you money on fuel, repairs, and preventing further damage to your engine.
How to Choose the Right Multimeter for MAF Sensor Testing
Before you start testing, you'll need a suitable multimeter. While most multimeters will work, some features are more beneficial than others for this task. Here's what to consider when choosing a multimeter for MAF sensor testing:
- Digital Multimeter (DMM): Opt for a digital multimeter rather than an analog one. DMMs provide more accurate and easier-to-read measurements.
- Voltage Measurement Range: Ensure the multimeter can measure DC voltage in the range of 0-5 volts, which is the typical output range for most MAF sensors.
- Continuity Testing: A continuity testing feature can be helpful for checking the wiring harness and connectors associated with the MAF sensor.
- Accuracy: Look for a multimeter with reasonable accuracy. For MAF sensor testing, an accuracy of +/- 1% is generally sufficient.
- Auto-Ranging: An auto-ranging multimeter automatically selects the appropriate measurement range, simplifying the testing process. However, manual ranging multimeters are also perfectly acceptable if you are comfortable setting the range yourself.
- Safety Features: Choose a multimeter with built-in safety features, such as overload protection and fused inputs. This protects both you and the multimeter from damage.
- Price: Multimeters range in price from affordable to professional-grade. A mid-range DMM with the necessary features will suffice for most DIY MAF sensor testing needs. Brands like Fluke, Klein Tools, and INNOVA are well-regarded.
Important Safety Note: Always disconnect the negative battery terminal before working on any electrical components in your vehicle. This prevents accidental short circuits and potential injury.
Testing Your MAF Sensor with a Multimeter: A Step-by-Step Guide
Here's a detailed guide on how to test your MAF sensor using a multimeter. Remember to consult your vehicle's repair manual for specific wiring diagrams and voltage specifications for your MAF sensor.
- Gather Your Tools and Materials: You'll need:
- A digital multimeter.
- Your vehicle's repair manual or wiring diagram for the MAF sensor.
- A small flathead screwdriver (may be needed for connector removal).
- Safety glasses.
- Locate the MAF Sensor: The MAF sensor is typically located in the intake air duct, between the air filter box and the throttle body. It's usually a cylindrical or rectangular component with an electrical connector attached.
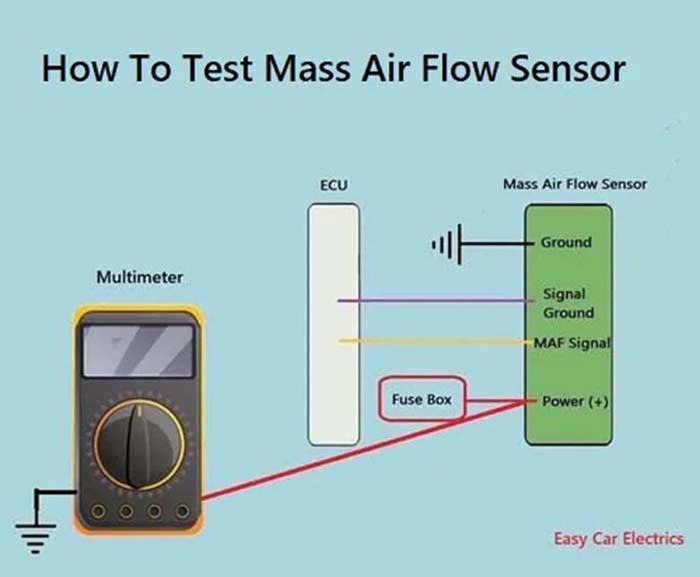
- Identify the MAF Sensor Wires: Refer to your vehicle's wiring diagram to identify the specific wires on the MAF sensor connector. Typically, you'll find:
- Power (usually +12V or +5V)
- Ground
- Signal (the output voltage that changes based on airflow)
- Prepare the Multimeter: Set your multimeter to DC voltage (VDC or DCV) mode. If your multimeter is not auto-ranging, set the range to 20V.
- Perform a Power and Ground Check:
- Power Check: Turn the ignition key to the "ON" position, but do not start the engine. Connect the black lead of the multimeter to a good ground point on the vehicle's chassis (e.g., a clean, unpainted metal surface). Connect the red lead to the power wire of the MAF sensor connector. You should read approximately 12V or 5V, depending on your vehicle's system.
- Ground Check: With the ignition still in the "ON" position, connect the red lead of the multimeter to the positive battery terminal. Connect the black lead to the ground wire of the MAF sensor connector. You should read approximately 12V (or close to the battery voltage). A reading close to zero indicates a good ground connection. A voltage reading significantly lower than battery voltage indicates a poor ground.
If you don't have power or ground, investigate the wiring, fuses, and relays associated with the MAF sensor circuit.
- Test the Signal Wire (Engine Running):
- Start the engine and let it idle.
- Backprobe the signal wire of the MAF sensor connector using a thin wire or backprobing probes. Do not pierce the wire insulation.
- Connect the black lead of the multimeter to a good ground point on the vehicle's chassis. Connect the red lead to the backprobing probe on the signal wire.
- Observe the voltage reading on the multimeter. The voltage should typically be in the range of 0.5 to 1.5 volts at idle, but this can vary depending on the vehicle.
- Increase the engine RPM by gently pressing the accelerator pedal. As the engine RPM increases, the voltage on the signal wire should also increase proportionally. A healthy MAF sensor will show a smooth and consistent increase in voltage with increasing airflow.
- Note any erratic or unstable voltage readings. A fluctuating or unresponsive signal wire indicates a potential problem with the MAF sensor.
- Interpreting the Results:
- Correct Power and Ground, but No Signal: If you have proper power and ground but no signal from the MAF sensor, the sensor itself is likely faulty.
- Erratic Signal Readings: Fluctuating or unstable voltage readings during acceleration suggest a malfunctioning MAF sensor.
- No Change in Signal Voltage: If the signal voltage doesn't change when you increase the engine RPM, the MAF sensor is likely not responding to changes in airflow and needs replacement.
Real-World Owner Experiences
Many car owners have successfully diagnosed and resolved MAF sensor issues using a multimeter. Here are a few real-world experiences:
- John, 2008 Honda Civic: "My Civic was running rough and getting terrible gas mileage. I scanned it and got a MAF sensor code. After watching a few YouTube videos, I decided to test it myself with a multimeter. Turns out the signal wire was dead. Replaced the MAF sensor, and the car runs like new again!"
- Sarah, 2012 Ford F-150: "My F-150 was hesitating badly when accelerating. I suspected the MAF sensor, but didn't want to just throw parts at it. I used a multimeter to check the power, ground, and signal wires. The signal voltage wasn't changing with engine RPM. I replaced the MAF sensor, and the hesitation is gone."
- David, 2005 Toyota Camry: "My Camry's Check Engine Light came on, and the code pointed to the MAF sensor. I used a multimeter to test the sensor, and the readings were all over the place. After replacing the MAF sensor, the Check Engine Light went off, and the car is running much smoother."
These experiences highlight the value of using a multimeter to diagnose MAF sensor problems. It allows you to pinpoint the issue accurately and avoid unnecessary repairs.
Frequently Asked Questions (FAQs)
Here are some frequently asked questions about testing MAF sensors with a multimeter:
- Q: Can I clean my MAF sensor instead of replacing it?
A: Cleaning the MAF sensor may help in some cases, especially if it's just dirty. Use a specialized MAF sensor cleaner (available at auto parts stores) and follow the instructions carefully. Avoid touching the delicate sensor wires. However, if the sensor is damaged or malfunctioning internally, cleaning will not fix it. If you have successfully cleaned the sensor, retest with the multimeter to ensure the voltage readings are now stable. If you are still having issues, replacement is needed.
- Q: How do I know if my MAF sensor is bad?
A: Common symptoms of a bad MAF sensor include poor fuel economy, rough idling, stalling, hesitation during acceleration, a Check Engine Light with a MAF sensor code, and reduced engine power. Testing with a multimeter can confirm whether the sensor is functioning correctly.
- Q: Is it difficult to replace a MAF sensor?
A: Replacing a MAF sensor is typically a straightforward process. It usually involves disconnecting the electrical connector, removing a couple of screws or clamps, and installing the new sensor in its place. Make sure to use the correct MAF sensor for your vehicle's make, model, and year.
- Q: How much does a new MAF sensor cost?
A: The cost of a new MAF sensor can vary depending on the vehicle make and model, as well as the brand of the sensor. Prices typically range from $50 to $200 or more. It's best to compare prices from different auto parts stores and online retailers.
- Q: Can I drive with a bad MAF sensor?
A: Driving with a bad MAF sensor is not recommended. It can lead to poor engine performance, reduced fuel economy, and potential damage to other engine components. It's best to address the issue as soon as possible.
- Q: I replaced the MAF Sensor and the problem persists?
A: Verify the replacement sensor is the correct part. The issue might stem from wiring problems, vacuum leaks, or issues with other engine sensors such as the O2 sensor. An OBD II scanner is a great resource for diagnosing and clearing codes.
By following the steps outlined in this article, you can effectively test your MAF sensor with a multimeter and diagnose potential engine performance issues. Remember to consult your vehicle's repair manual for specific instructions and voltage specifications. Good luck!