How To Use A Compression Tester
So, you think you might have an engine problem. Maybe it's down on power, burning oil, or just sounds… off. One of the most valuable diagnostic tools at your disposal is a compression tester. It's a relatively inexpensive tool, and understanding how to use it correctly can save you a lot of time and money by helping you pinpoint the source of your engine woes. This article will walk you through the process of performing a compression test, interpreting the results, and understanding what those results mean for the health of your engine.
Background: The Internal Combustion Engine and Compression
Before diving into the "how-to," let's quickly revisit the fundamentals of the internal combustion engine. At its heart, an engine is an air pump. It sucks in air, mixes it with fuel, compresses the mixture, ignites it, and expels the resulting exhaust. The compression stroke is a critical part of this process. During this stroke, the piston moves upward in the cylinder, compressing the air-fuel mixture. This compression significantly increases the temperature of the mixture, making it easier to ignite and maximizing the power produced during combustion. Higher compression generally translates to more efficient combustion and more power.
The integrity of the cylinder is paramount for achieving proper compression. Think of it like trying to compress air in a syringe with a leaky plunger. If there are leaks in the cylinder, such as worn piston rings, damaged valves, or a blown head gasket, the pressure will escape, and compression will be low. This, in turn, leads to reduced power, poor fuel economy, increased emissions, and potential engine damage.
Technical Breakdown: How a Compression Test Works
A compression test is a relatively simple procedure that measures the maximum pressure achieved in each cylinder during the compression stroke. The process involves removing the spark plugs, disabling the fuel injection and ignition systems (to prevent fuel from entering the cylinders and starting the engine), and then cranking the engine with a compression tester installed in the spark plug hole. As the engine cranks, the piston moves up and down, and the compression tester records the peak pressure achieved in the cylinder.
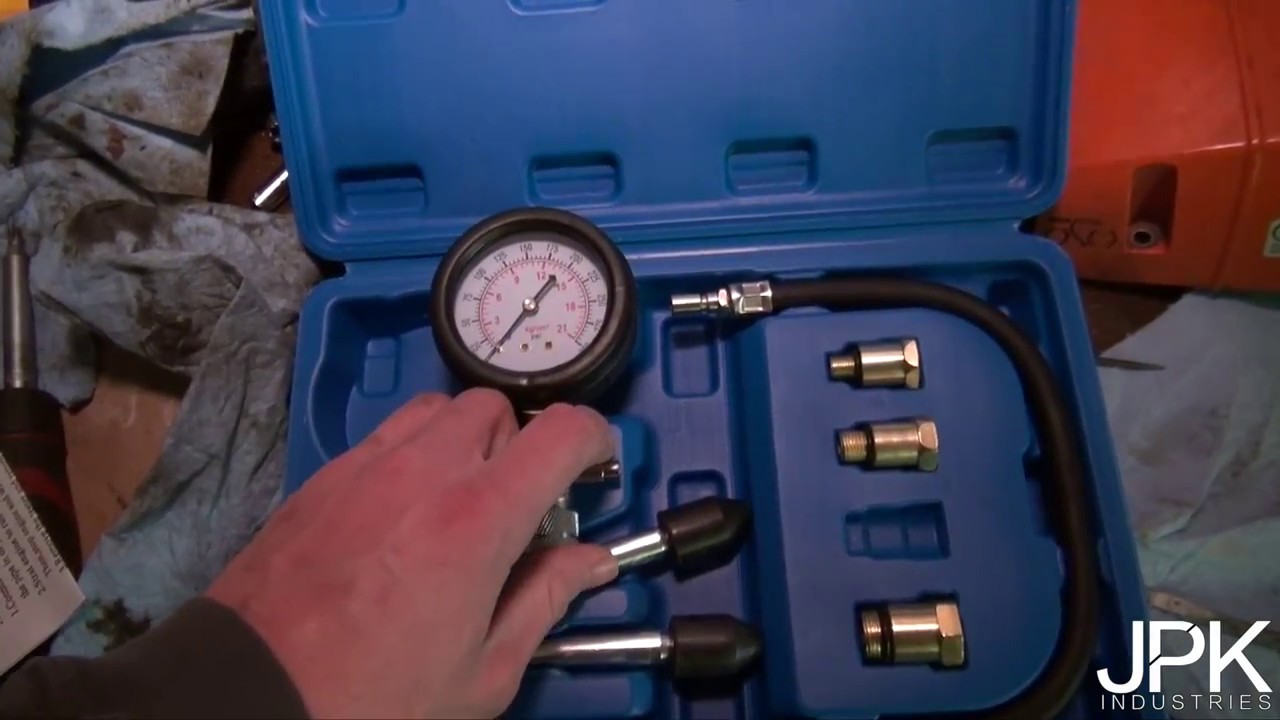
Types of Compression Testers
There are two main types of compression testers: screw-in and hold-on. Screw-in testers are generally considered more accurate because they create a better seal in the spark plug hole. They require you to screw the tester directly into the spark plug threads. Hold-on testers, on the other hand, have a rubber cone that you press firmly against the spark plug hole. They're quicker to use but can be less accurate due to potential leakage. For accurate diagnostics, a screw-in tester is highly recommended.
Performing the Test: Step-by-Step
- Preparation: Gather your tools. You'll need a compression tester (preferably a screw-in type), spark plug socket, ratchet, extension, wrench to disconnect the fuel pump relay or fuse, and possibly a helper. Ensure the engine is warmed up to operating temperature. This helps to seat the piston rings and provide a more accurate reading. Safety first! Disconnect the negative battery terminal to prevent accidental starting.
- Disable Fuel and Ignition: Locate the fuel pump relay or fuse (consult your vehicle's repair manual). Remove it to disable the fuel pump and prevent fuel from being injected into the cylinders during the test. This is crucial to avoid washing down the cylinder walls with fuel, which can damage the engine and give inaccurate readings. Also, disable the ignition system. Depending on your car, this might involve disconnecting the ignition coil or a similar procedure outlined in your repair manual.
- Remove Spark Plugs: Carefully remove all the spark plugs. Keep track of which spark plug came from which cylinder – this can be helpful later if you find a cylinder with low compression. Inspect the spark plugs for signs of damage or fouling (e.g., oil, carbon buildup, etc.), which can provide clues about the engine's condition.
- Install the Compression Tester: Screw the compression tester into the spark plug hole of the first cylinder you're testing. Make sure it's snug but not overtightened.
- Crank the Engine: Have a helper crank the engine for 5-7 compression strokes (usually about 5-10 seconds). Watch the gauge on the compression tester. The needle will climb with each compression stroke until it reaches a maximum value.
- Record the Reading: Record the maximum reading for that cylinder.
- Repeat: Repeat steps 4-6 for each of the remaining cylinders.
- Analyze: Compare the readings from all cylinders and consult your vehicle's repair manual for the manufacturer's specified compression values.
Interpreting the Results
The compression readings are usually expressed in pounds per square inch (PSI) or kilopascals (kPa). Here's how to interpret the results:
- Overall Compression: Check if the readings are within the manufacturer's specified range. Your repair manual will have this information. If all cylinders are within the specified range and close to each other, your engine likely has good compression.
- Variation Between Cylinders: The difference between the highest and lowest cylinder readings is more important than the absolute values. A significant difference (typically more than 10-15% variation) indicates a problem in one or more cylinders.
- Low Compression in One Cylinder: This could indicate a problem with the piston rings, valves (leaking or not seating properly), or a blown head gasket in that particular cylinder.
- Low Compression in Adjacent Cylinders: This strongly suggests a blown head gasket between those two cylinders.
- Very Low or Zero Compression: This indicates a severe problem, such as a broken valve, a hole in the piston, or a completely blown head gasket.
The "Wet" Compression Test
If you find a cylinder with low compression, you can perform a "wet" compression test to help determine whether the problem is with the piston rings or the valves. In this test, you add a small amount of oil (about a tablespoon) into the cylinder through the spark plug hole, wait a few seconds for the oil to coat the cylinder walls, and then repeat the compression test. If the compression reading increases significantly after adding oil, it suggests that the piston rings are worn and not sealing properly. The oil helps to temporarily seal the gap between the piston rings and the cylinder wall. If the compression reading doesn't increase significantly, the problem is likely with the valves.
Common Issues and Maintenance Concerns
Several factors can cause low compression. Here are some of the most common:
- Worn Piston Rings: Over time, the piston rings can wear down, losing their ability to seal the cylinder effectively.
- Leaking Valves: Valves that are bent, burned, or coated with carbon buildup may not seat properly, allowing pressure to escape.
- Blown Head Gasket: A blown head gasket can create a leak between the cylinder and the cooling system or an adjacent cylinder.
- Damaged Cylinder Walls: Scratches or damage to the cylinder walls can also cause compression loss.
- Incorrect Valve Timing: If the valves are not opening and closing at the correct times, it can affect compression.
Regular engine maintenance can help prevent these problems. This includes changing the oil and filter regularly, keeping the cooling system in good condition, and avoiding overheating the engine. If you suspect a problem with your engine's compression, it's best to address it as soon as possible to prevent further damage.
Do's and Don'ts / Best Practices
- DO use a screw-in compression tester for the most accurate results.
- DO warm up the engine before performing the test.
- DO disable the fuel and ignition systems to prevent fuel from entering the cylinders.
- DO keep track of which spark plug came from which cylinder.
- DO consult your vehicle's repair manual for the manufacturer's specified compression values.
- DO perform a "wet" compression test if you find a cylinder with low compression.
- DON'T overtighten the compression tester when installing it in the spark plug hole.
- DON'T crank the engine for too long at a time.
- DON'T ignore low compression readings. Investigate the cause and address the problem promptly.
- DON'T forget to reconnect the fuel pump relay/fuse and ignition system after completing the test.
- Best Practice: Charge the battery fully before performing a compression test. A weak battery can result in slower cranking speed and lower compression readings.
Conclusion
Performing a compression test is a valuable diagnostic tool that can help you identify engine problems early on. By following the steps outlined in this article and interpreting the results correctly, you can gain valuable insights into the health of your engine and take steps to address any issues before they become more serious. While a compression test provides valuable information, it's not a magic bullet. Consider combining it with other diagnostic procedures, such as a leak-down test or cylinder balance test, for a more comprehensive assessment of your engine's condition. If you're not comfortable performing these tests yourself, consult with a qualified mechanic.
Recommendation: Invest in a good quality screw-in compression tester and familiarize yourself with the procedure. It's a skill that every serious DIY mechanic should have in their toolbox.