How To Use A Fender Roller
Have you ever dreamed of fitting wider wheels and tires to your car for improved grip, a more aggressive stance, or simply the aesthetics? The unfortunate reality is that often the stock fender wells simply don't offer enough clearance, leading to tire rub, damaged paint, and potentially even safety concerns. This is where the seemingly simple, yet surprisingly effective, fender roller comes into play. It's a tool that allows you to gently roll the inner lip of your fenders upwards and outwards, creating the necessary space without resorting to drastic measures like cutting and welding.
The Problem: Insufficient Fender Clearance
Imagine this: You've just invested in a beautiful set of new wheels, wider and with a more aggressive offset than your stock ones. You bolt them on, step back to admire your handiwork, and then...thump, thump, thump. Every time you hit a bump or take a corner, your tires are making unwelcome contact with the inside lip of your fenders. This isn't just annoying; it can quickly damage both your tires and your paint, leading to costly repairs. In extreme cases, it could even compromise the structural integrity of your fender.
This problem isn't limited to those who are simply installing wider wheels. Lowering your car also drastically reduces fender clearance, as the suspension now travels further within the wheel well during compression. Even with stock wheels, a lowered car can experience fender rub. Fender rolling is a common solution to both these scenarios.
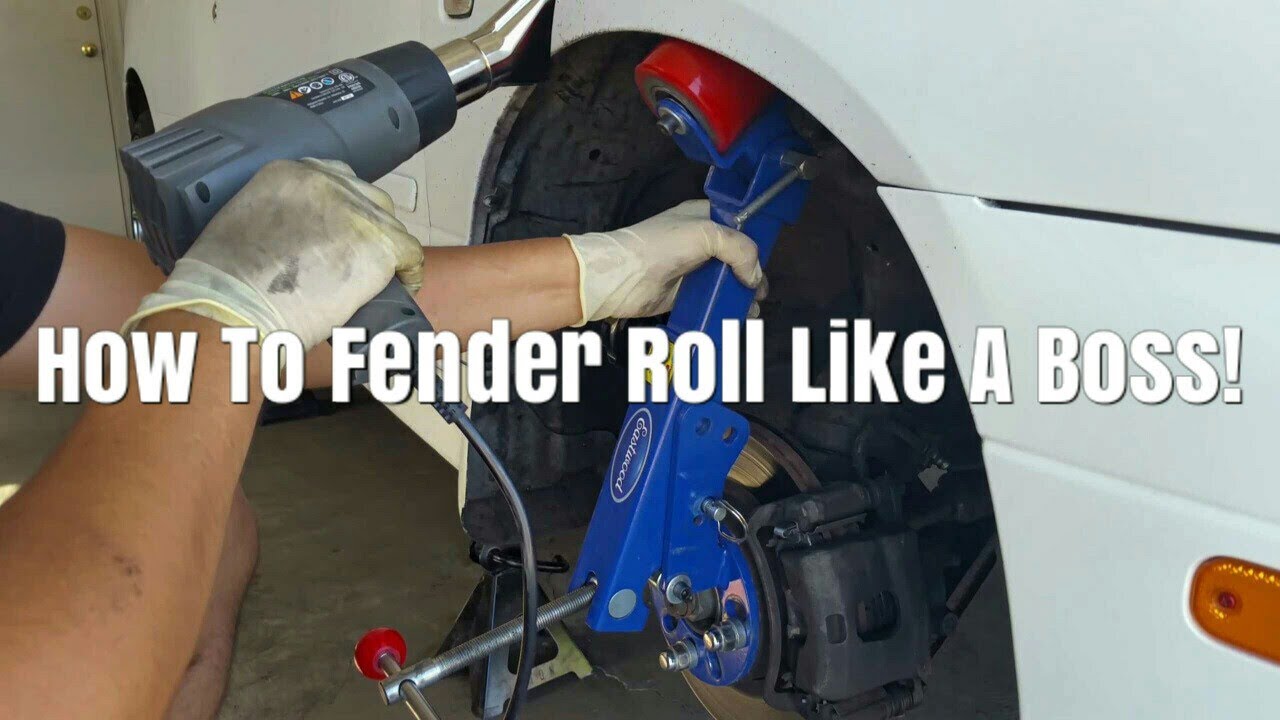
How a Fender Roller Works: A Mechanical Ballet
At its core, a fender roller is a lever-based tool designed to apply controlled pressure to the inner lip of the fender. It consists of several key components:
1. Hub Assembly
The hub assembly is the central point of the tool. It's designed to bolt directly to your car's wheel hub, using the existing lug bolt holes. The universal bolt pattern allows it to adapt to a wide range of vehicles. The hub assembly provides a stable and secure mounting point for the rest of the tool.
2. Adjustable Arm
Extending from the hub assembly is an adjustable arm. This arm is crucial for setting the appropriate offset and angle for the rolling process. Adjustment mechanisms vary between models, but typically involve a threaded shaft or sliding components that allow you to precisely position the roller head.
3. Rolling Head
The rolling head is the heart of the operation. It's a smooth, rounded roller made of a durable material like hardened steel or nylon. This roller is the point of contact with the fender lip. As you move the roller back and forth along the fender lip, it gradually bends the metal outwards, creating the desired clearance. The rolling head's shape is designed to minimize the risk of sharp creases or damage to the paint.
4. Heat Gun (External)
While not a part of the fender roller itself, a heat gun is an absolutely essential companion tool. Applying heat to the fender before and during the rolling process makes the metal more malleable and significantly reduces the risk of cracking or paint damage. Think of it like blacksmithing – heating the metal allows it to be shaped more easily.
The Process: Step-by-Step Fender Rolling
Fender rolling requires patience, attention to detail, and a methodical approach. Here’s a breakdown of the typical process:
- Preparation is Key: Thoroughly clean the fender and surrounding area. Remove any dirt, debris, or loose paint. This helps prevent scratches and ensures a clean surface for the rolling head.
- Heat Application: Using a heat gun, carefully warm the fender, focusing on the area where you'll be rolling. Keep the heat gun moving and avoid overheating any one spot. The goal is to make the metal warm to the touch, but not so hot that it burns you.
- Mounting the Roller: Securely mount the fender roller to the wheel hub, ensuring it's properly aligned. Double-check the lug nuts for tightness.
- Initial Adjustment: Adjust the arm of the fender roller so that the rolling head is positioned against the inner lip of the fender. Start with a very shallow angle and apply only light pressure.
- The Rolling Process: Slowly and deliberately move the roller back and forth along the fender lip. Apply consistent pressure, gradually increasing the angle as needed. Avoid rushing the process. Several passes with light pressure are much better than one pass with excessive force.
- Regular Heat Application: Continuously re-apply heat to the fender as you roll. This keeps the metal pliable and prevents cracking.
- Monitoring Progress: Frequently check the progress of the roll. Look for even bending and any signs of stress or cracking. Use a straight edge to gauge the amount of clearance you've gained.
- Final Touches: Once you've achieved the desired clearance, allow the fender to cool completely. Inspect the rolled area for any imperfections and touch up the paint as needed.
Pros and Cons of Using a Fender Roller
Pros:
- Increased Tire Clearance: The primary benefit is, of course, increased clearance for wider tires or lowered suspensions.
- Cost-Effective Solution: Fender rolling is generally much cheaper than other alternatives like fender flares or body modifications.
- Preserves Original Aesthetics: When done correctly, fender rolling maintains the original look of your car.
- Relatively Simple Procedure: With the right tools and some patience, fender rolling can be a DIY project.
Cons:
- Risk of Paint Damage: If not done carefully, fender rolling can lead to paint cracking or chipping.
- Potential for Metal Distortion: Excessive force or improper technique can distort the shape of the fender.
- Limited Clearance Gains: Fender rolling only provides a limited amount of additional clearance.
- Requires Skill and Patience: Achieving a perfect roll requires practice and attention to detail.
Use Cases and Scenarios
Fender rollers are useful in a variety of situations:
- Installing Wider Wheels and Tires: This is the most common application for fender rollers.
- Lowering a Vehicle: Lowering a car significantly reduces fender clearance, making fender rolling a necessity.
- Correcting Tire Rubbing Issues: Even with stock wheels and suspension, some cars may experience tire rubbing due to manufacturing tolerances or worn suspension components.
- Preparing for Track Use: Track days often require wider tires for improved grip, necessitating fender rolling.
Manufacturer Examples
Several manufacturers offer fender rollers, each with its own features and price point. Some popular brands include:
- Eastwood: Eastwood offers a range of automotive tools, including fender rollers. Their models are known for their durability and ease of use.
- Klutch: Klutch fender rollers are a more budget-friendly option, suitable for occasional use.
- Performance Tool: Performance Tool offers a variety of automotive tools, including basic fender rollers.
- Various Generic Brands: Numerous generic fender rollers are available online, often at very low prices. However, the quality of these tools can vary significantly.
Real-World Insights and Recommendations
Based on experiences from countless enthusiasts and professionals, here are some key takeaways and recommendations for using a fender roller:
- Prioritize Heat: Never underestimate the importance of heat. Consistent and even heat application is crucial for preventing paint damage and ensuring a smooth roll.
- Go Slow and Steady: Rushing the process is a recipe for disaster. Take your time, apply light pressure, and gradually increase the angle as needed.
- Practice on a Scrap Panel: If possible, practice on a scrap piece of metal or an old fender before working on your car. This will give you a feel for the tool and allow you to refine your technique.
- Use a Paint Thickness Gauge: A paint thickness gauge can help you determine the thickness of the paint on your fenders. This information can be useful in preventing over-heating and paint damage.
- Consider Professional Installation: If you're not comfortable performing the work yourself, or if you have a valuable or rare car, consider hiring a professional. An experienced body shop will have the tools and expertise to ensure a flawless result.
- Address Rust Prevention: After rolling the fenders, it is wise to apply some form of rust inhibitor, like a paintable undercoating, to the bare metal inside the wheel well. This will prevent corrosion issues from cropping up down the line.
Fender rolling is a valuable skill for any car enthusiast looking to maximize tire clearance and achieve a more aggressive stance. While it requires patience and attention to detail, the results can be well worth the effort. By understanding the mechanics of the tool, following a methodical process, and heeding real-world insights, you can successfully roll your fenders and unlock the full potential of your wheels and tires.