How To Use Roof Rails For Luggage
So, you're looking to maximize your vehicle's cargo-carrying capabilities by using those roof rails? Excellent choice! Using roof rails effectively and safely can transform your car into a veritable road trip machine. This guide is aimed at experienced DIYers and car enthusiasts who want to understand the ins and outs of utilizing roof rails for luggage transport. We'll cover everything from the key components and how they work together to safe loading practices and troubleshooting common issues.
Understanding Roof Rails and Luggage Systems
Purpose
Think of this article as your comprehensive guide to roof rail luggage systems. Whether you're planning a family vacation, hauling camping gear, or transporting oversized items, understanding how to properly utilize your roof rails is crucial for both safety and convenience. This knowledge will help you avoid costly damage to your vehicle, prevent accidents caused by improper loading, and ultimately, get the most out of your investment. Furthermore, understanding the system's limitations will prevent you from attempting loads that exceed its maximum load capacity, a critical safety concern.
Key Specs and Main Parts
Before we dive into the "how-to," let's define the main components. It's important to understand these terms so you can confidently discuss your setup with retailers, mechanics, or other enthusiasts.
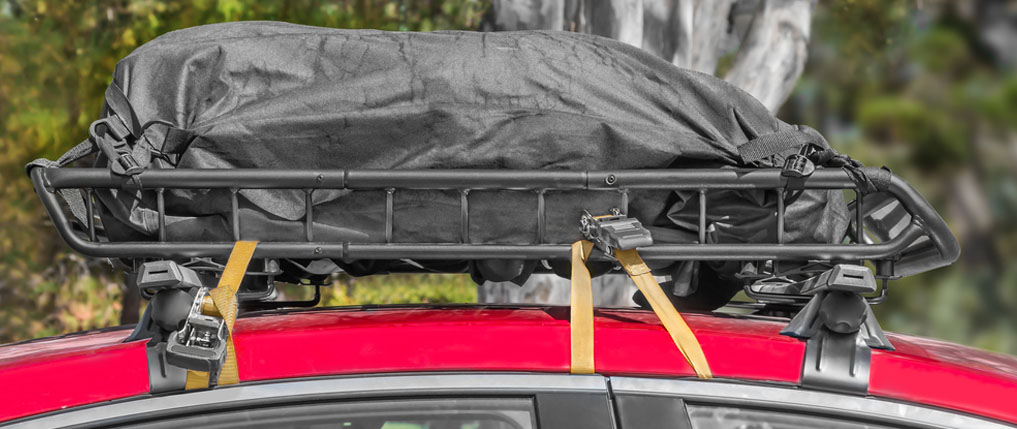
- Roof Rails: These are the longitudinal bars that run along the length of your vehicle's roof. They can be either flush-mounted (close to the roof) or raised (with a gap between the rail and the roof). The type of rail significantly impacts the type of crossbars you can use.
- Crossbars: These bars attach perpendicularly to the roof rails, creating a platform for carrying luggage. They are essential for distributing the load evenly and preventing damage to your vehicle's roof. They come in various shapes (round, square, aero) and materials (steel, aluminum).
- Mounting Hardware: This includes clamps, screws, and other fasteners that secure the crossbars to the roof rails. The specific hardware will depend on the type of roof rails and crossbars you have. Make sure the hardware is corrosion-resistant.
- Luggage Carrier/Cargo Box: This is an optional but highly recommended component for protecting your luggage from the elements and streamlining airflow. They come in various sizes and shapes, impacting the overall aerodynamic drag and fuel economy.
- Straps/Tie-Downs: These are crucial for securing your luggage to the crossbars or cargo box. Ratchet straps, cam buckle straps, and bungee cords are common options. Always choose straps with a load rating that exceeds the weight of your cargo.
Important specifications to note include:
- Maximum Load Capacity: This is the maximum weight the roof rails and crossbars can safely support. This is usually specified in your vehicle's owner's manual and on the crossbars themselves. Never exceed this limit.
- Crossbar Spread: This refers to the distance between the crossbars. A wider spread generally provides better stability for longer items.
- Crossbar Length: The length of the crossbars should be sufficient to accommodate your luggage or cargo without extending excessively beyond the vehicle's width.
How It Works
The fundamental principle is weight distribution. The roof rails provide a mounting point, and the crossbars distribute the weight of the luggage across the roof structure. The mounting hardware ensures a secure connection between the crossbars and the roof rails. Here's a breakdown of the process:
- Attachment: The crossbars attach to the roof rails using clamps or other mounting hardware. The specific method depends on the type of roof rail and crossbar. Flush-mounted rails often require specific adapters, while raised rails typically use clamps that grip the sides of the rails.
- Load Distribution: The crossbars distribute the weight of the luggage across the roof structure. The wider the crossbar spread, the more evenly the weight is distributed.
- Securing: Luggage is secured to the crossbars using straps or tie-downs. The straps should be tightened securely to prevent the luggage from shifting during transit. If using a cargo box, the box is typically bolted or clamped to the crossbars.
Real-World Use and Basic Troubleshooting
Okay, so you've got your roof rails, crossbars, and cargo ready to go. Here are some common scenarios and troubleshooting tips:
- Problem: Crossbars are loose. Solution: Double-check the mounting hardware. Ensure all screws and clamps are tightened to the manufacturer's specifications. If the hardware is damaged, replace it immediately.
- Problem: Luggage is shifting during transit. Solution: Tighten the straps. Ensure the straps are properly routed and that there are no loose ends flapping in the wind. Consider using non-slip mats under the luggage to provide extra grip.
- Problem: Excessive wind noise. Solution: This is often caused by the crossbars themselves. Aero-shaped crossbars are designed to minimize wind noise. You can also purchase wind fairings that attach to the front of the crossbars to deflect air. Consider repositioning the crossbars to optimize airflow.
- Problem: Reduced fuel economy. Solution: Adding a luggage carrier or cargo box increases aerodynamic drag, which reduces fuel economy. Try to minimize the size and height of the load. Remove the crossbars when not in use.
Safety Considerations
Using roof rails safely is paramount. Ignoring these precautions can lead to accidents and damage.
- Weight Limits: As mentioned earlier, never exceed the maximum load capacity of your roof rails and crossbars. This is a critical safety concern. Overloading can damage the roof structure of your vehicle and lead to instability.
- Load Distribution: Distribute the weight of your luggage evenly across the crossbars. Place heavier items towards the center of the vehicle.
- Secure Strapping: Use high-quality straps with a load rating that exceeds the weight of your cargo. Tighten the straps securely and double-check them regularly during your trip.
- Height Clearance: Be aware of your vehicle's increased height when using roof rails. This is especially important when driving under bridges, through parking garages, and around low-hanging obstacles.
- Regular Inspection: Inspect your roof rails, crossbars, and mounting hardware regularly for signs of damage. Replace any worn or damaged components immediately.
Risky Components: The most risky components are undoubtedly the mounting hardware and the straps. A failure of either of these can lead to catastrophic consequences. Always use high-quality components and inspect them regularly.
Important Reminder: When securing luggage, ensure that the straps do not interfere with any vehicle components, such as the sunroof, antenna, or rear hatch. Check your vehicle's manual for any specific recommendations or warnings related to roof rail usage.
This guide provides a comprehensive overview of using roof rails for luggage transport. By understanding the key components, how they work, and the associated safety considerations, you can confidently and safely maximize your vehicle's cargo-carrying capabilities.
We have a detailed diagram available for download that provides visual representations of the components, mounting procedures, and strapping techniques. Contact us and we can share the diagram.