How To Wire A Electric Fan
Wiring an electric fan might seem daunting, but with the right information and precautions, it's a manageable DIY project. This guide provides a comprehensive overview of how to safely and effectively wire an electric fan, covering everything from choosing the right components to troubleshooting common issues.
Why Understanding Fan Wiring Matters
Understanding how to wire an electric fan is crucial for several reasons:
- Safety: Incorrect wiring can lead to electric shock, fire hazards, and damage to your fan and electrical system. Proper wiring ensures a safe and functional device.
- Cost Savings: Knowing how to wire a fan allows you to install or repair it yourself, saving on electrician fees.
- Customization: You can adapt your fan's wiring to specific needs, such as adding speed controls or adjusting the power source.
- Extending Lifespan: Correct wiring prevents stress on the motor and other components, contributing to a longer lifespan for your fan.
How to Choose the Right Components for Wiring Your Fan
Before you begin wiring, ensure you have the correct components. Selecting the right parts is essential for safety and performance. Here's what you need to consider:
1. Wire Gauge
Wire gauge is crucial for handling the electrical load of your fan. Always consult your fan's manual to determine the recommended wire gauge. Using a wire gauge that is too thin can lead to overheating and fire hazards. Common gauges used for fans include 14 AWG and 16 AWG. Lower numbers indicate thicker wires that can carry more current.
2. Electrical Cord
If you're replacing a damaged cord or adding one to a motor, choose a cord that is appropriately rated for the voltage and amperage of your fan. Look for cords with a UL (Underwriters Laboratories) listing, which indicates they have been tested and meet safety standards. Consider the length of the cord you need, as a too-short cord can create a tripping hazard.
3. Wire Connectors
Wire connectors, such as wire nuts or push-in connectors, are used to securely join wires together. Choose connectors that are appropriately sized for the wire gauge you are using. Ensure they are UL listed for safety. Properly installed connectors prevent loose connections, which can cause arcing and overheating.
4. Switch (If Applicable)
If your fan requires a switch for on/off control or speed settings, select a switch that is rated for the voltage and amperage of your fan. Different types of switches are available, including toggle switches, rotary switches, and dimmer switches. Choose a switch that is compatible with your fan's wiring and control requirements.
5. Grounding Wire
Grounding is essential for safety. Ensure your fan has a grounding wire (usually green or bare copper) that connects to the ground terminal in your electrical box. This provides a path for electricity to flow safely to the ground in the event of a fault, preventing electric shock.
6. Tools
Gather the necessary tools before you start. This includes:
- Wire strippers: For removing insulation from wires without damaging them.
- Pliers: For twisting wires together and securing wire connectors.
- Screwdrivers: Appropriate sizes for the screws on your fan and electrical box.
- Electrical tape: For insulating wire connections if needed (wire connectors are generally preferred).
- Multimeter: For testing voltage and continuity.
- Voltage tester: To ensure power is off before working on the wiring. This is a critical safety tool.
Steps to Wire an Electric Fan
Safety First! Before beginning any electrical work, always turn off the power to the circuit at the breaker box. Use a voltage tester to verify that the power is off before touching any wires.
1. Identify the Wires
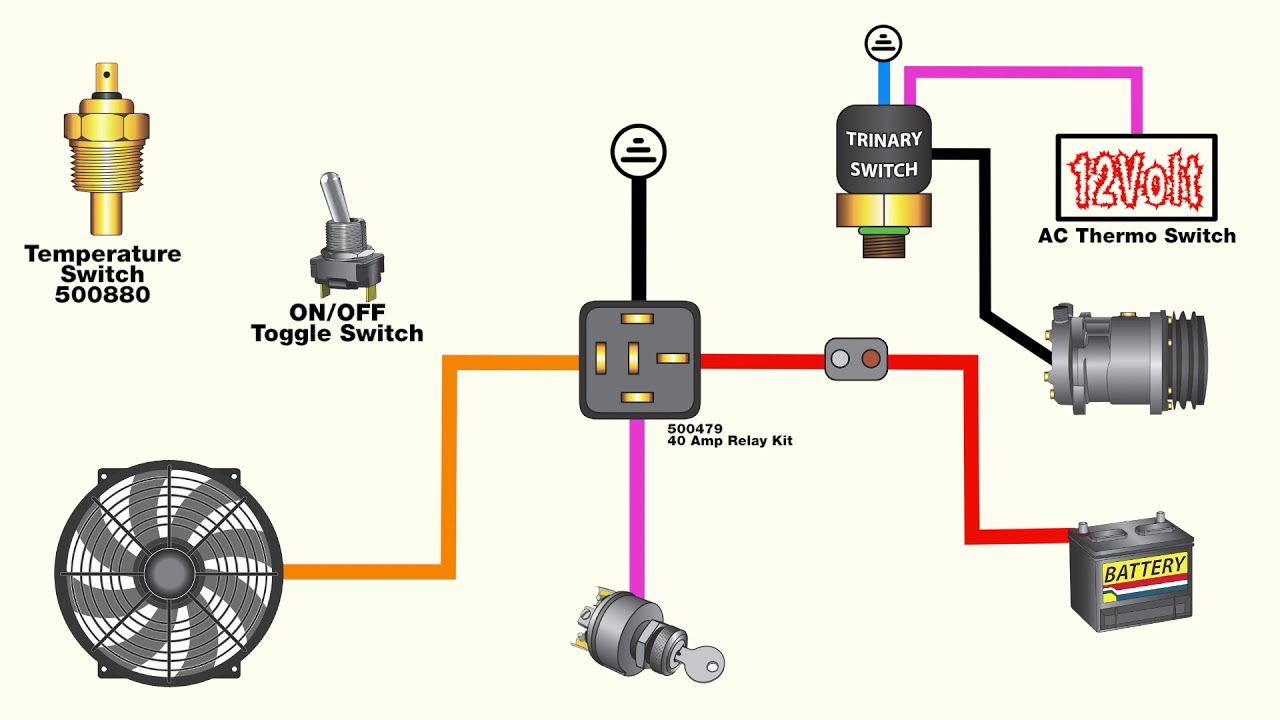
Most fans have three wires: a black (hot) wire, a white (neutral) wire, and a green or bare copper (ground) wire. If your fan has multiple wires for different speeds, consult the wiring diagram that came with your fan. The wiring diagram is crucial for correct installation.
2. Connect the Wires
Using wire strippers, carefully strip about ¾ inch of insulation from the end of each wire. Twist the exposed wires together with the corresponding wires from the power source (black to black, white to white, green/bare copper to green/bare copper). Secure the connections with wire connectors, twisting them tightly until they are snug. Gently tug on the connectors to ensure they are secure.
3. Grounding
Connect the green or bare copper wire (the ground wire) to the ground terminal in the electrical box. This is usually a green screw or a metal terminal. Make sure the connection is tight and secure.
4. Secure the Wires
Carefully tuck the wires into the electrical box, ensuring they are not pinched or strained. Position the fan so that the wires are not under tension.
5. Test the Fan
After wiring the fan, carefully turn the power back on at the breaker box. Test the fan to ensure it is working properly. If the fan does not turn on, immediately turn off the power and recheck your wiring connections. If the fan turns on but makes unusual noises or smells, turn off the power and investigate further.
Real-World Owner Experiences & Tips
Many DIYers find that taking pictures of the original wiring before disconnecting anything can be incredibly helpful for reassembly. Also, labeling the wires with masking tape and a marker can prevent confusion.
One common issue encountered is difficulty fitting all the wires back into the electrical box. Neatly folding the wires and ensuring they are not excessively long can help. Sometimes, a deeper electrical box is required if there is not enough space.
Another tip is to always double-check the wiring diagram before making any connections. Even if you think you know what you're doing, a quick review can prevent costly mistakes.
Troubleshooting Common Issues
Fan Not Working:
- Check the breaker: Ensure the circuit breaker is not tripped.
- Loose connections: Verify all wire connections are secure.
- Faulty switch: Test the switch with a multimeter to ensure it is working.
- Motor issue: The motor may be damaged and require replacement.
Fan Runs Slowly:
- Low voltage: Check the voltage at the outlet with a multimeter.
- Dirty fan blades: Clean the fan blades to reduce drag.
- Worn motor: The motor may be nearing the end of its lifespan.
Fan Makes Noise:
- Loose screws: Tighten all screws on the fan and mounting bracket.
- Imbalanced blades: Balance the fan blades with a balancing kit.
- Motor noise: The motor may be worn or damaged and require replacement.
FAQs About Wiring an Electric Fan
Q: Can I use a dimmer switch to control the speed of my fan?
A: Not all fans are compatible with dimmer switches. Check your fan's manual to see if it is compatible with a dimmer switch. Using the wrong type of dimmer switch can damage the fan's motor.
Q: What do I do if the wires are different colors than what is described in this guide?
A: Always refer to the wiring diagram that came with your fan. The wiring diagram will show the correct connections for your specific fan model. If you are unsure, consult a qualified electrician.
Q: How do I know if my fan is properly grounded?
A: Use a multimeter to test the continuity between the fan's metal housing and the ground wire. There should be a low resistance reading. If there is no continuity, the fan is not properly grounded.
Q: Is it safe to wire a fan myself if I have no electrical experience?
A: If you have no electrical experience, it is strongly recommended that you hire a qualified electrician. Electrical work can be dangerous, and incorrect wiring can lead to serious injury or property damage. Safety is paramount.
Q: Where can I find a replacement wiring diagram for my fan?
A: Check the manufacturer's website or contact their customer service department. You may also be able to find a wiring diagram online by searching for your fan model number.
By following these steps and taking the necessary precautions, you can safely and effectively wire an electric fan. Remember to prioritize safety and consult a qualified electrician if you have any doubts or concerns. Good luck!