How To Wire A Electric Fan Relay
Wiring an electric fan relay might seem daunting, but with the right knowledge and precautions, it's a manageable task. This article provides a comprehensive guide on how to wire an electric fan relay, covering everything from understanding its purpose to troubleshooting common issues.
Why Wiring an Electric Fan Relay Matters
Electric fan relays are essential components in many automotive and electrical systems. Their primary function is to control the operation of an electric cooling fan, ensuring that it turns on and off as needed to maintain optimal temperatures. Here’s why this is so important:
- Preventing Overheating: The most crucial benefit is preventing the engine from overheating. Overheating can cause severe damage, leading to costly repairs.
- Improved Engine Efficiency: Maintaining the correct engine temperature improves combustion efficiency, which translates to better fuel economy and performance.
- Extending Engine Life: Consistent temperature regulation reduces thermal stress on engine components, extending their lifespan.
- Protecting Electrical Components: Using a relay allows a low-current circuit (like a temperature sensor signal) to control a high-current circuit (the fan), protecting delicate components from overload.
- Consistent Cooling: Electric fans provide consistent cooling, especially at low speeds or when idling, something belt-driven fans can struggle with.
By understanding the role of the relay, you can appreciate the importance of wiring it correctly. Improper wiring can lead to fan malfunction, overheating, and even electrical damage.
How to Choose the Right Electric Fan Relay
Selecting the appropriate electric fan relay is crucial for a successful and safe installation. Several factors influence this decision:
1. Amperage Rating:
This is the most critical consideration. The relay must be able to handle the inrush current of the electric fan. Inrush current is the surge of electricity that occurs when the fan initially starts, and it's typically much higher than the fan's continuous running current. Refer to your fan's specifications for both the running and inrush amperage. Choose a relay with an amperage rating significantly higher than the fan's inrush current (ideally 1.5 to 2 times the inrush amperage) to ensure reliable operation and prevent premature failure.
2. Voltage:
Ensure the relay's voltage rating matches the voltage of your electrical system (typically 12V in automotive applications). Using a relay with an incorrect voltage rating can lead to malfunction or damage.
3. Type of Relay:
There are primarily two types of relays used for electric fans: Single Pole Single Throw (SPST) and Single Pole Double Throw (SPDT). SPST relays are simpler and suitable for basic on/off control. SPDT relays offer more versatility and can be used for more complex applications, such as controlling two different circuits or providing a fail-safe function. For most electric fan installations, an SPST relay is sufficient.
4. Terminal Configuration:
Relays typically have four or five terminals. The standard configuration includes terminals for the coil (to activate the relay) and terminals for the switched circuit (to control the fan). Familiarize yourself with the relay's terminal diagram, which is usually printed on the relay itself or in the product documentation.
5. Quality and Brand:
Opt for relays from reputable manufacturers known for their quality and reliability. While cheaper options may be tempting, investing in a good-quality relay will save you headaches in the long run. Brands like Bosch, Hella, and Tyco are well-regarded in the automotive industry.
6. Sealed vs. Unsealed:
Consider the environment in which the relay will be installed. If it's exposed to moisture or harsh conditions, choose a sealed relay to protect it from corrosion and damage. Unsealed relays are suitable for protected environments.
Step-by-Step Guide: How to Wire an Electric Fan Relay
Safety First: Disconnect the negative terminal of your vehicle's battery before beginning any electrical work. This prevents accidental shorts and electrical shocks.
Tools You'll Need:
- Electric fan relay
- Wire stripper
- Wire crimper
- Wire connectors (butt connectors or ring terminals)
- Electrical tape or heat shrink tubing
- Multimeter (for testing)
- Wiring diagram (specific to your relay and fan)
- Screwdrivers and pliers
Steps:
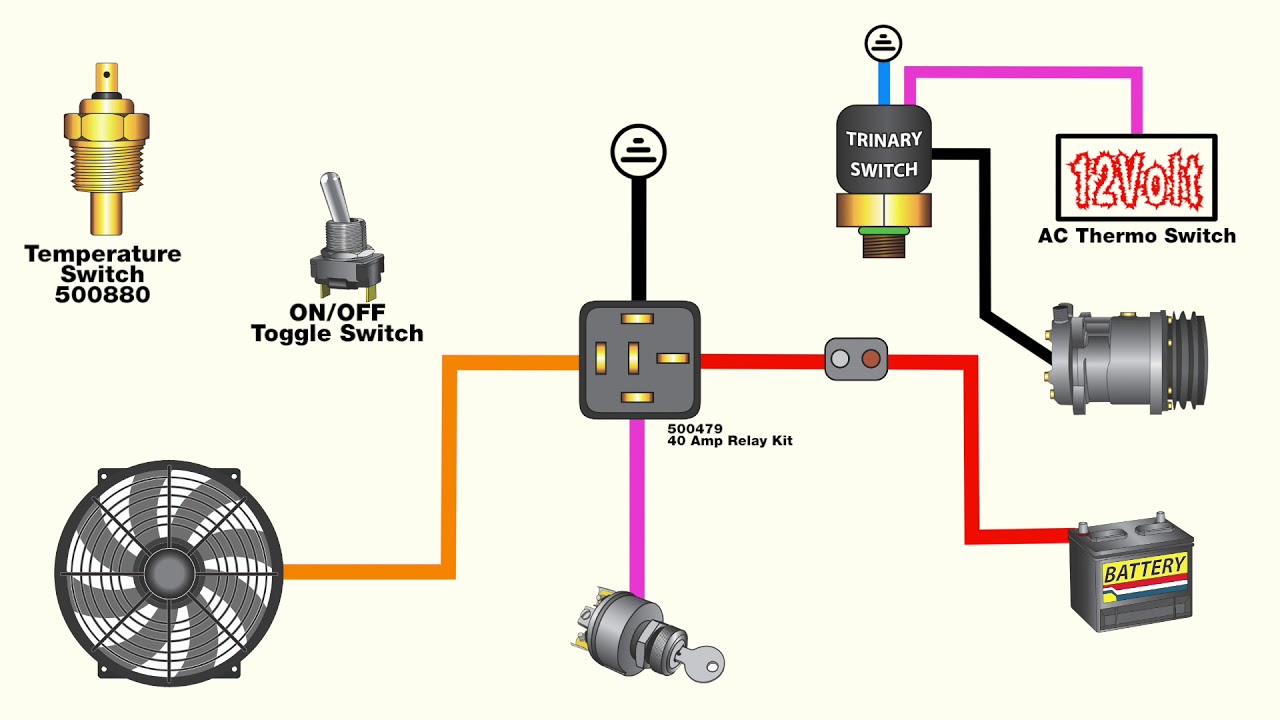
- Identify the Relay Terminals: Locate the relay's terminal diagram. Typically, it will show the following terminals:
- Terminal 30: Power input (from the battery)
- Terminal 85: Ground
- Terminal 86: Trigger signal (from the temperature sensor or switch)
- Terminal 87: Power output (to the electric fan)
- Terminal 87a (Optional): Normally closed contact (not used in most electric fan applications)
- Connect Terminal 30 to the Battery: Run a heavy-gauge wire (typically 12-14 gauge) from the positive (+) terminal of the battery to terminal 30 on the relay. Include an inline fuse as close as possible to the battery connection. The fuse rating should be slightly higher than the fan's running amperage (e.g., a 20-amp fuse for a 15-amp fan). This fuse protects the circuit from overloads.
- Connect Terminal 85 to Ground: Run a wire from terminal 85 to a solid ground point on the vehicle's chassis. Ensure the ground connection is clean and secure.
- Connect Terminal 86 to the Trigger Signal: This is the wire that activates the relay. There are two common methods for triggering the relay:
- Temperature Sensor: If using a temperature sensor, connect terminal 86 to the sensor's output wire. The sensor will close the circuit when the engine reaches a specific temperature, activating the relay.
- Manual Switch: Alternatively, you can use a manual switch to control the fan. Connect terminal 86 to one side of the switch, and connect the other side of the switch to a 12V ignition-switched power source (a wire that only has power when the ignition is on).
- Connect Terminal 87 to the Electric Fan: Run a heavy-gauge wire from terminal 87 to the positive (+) wire of the electric fan. Connect the negative (-) wire of the electric fan to a solid ground point on the vehicle's chassis.
- Secure and Insulate: Once all connections are made, double-check that all connections are secure and properly crimped. Use electrical tape or heat shrink tubing to insulate all exposed terminals and wires, preventing shorts and corrosion. Route the wires neatly and securely, away from moving parts and sources of heat.
- Test the Circuit: Reconnect the negative terminal of the battery. Start the engine and allow it to warm up. If using a temperature sensor, the fan should turn on automatically when the engine reaches the set temperature. If using a manual switch, the fan should turn on when you flip the switch. Use a multimeter to verify that the correct voltage is present at the fan terminals.
Real-World Owner Experiences
Many vehicle owners have successfully installed electric fan relays to improve cooling performance. Here are some common experiences:
* Improved Fuel Economy: "After installing an electric fan and relay, I noticed a slight improvement in my fuel economy, especially during city driving." - John S. * Reduced Engine Noise: "My old mechanical fan was quite noisy. The electric fan is much quieter, making the driving experience more enjoyable." - Mary L. * Consistent Cooling: "The electric fan keeps my engine temperature more consistent, especially when idling in traffic." - David P. * Easier Installation: "While I was initially intimidated, the wiring process was straightforward with a clear wiring diagram and the right tools." - Sarah K.However, some owners have also encountered challenges:
* Incorrect Wiring: "I initially wired the relay incorrectly, and the fan didn't turn on. Double-checking the wiring diagram fixed the problem." - Tom B. * Relay Failure: "I used a cheap relay, and it failed after a few months. Investing in a higher-quality relay solved the issue." - Lisa R. * Fuse Blowing: "The fuse kept blowing because I used a fuse with too low of an amperage rating. Upgrading to a higher-rated fuse resolved the problem." - Mark W.These experiences highlight the importance of careful planning, proper wiring, and using quality components.
Frequently Asked Questions (FAQs)
Q: What happens if I use a relay with an amperage rating that's too low?
A: The relay will likely overheat and fail prematurely. It may also cause the fuse to blow repeatedly.
Q: Can I wire the electric fan directly to the battery without a relay?
A: While possible, it's strongly discouraged. Wiring the fan directly to the battery bypasses the control circuit and can overload the electrical system, potentially damaging the fan, wiring, or other components. A relay provides a safe and controlled way to manage the fan's high current draw.
Q: Where is the best place to mount the relay?
A: Choose a location that is dry, protected from the elements, and easily accessible for maintenance. Consider mounting it near the fuse box or in the engine compartment, away from direct heat sources.
Q: How do I test if the relay is working correctly?
A: You can test the relay using a multimeter. Check for continuity between terminals 30 and 87 when the relay is activated (by applying voltage to terminals 85 and 86). You should also check for resistance across the coil terminals (85 and 86) to ensure the coil is not open or shorted.
Q: What size wire should I use for the fan wiring?
A: Use a heavy-gauge wire (typically 12-14 gauge) to handle the fan's current draw. Refer to the fan's specifications for the recommended wire size. Using a wire that's too small can cause voltage drop and overheating.
Q: My electric fan is constantly running. What could be the problem?
A: Possible causes include a faulty temperature sensor, a shorted wire in the trigger circuit, or a relay that is stuck in the "on" position. Inspect the wiring and components to identify the issue.
By following these guidelines and taking the necessary precautions, you can confidently wire an electric fan relay and enjoy the benefits of improved cooling performance and engine protection.