How To Wire A Electric Radiator Fan
Electric radiator fans are a common upgrade, modification, or even replacement for aging or inefficient mechanical fans in many vehicles. They offer several advantages, including improved cooling efficiency, increased horsepower (by reducing parasitic drag on the engine), and more precise temperature control. Successfully wiring an electric radiator fan is a manageable project for the experienced DIYer, but it requires a solid understanding of automotive electrical systems and careful execution. This guide will provide you with the knowledge to tackle this task with confidence.
Background: Engine Cooling and Radiator Fans
The internal combustion engine generates a massive amount of heat during operation. Without a robust cooling system, this heat would quickly lead to catastrophic engine failure. The cooling system's primary function is to transfer excess heat away from the engine and dissipate it into the atmosphere. Coolant, a mixture of water and antifreeze, circulates through the engine block and cylinder head, absorbing heat. This hot coolant then flows to the radiator, a heat exchanger that uses airflow to lower the coolant's temperature before returning it to the engine.
A radiator fan is crucial for maximizing the radiator's efficiency, especially at low speeds or when the vehicle is stationary. At higher speeds, sufficient airflow is often generated by the vehicle's motion. However, in stop-and-go traffic or during idling, the fan becomes essential. Traditionally, many vehicles used a mechanical fan driven directly by the engine's crankshaft via a belt. While simple and reliable, mechanical fans have drawbacks: they constantly draw power from the engine, even when cooling isn't needed, and their speed is directly proportional to engine speed, making them less effective at low RPMs.
Electric radiator fans, on the other hand, offer several benefits:
- On-demand Cooling: Electric fans can be switched on and off based on engine temperature, using a temperature sensor or thermostat.
- Improved Fuel Efficiency: By only operating when needed, they reduce the parasitic drag on the engine, potentially improving fuel economy.
- Increased Horsepower: Eliminating the belt-driven mechanical fan frees up horsepower that would otherwise be used to turn it.
- Precise Temperature Control: Many electric fan setups allow for variable speed control, enabling even more precise temperature management.
Technical Breakdown: Wiring Your Electric Radiator Fan
Wiring an electric radiator fan typically involves several key components and considerations:
1. Fan Selection
The first step is choosing the right fan for your application. Consider the following factors:
- CFM (Cubic Feet per Minute): This rating indicates the fan's airflow capacity. Consult your vehicle's specifications or calculate the required CFM based on engine size, horsepower, and operating conditions. A higher CFM rating generally equates to more cooling power.
- Fan Diameter: Ensure the fan fits within the available space behind the radiator. Measure carefully to avoid clearance issues.
- Amp Draw: This is the amount of current the fan draws during operation. Select a fan with an amp draw that is compatible with your vehicle's electrical system and the relay you plan to use.
- Pusher vs. Puller: Pusher fans are mounted in front of the radiator and push air through it. Puller fans are mounted behind the radiator and pull air through it. Puller fans are generally more efficient, but pusher fans are sometimes necessary due to space constraints.
2. Wiring Diagram
Before you start cutting wires, create or find a wiring diagram specific to your fan and control method. A typical wiring configuration involves the following:
- Power Source: The fan needs a reliable 12V power source. This can be directly from the battery or from an ignition-switched source. If connecting directly to the battery, a fuse is essential.
- Ground: The fan also requires a solid ground connection to the vehicle's chassis or negative battery terminal.
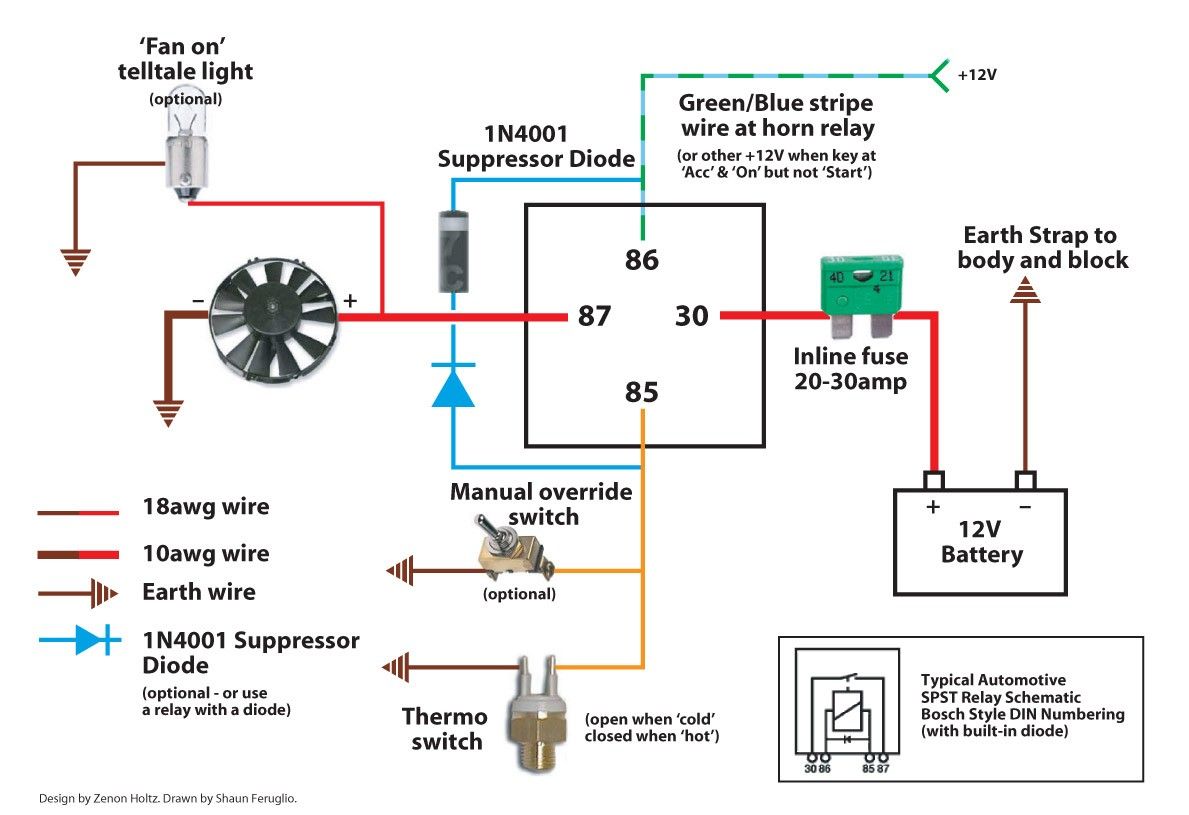
- Relay: A relay is an electromagnetic switch used to control a high-current circuit (the fan) with a low-current signal (from the temperature sensor or switch). Using a relay protects your vehicle's wiring and prevents damage to sensitive components. A common relay configuration uses 4 or 5 pins:
- Pin 30: Direct battery positive (+) connection (fused).
- Pin 87: Output to the positive (+) terminal of the fan.
- Pin 85: Ground (-) connection.
- Pin 86: Trigger wire from the temperature sensor or switch (+).
- Pin 87a (Optional): Normally closed contact. Used in some advanced configurations.
- Temperature Sensor/Switch: This device activates the fan based on engine temperature. Options include:
- Adjustable Thermostat: A probe inserted into the radiator fins or coolant passage, with an adjustable temperature setting.
- Threaded Temperature Switch: Screws into a threaded port on the engine or radiator and activates at a specific temperature.
- ECU Control: For more modern vehicles, the engine control unit (ECU) can control the fan based on coolant temperature sensor data. This requires tapping into the appropriate ECU output wire.
- Fuse: An inline fuse is absolutely critical to protect the wiring and components from overcurrent. Choose a fuse rating slightly higher than the fan's amp draw (e.g., a 20A fuse for a fan that draws 15A).
3. Wiring Steps
- Disconnect the Negative Battery Terminal: Safety first! Always disconnect the negative battery terminal before working on any electrical system.
- Mount the Fan: Securely mount the fan to the radiator using appropriate mounting hardware. Ensure the fan blades have sufficient clearance.
- Install the Temperature Sensor/Switch: Install the sensor according to the manufacturer's instructions. If using a probe-style thermostat, carefully insert it into the radiator fins, avoiding damage to the radiator core.
- Wire the Relay: Connect the relay according to your wiring diagram. Use proper crimping tools and connectors to ensure secure and reliable connections.
- Connect Pin 30 to the battery positive terminal via a fused wire.
- Connect Pin 87 to the positive terminal of the fan.
- Connect Pin 85 to a reliable ground.
- Connect Pin 86 to the output of the temperature sensor/switch.
- Connect the Fan Ground: Connect the fan's ground wire to the vehicle's chassis or negative battery terminal.
- Double-Check Your Work: Carefully review all connections to ensure they are correct and secure.
- Reconnect the Negative Battery Terminal: Reconnect the negative battery terminal.
- Test the System: Start the engine and allow it to warm up to the activation temperature of the sensor/switch. The fan should turn on automatically.
Common Issues and Maintenance Concerns
- Overheating: If the fan isn't providing adequate cooling, check the CFM rating, sensor activation temperature, and wiring connections. Ensure the radiator is clean and free of obstructions.
- Fan Not Turning On: Check the fuse, relay, temperature sensor/switch, and wiring connections. Use a multimeter to test for voltage and continuity.
- Wiring Problems: Loose or corroded connections can cause intermittent fan operation or complete failure. Regularly inspect wiring and connectors for damage. Use dielectric grease on connectors to prevent corrosion.
- Relay Failure: Relays can fail over time. If you suspect a faulty relay, test it with a multimeter or replace it with a new one.
- Sensor Failure: Temperature sensors/switches can also fail. Test the sensor using a multimeter and refer to the manufacturer's specifications.
- Incorrect Fan Rotation: Some fans can be wired to spin in either direction. Ensure the fan is blowing air in the correct direction (through the radiator, not against it).
Do's and Don'ts / Best Practices
Do's:
- Do use a wiring diagram: A clear and accurate wiring diagram is essential for success.
- Do use a relay: A relay is crucial for protecting your vehicle's wiring.
- Do use an inline fuse: A fuse protects the circuit from overcurrent.
- Do use proper crimping tools and connectors: Secure connections are essential for reliable operation.
- Do use dielectric grease on connectors: Dielectric grease prevents corrosion and improves connection reliability.
- Do test the system thoroughly: Verify that the fan operates correctly under various conditions.
- Do protect wiring with heat shrink tubing or wire loom: This protects the wiring from abrasion and heat damage.
Don'ts:
- Don't skip the relay: Connecting the fan directly to the vehicle's wiring can overload the circuit and cause damage.
- Don't use undersized wiring: Use wiring that is appropriate for the fan's amp draw. Consult a wiring gauge chart for proper sizing.
- Don't splice wires without proper connectors: Poorly spliced wires can cause resistance and lead to overheating or failure.
- Don't run wires across sharp edges: Protect wires from abrasion to prevent shorts.
- Don't guess at wire connections: Always refer to a wiring diagram and use a multimeter to verify connections.
- Don't ignore warning signs: If the fan is not operating correctly, investigate the problem immediately.
Conclusion
Wiring an electric radiator fan is a rewarding project that can improve your vehicle's cooling performance and efficiency. By carefully selecting the right components, following a proper wiring diagram, and adhering to best practices, you can successfully complete this task. Remember to prioritize safety and double-check your work before reconnecting the battery. With a little patience and attention to detail, you'll be enjoying the benefits of your new electric radiator fan in no time. If you're uncomfortable with any aspect of the wiring process, it's always best to consult a qualified automotive electrician to ensure the job is done safely and correctly. Specifically, if you intend to tap into the ECU, professional assistance is strongly recommended.