How To Wire A Light Bar To High Beam
Adding a light bar to your vehicle can dramatically improve visibility during off-road adventures or late-night drives. Wiring it to your high beams means it automatically comes on when you activate your high beams, simplifying operation and improving safety. This article provides a detailed guide on how to safely and effectively wire a light bar to your high beam circuit. We'll cover the necessary precautions, the proper wiring techniques, and potential pitfalls to avoid.
Understanding the Automotive Electrical System
Before diving into the wiring process, it's crucial to understand the basics of your car's electrical system. Modern vehicles typically operate on a 12-volt direct current (DC) system. The battery provides the initial power, and the alternator recharges the battery and provides power while the engine is running.
The wiring harness is the central nervous system of your vehicle, routing electrical signals to various components. Each circuit is typically protected by a fuse, a safety device designed to break the circuit if there's an overload, preventing damage to the wiring and components. Overloading a circuit by drawing too much current can blow a fuse, and in extreme cases, can cause a fire. That's why it's essential to use the correct wire gauge and fuse rating for your light bar installation.
Understanding the high beam circuit specifically is also vital. When you activate your high beams, the vehicle's electrical system sends power to the high beam filaments (or LEDs) in your headlights. We will be tapping into this circuit to trigger our light bar, but doing so safely is paramount. We will not be directly powering the light bar from the high beam circuit. Instead, we'll use the high beam circuit as a signal to activate a relay.
Technical Breakdown: Wiring the Light Bar
Wiring a light bar to your high beams involves several steps, including selecting the right components, planning the wiring route, and making the necessary connections. Let's break down each step in detail:
1. Gathering the Necessary Components:
You'll need the following items for this project:
* Light Bar: Choose a light bar with appropriate wattage and amperage for your vehicle. Check the light bar's specifications to determine its power consumption. * Wiring Harness with Relay: A pre-wired harness simplifies the process and provides essential protection. Ensure the harness includes a relay, fuse, and switch. The relay is crucial because it allows the high beam circuit to switch the light bar on without actually powering it directly. * Fuse Tap (Add-a-Circuit): This allows you to safely tap into the high beam fuse without cutting or splicing wires. * Wire Strippers/Crimpers: For preparing and connecting wires. * Electrical Tape or Heat Shrink Tubing: To insulate and protect connections. * Multimeter: For testing voltage and continuity. * Zip Ties: For securing the wiring harness. * Screwdrivers and Socket Set: For mounting the light bar and accessing electrical components. * Optional: Wire loom or split loom tubing for protecting the wiring harness along its route.2. Planning the Wiring Route:
Before you start cutting and connecting wires, plan the route for your wiring harness. Consider the following:
* Light Bar Location: Determine where you want to mount the light bar. * Harness Routing: Plan how you'll run the wiring harness from the light bar to the battery, relay location, and the high beam circuit. Choose a route that avoids moving parts, sharp edges, and extreme heat. * Relay Placement: Find a secure and dry location for the relay, typically in the engine compartment. * Switch Location (If Applicable): If your harness includes an on/off switch, decide where you want to mount it inside the vehicle.3. Wiring Connections:
Now, let's get to the wiring:
* Step 1: Mount the Light Bar: Securely mount the light bar to your vehicle according to the manufacturer's instructions. * Step 2: Connect the Light Bar to the Harness: Connect the light bar's wiring to the corresponding connectors on the wiring harness. Typically, there will be positive (+) and negative (-) connections. * Step 3: Connect the Harness to the Battery: Connect the positive (+) and negative (-) terminals of the wiring harness to the corresponding terminals on the vehicle's battery. Ensure the connections are secure. * Step 4: Tap into the High Beam Circuit: This is where the fuse tap comes in. * Identify the high beam fuse in your vehicle's fuse box. Consult your owner's manual for the location. * Remove the high beam fuse. * Insert the fuse tap into the fuse slot. * Insert the original high beam fuse into the lower slot of the fuse tap. * Insert a new fuse (typically a 5-10 amp fuse, check your light bar wiring harness instructions) into the upper slot of the fuse tap. * Connect the wire from the fuse tap to the trigger wire (usually blue or white) on the light bar wiring harness. This wire will activate the relay when the high beams are on. * Step 5: Ground the Relay: Ensure the relay has a good ground connection. Connect the ground wire (usually black) from the relay to a clean, bare metal surface on the vehicle's chassis. Scrape away any paint or corrosion to ensure a solid connection. * Step 6: Secure and Protect the Wiring: Use zip ties to secure the wiring harness along its route, keeping it away from moving parts and heat sources. Protect the wiring with wire loom or split loom tubing for added durability. * Step 7: Test the System: Start the vehicle and turn on the high beams. The light bar should illuminate simultaneously. If it doesn't, check all your connections and the fuse. If you are using an optional switch, make sure it is on.4. How it Works (Relay Explanation):
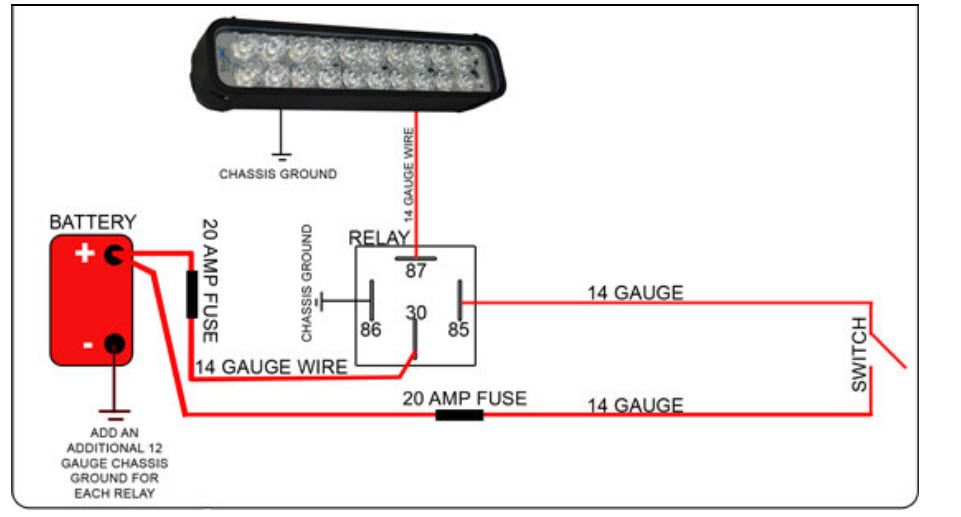
The relay acts as an electrically operated switch. It has four or five terminals:
* Terminal 30: Battery positive (+) - This is the main power source for the light bar, directly from the battery. * Terminal 87: Output to Light Bar (+) - This terminal connects to the positive (+) wire of the light bar. * Terminal 85: Ground (-) - This terminal is connected to a ground point. * Terminal 86: Trigger (+) - This terminal is connected to the high beam circuit via the fuse tap. * Terminal 87a (Optional): Normally Closed Contact - Some relays have this terminal, which is closed when the relay is not energized.Here's how it works:
1. When the high beams are off, no power flows to Terminal 86 (the trigger wire). The relay remains in its resting state. 2. When the high beams are turned on, power flows through the high beam circuit and into Terminal 86. 3. This energizes the relay's internal coil, creating an electromagnetic field. 4. The electromagnetic field pulls a switch inside the relay, connecting Terminal 30 (battery positive) to Terminal 87 (light bar positive). 5. This completes the circuit, and the light bar turns on. 6. When the high beams are turned off, the power to Terminal 86 is cut, the electromagnetic field collapses, and the switch returns to its resting state, disconnecting Terminal 30 and 87, turning off the light bar.This setup allows the relatively low-current high beam circuit to control a high-current device like a light bar, protecting the vehicle's wiring and preventing damage.
Common Issues and Maintenance Concerns
* Blown Fuses: If the light bar stops working, the first thing to check is the fuse in the wiring harness and the fuse tap. Replace the fuse with the same amperage rating. If the fuse continues to blow, there may be a short circuit in the wiring. * Loose Connections: Vibration and environmental factors can cause connections to loosen over time. Periodically inspect the wiring connections and tighten them as needed. * Corrosion: Corrosion can build up on electrical connections, causing resistance and voltage drop. Clean corroded connections with a wire brush and apply dielectric grease to prevent future corrosion. * Relay Failure: Relays can fail over time due to wear and tear. If the light bar doesn't turn on when the high beams are activated, try replacing the relay. * Wiring Damage: Inspect the wiring harness for any signs of damage, such as cuts, abrasions, or melting. Repair or replace damaged wiring as needed.Do's and Don'ts / Best Practices
* Do: Use a wiring harness with a relay and fuse. This is crucial for safety and proper operation. * Do: Use a fuse tap to safely tap into the high beam circuit. Avoid cutting or splicing wires. * Do: Use the correct wire gauge for the amperage of the light bar. Undersized wires can overheat and cause a fire. * Do: Secure the wiring harness properly to prevent it from rubbing against sharp edges or moving parts. * Do: Use electrical tape or heat shrink tubing to insulate all connections. * Do: Test the system thoroughly after installation. * Don't: Overload the high beam circuit by drawing too much current. This can damage the vehicle's electrical system. * Don't: Run the wiring harness through areas where it could be pinched or damaged. * Don't: Skip the relay. Connecting the light bar directly to the high beam circuit can overload the circuit and damage the vehicle's electrical system. * Don't: Use cheap or low-quality wiring components. Invest in quality components for a safe and reliable installation. * Don't: Work on the electrical system with the engine running or the battery connected without taking proper safety precautions. Disconnect the negative battery terminal before starting any electrical work.Conclusion
Wiring a light bar to your high beams is a relatively straightforward project that can significantly improve your vehicle's visibility. By following these instructions and taking the necessary precautions, you can safely and effectively integrate a light bar into your vehicle's electrical system. Remember to use a wiring harness with a relay and fuse, plan the wiring route carefully, and test the system thoroughly after installation. If you are not comfortable working with your vehicle's electrical system, it is always best to consult a qualified mechanic.