How To Wire A Push Button Start
So, you're thinking about adding a push-button start to your ride? It's a popular modification, offering a touch of modern convenience and a cool aesthetic. While it might seem intimidating, wiring a push-button start is a manageable project for the experienced DIYer. This article will walk you through the process, covering the underlying principles, the wiring specifics, and essential safety precautions.
Background: The Starting System Demystified
Before diving into the wiring, let's understand how a traditional key-operated starting system works. The process is actually quite simple. When you insert and turn the key, you're essentially performing several actions in a specific sequence using a single mechanical device – the ignition switch.
- Accessory (ACC): This position powers non-essential circuits like the radio and cigarette lighter (if your car still has one!).
- On (RUN): This position energizes the engine's control systems (ECU/PCM), fuel pump, ignition system, and other vital components necessary for the car to run.
- Start: This position provides power to the starter solenoid, a high-current relay that engages the starter motor with the engine's flywheel to crank the engine.
The ignition switch is, therefore, a multi-pole switch that controls power distribution to different circuits depending on its position. The "Start" position is crucial because it allows high amperage electricity to flow to the starter motor. A push-button start system aims to replicate these key functions electronically.
Technical Breakdown: Wiring the Push-Button Start
The core of a push-button start system involves replacing the mechanical ignition switch with a combination of relays and an electronic switch (the push button itself). Here's a step-by-step breakdown of the wiring process, assuming you're working with a typical aftermarket push-button start kit:
1. Identifying Key Wires
The first and most important step is identifying the critical wires coming from your existing ignition switch. You'll need a multimeter to do this accurately. Here's what to look for:
- Battery (B+) or Constant 12V: This wire always has 12V power, even when the key is removed. This is your main power source. Use your multimeter to find a wire that always reads ~12.6V (fully charged battery).
- Accessory (ACC) Wire: This wire has 12V power when the key is in the "Accessory" or "On" position. It's usually only active when the key is turned one click.
- Ignition (IGN) or Run Wire: This wire has 12V power when the key is in the "On" position. This wire is crucial as it powers the engine management systems. It must be energized for the car to run.
- Start Wire: This wire only has 12V power when the key is turned to the "Start" position. This activates the starter solenoid.
- Ground: This wire connects to the car's chassis and provides a return path for the electrical current.
Carefully record the color and function of each wire. A wiring diagram for your specific vehicle can be invaluable here. Incorrect wiring can damage your car's electrical system.
2. Installing the Relays
Your push-button start kit will likely include several relays. These relays act as electrically controlled switches, allowing the low-current signal from the push button to control high-current circuits.
- Relay for Ignition (IGN): This relay replicates the "On" position of the ignition switch. When activated, it provides power to the Ignition (IGN) wire you identified earlier.
- Relay for Accessory (ACC): This relay replicates the "Accessory" position. When activated, it powers the Accessory (ACC) wire.
- Relay for Starter: This relay activates the starter motor. It's triggered by the momentary switch action of the push button.
Connect the relays according to the kit's instructions. Here's a general overview:
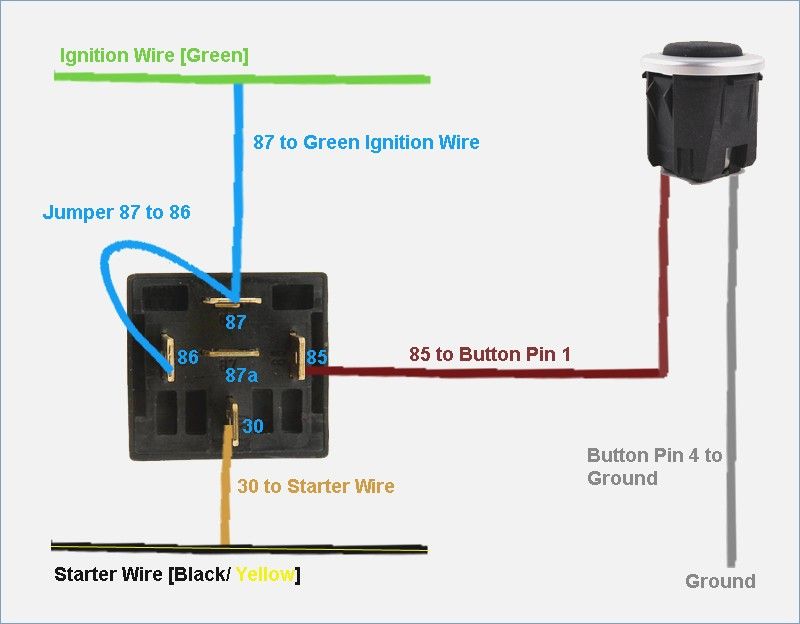
- Relay Pin 30: Connect this to the Battery (B+) wire.
- Relay Pin 87: Connect this to the corresponding output wire (IGN, ACC, or Start). For example, for the Ignition relay, connect pin 87 to the Ignition (IGN) wire you identified earlier.
- Relay Pin 85: Connect this to ground.
- Relay Pin 86: This is the trigger wire. It will be connected to the push button switch.
Important Note: Some kits may use a single relay to activate both the ACC and IGN circuits simultaneously. Refer to your kit's wiring diagram for specific instructions.
3. Wiring the Push Button
The push button itself is a simple momentary switch. It's typically a low-current device and directly controls the relays.
- Power: Connect one terminal of the push button to a 12V source (typically the same Battery (B+) wire used for the relays). Some kits may have a dedicated power wire for the button, especially if it has illumination.
- Output: Connect the other terminal of the push button to the trigger wires (Pin 86) of the relays. If you need to hold the button down for a moment before the engine starts, this means you will connect the starter relay with the IGN relay pin 86 to start the engine. If you are using a kit that has a dedicated start module you may wire this differently depending on the kit.
Note: Some push buttons have built-in LEDs for illumination. These will require separate wiring for power and ground. Check the button's datasheet for specific wiring instructions.
4. Security Considerations (Optional)
Adding a push-button start without addressing security can make your vehicle more vulnerable to theft. Consider these options:
- Immobilizer: An immobilizer prevents the engine from starting unless a specific transponder or code is present. Many aftermarket push-button start kits include an immobilizer function. Use it.
- Hidden Kill Switch: A simple kill switch can interrupt power to the fuel pump or ignition system, preventing the car from starting even if the push button is activated.
5. Testing and Verification
Before reassembling everything, thoroughly test the system. Make sure:
- The Accessory (ACC) circuit activates when the button is pressed briefly (if applicable).
- The Ignition (IGN) circuit activates when the button is pressed.
- The starter motor engages when the button is pressed and held (if applicable).
- The engine starts and runs smoothly.
- All related systems (lights, radio, etc.) function correctly.
Common Issues and Maintenance Concerns
- Relay Failure: Relays are electromechanical devices and can fail over time. Carry spare relays and know how to replace them.
- Loose Connections: Vibration can cause connections to loosen. Regularly inspect all connections for tightness and corrosion. Use dielectric grease to prevent corrosion.
- Battery Drain: Improper wiring or a faulty relay can cause parasitic battery drain. Monitor your battery voltage regularly.
- Interference with Factory Systems: In some cases, aftermarket push-button start systems can interfere with the vehicle's factory systems, such as the anti-theft system or the ECU. Consult with a qualified mechanic if you experience any unusual behavior.
Do's and Don'ts / Best Practices
Do's:
- Use a Wiring Diagram: Obtain a wiring diagram for your specific vehicle model and year.
- Use a Multimeter: A multimeter is essential for identifying wires and verifying voltage levels.
- Use Quality Components: Invest in a reputable push-button start kit with quality relays and wiring.
- Solder and Heat Shrink Connections: Soldered connections are more reliable than crimped connections. Use heat shrink tubing to insulate and protect the connections.
- Secure Wiring: Route and secure wiring away from moving parts and heat sources. Use zip ties or wire loom to protect the wires.
- Disconnect the Battery: Always disconnect the negative battery terminal before working on the electrical system.
Don'ts:
- Guess at Wire Functions: Never assume the function of a wire based on its color alone. Always use a multimeter to verify.
- Overload Circuits: Avoid overloading circuits by tapping into existing wires for power. Use dedicated power wires from the battery.
- Ignore Security: Implement security measures to prevent theft.
- Skip Testing: Thoroughly test the system before reassembling everything.
Conclusion
Installing a push-button start system can be a rewarding project for the experienced DIYer. However, it's crucial to approach the task with caution, meticulousness, and a thorough understanding of the vehicle's electrical system. By following the steps outlined in this article, and prioritizing safety and quality components, you can successfully add this modern convenience to your ride. However, if you're not comfortable working with electrical systems, or if you're unsure about any aspect of the process, it's always best to consult with a qualified automotive electrician. Safety first!