How To Wire A Push Start Button
So, you're thinking about installing a push start button in your ride? Awesome! It's a mod that adds a touch of modern convenience and can even improve security, depending on how you implement it. This article will guide you through the process, assuming you're already comfortable working with automotive electrical systems. We'll break down the wiring, explain the components involved, and cover the common pitfalls to avoid. Let's get started.
Background: The Automotive Starting System
Before we dive into the wiring specifics, it's crucial to understand the existing starting system in your vehicle. Traditionally, this system relies on the ignition switch to perform several key functions, usually controlled by turning a physical key. These functions generally include:
- Accessory (ACC): Powers non-essential components like the radio and climate control.
- On (RUN): Powers the engine control unit (ECU), fuel pump, and other systems needed for the engine to run.
- Start: Activates the starter solenoid, which in turn engages the starter motor to crank the engine.
The ignition switch essentially acts as a multi-pole switch, routing power to different circuits based on its position. The key prevents unauthorized operation and, in many modern vehicles, also communicates with an immobilizer system (more on that later).
Technical Breakdown: Wiring a Push Start Button
Integrating a push start button typically involves bypassing or augmenting the functionality of the existing ignition switch, specifically the "Start" circuit. There are a few different approaches, each with varying levels of complexity and security. We'll focus on a relatively straightforward method that offers a good balance.
Components Required:
- Push Start Button: Select a button rated for automotive use. Consider one with an LED indicator for visual feedback.
- Relays (Multiple): These are electromagnetic switches that allow a low-current signal (from the button) to control a high-current circuit (the starter motor). You'll need at least two, but possibly three, depending on the complexity. We recommend using 30/40A relays.
- Wiring: Automotive-grade wire of appropriate gauge (thickness) for the circuits involved. 16-gauge is generally sufficient for control signals, while 12-gauge or 10-gauge is needed for the starter motor circuit.
- Fuse Holders and Fuses: Protect your wiring and components from overcurrent. Select fuse ratings appropriate for the circuits they protect (e.g., a 10A fuse for control circuits, a 30A or higher fuse for the starter circuit).
- Wire Connectors and Terminals: For making secure and reliable connections. Solder and heat shrink tubing are the gold standard, but crimp connectors are acceptable if properly installed.
- Diode (1N4001 or similar): Prevents backfeeding of current, which can cause issues with other vehicle systems.
Wiring Steps:
- Identify the Ignition Switch Wires: Use a multimeter to identify the "ACC," "RUN," and "Start" wires coming from your ignition switch. Refer to your vehicle's wiring diagram for accurate identification. Be absolutely sure you have the correct wires before proceeding. Many modern vehicles have multiple wires for the same functions.
- ACC and RUN Circuits: Typically, you'll leave the "ACC" and "RUN" circuits untouched. The push start button will primarily control the "Start" circuit. However, you *may* need to ensure that the "RUN" circuit is active before the push start button is enabled. This prevents accidental cranking without the engine being properly prepared to start. This can be accomplished by using a relay triggered by the "RUN" wire to enable the push start circuit.
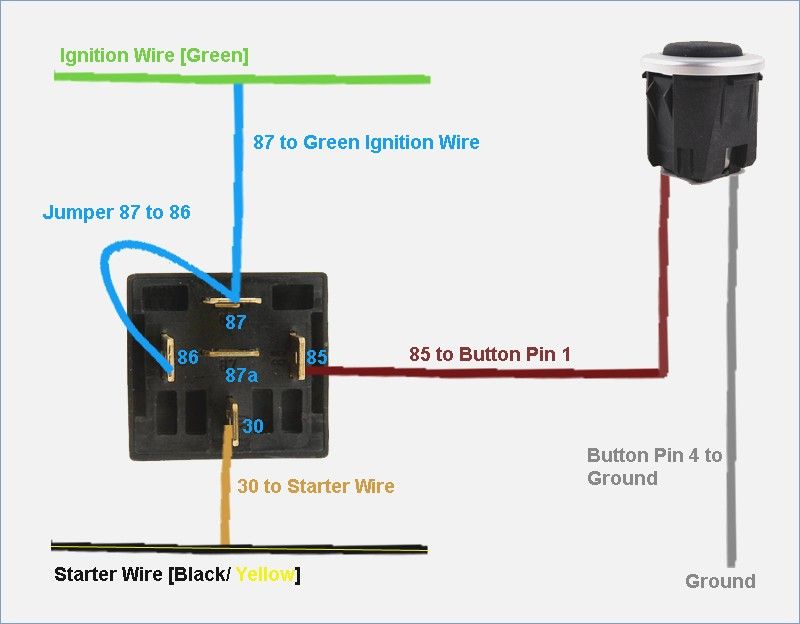
- Wiring the Start Relay: This is the heart of the push start system.
- Relay Pin 85: Connect this to a good chassis ground.
- Relay Pin 86: Connect this to one terminal of the push start button. The other terminal of the push start button is connected to a fused 12V constant power source. This is the trigger for the relay.
- Relay Pin 30: Cut the "Start" wire coming from the ignition switch. Connect the ignition switch side of the cut wire to Relay Pin 30.
- Relay Pin 87: Connect the other side of the cut "Start" wire (the wire that leads to the starter solenoid) to Relay Pin 87.
When you press the push start button, it energizes the relay coil, which closes the contacts between pins 30 and 87, effectively connecting the ignition switch "Start" wire to the starter solenoid.
- Implementing Safety Interlocks (Highly Recommended): Modern vehicles typically have safety interlocks that prevent the starter from engaging unless the transmission is in Park (P) or Neutral (N) *and* the brake pedal is depressed. These interlocks are critical for preventing accidental starting. Tap into the existing interlock circuits (refer to your vehicle's wiring diagram) and use a second relay to interrupt the ground signal to the start relay unless the interlock conditions are met. This will require identifying the wires from the Park/Neutral switch and the brake pedal switch.
- Immobilizer Considerations: Many newer vehicles have immobilizer systems that require a transponder chip in the key to be present in the ignition switch before the engine can be started. Bypassing or circumventing these systems is complex and often illegal. Consider relocating the key near the immobilizer receiver antenna. This is not ideal as it compromises security. A better, but more expensive option, is to use an immobilizer bypass module specifically designed for push-to-start systems. These modules mimic the key signal to the ECU.
- Fuse Protection: Install fuses in the power and ground circuits to protect against short circuits and overloads. A 10A fuse for the push button trigger circuit and a 30A (or higher, depending on the starter current draw) fuse for the starter relay output is recommended.
- Testing: Before buttoning everything up, thoroughly test the system. Ensure the engine starts reliably when the push start button is pressed *only* when the interlock conditions (Park/Neutral and brake pedal) are met. Also, verify that the key still works in the ignition switch (if you haven't completely removed it).
Common Issues and Maintenance Concerns
- Voltage Drop: Insufficient wire gauge can cause voltage drop, resulting in a weak or unreliable start. Use appropriately sized wiring, especially for the starter circuit.
- Relay Failure: Relays can fail over time due to heat, vibration, and electrical stress. Periodically inspect the relays and replace them as needed.
- Wiring Issues: Poor connections, corrosion, and damaged wiring can lead to intermittent starting problems. Use quality connectors and protect the wiring from the elements.
- Immobilizer Conflicts: Interfering with the immobilizer system can trigger error codes or even prevent the engine from starting altogether. Always consult your vehicle's service manual before making any modifications to the immobilizer circuit.
- Starter Motor Wear: The starter motor is a high-wear component. Using the push start button aggressively (e.g., holding it down for excessive cranking) can shorten its lifespan.
Do's and Don'ts / Best Practices
Do's:
- Do use a wiring diagram specific to your vehicle. Generic diagrams are helpful for understanding the concepts, but the actual wiring colors and locations will vary.
- Do use quality components, especially relays and wiring. Skimping on these can lead to reliability issues.
- Do use proper wiring techniques, including soldering, heat shrinking, and securing the wiring to prevent chafing.
- Do protect all circuits with fuses.
- Do thoroughly test the system before completing the installation.
- Do research your vehicle's immobilizer system and take appropriate measures to address it (bypass module or key relocation).
Don'ts:
- Don't bypass safety interlocks. These are crucial for preventing accidental starting.
- Don't use undersized wiring. This can cause voltage drop and overheating.
- Don't make connections by simply twisting wires together. Use proper connectors or soldering.
- Don't leave wiring exposed to the elements. Protect it with conduit or loom.
- Don't attempt this modification if you're not comfortable working with automotive electrical systems.
- Don't start modification work without disconnecting the car battery.
Conclusion
Installing a push start button can be a rewarding project that adds convenience and a touch of customization to your vehicle. However, it's essential to approach this modification with caution and a thorough understanding of automotive electrical systems. Carefully plan the installation, use quality components, and prioritize safety. If you're unsure about any aspect of the process, consult a qualified automotive electrician. A well-executed push start system is a fantastic addition, but a poorly installed one can lead to headaches and potential damage to your vehicle. So, proceed with knowledge, caution, and respect for the complexity of automotive electrical systems. Good luck!