How To Wire Light Bar Into High Beams
Integrating an aftermarket light bar into your vehicle's high beam circuit is a popular modification, offering improved nighttime visibility on dark roads and trails. The appeal is clear: instant, powerful illumination synchronized with your factory high beams. However, this seemingly simple project demands a thorough understanding of your vehicle's electrical system to avoid damage and ensure safe operation. This guide provides a detailed, step-by-step approach to wiring a light bar into your high beams, geared towards the experienced DIYer.
Understanding Your Vehicle's Electrical System and High Beam Circuit
Before diving into the wiring, it’s crucial to grasp the basics of your vehicle's electrical system. Modern vehicles utilize a 12-volt DC (Direct Current) system. Power is supplied by the battery and managed by the alternator when the engine is running. The high beam circuit is a dedicated electrical pathway designed to activate the high beam headlights. Understanding how this circuit functions is paramount for safe and effective light bar integration.
Most vehicles use a positive-switched system for headlights. This means that the headlight receives a constant ground connection, and the high beams are activated by applying a positive (+) voltage to the high beam bulb. Less commonly, some vehicles use a negative-switched system, where the positive terminal is constantly powered, and the ground connection is switched to activate the high beams.
Identifying your vehicle’s wiring configuration is critical. A multimeter is your best friend here. Locate the high beam bulb connector (usually a three-pin connector). With the high beams activated, use the multimeter to check for voltage between each pin and the chassis ground. You should find one pin that shows approximately 12V when the high beams are on. This is your positive wire (in a positive-switched system). If, instead, you find a pin that reads near 0V when the high beams are on, but 12V when off, it’s a negative switched system.
Important Safety Note: Always disconnect the negative terminal of your battery before working on any electrical modifications. This prevents accidental short circuits and potential damage to your vehicle’s electrical system.
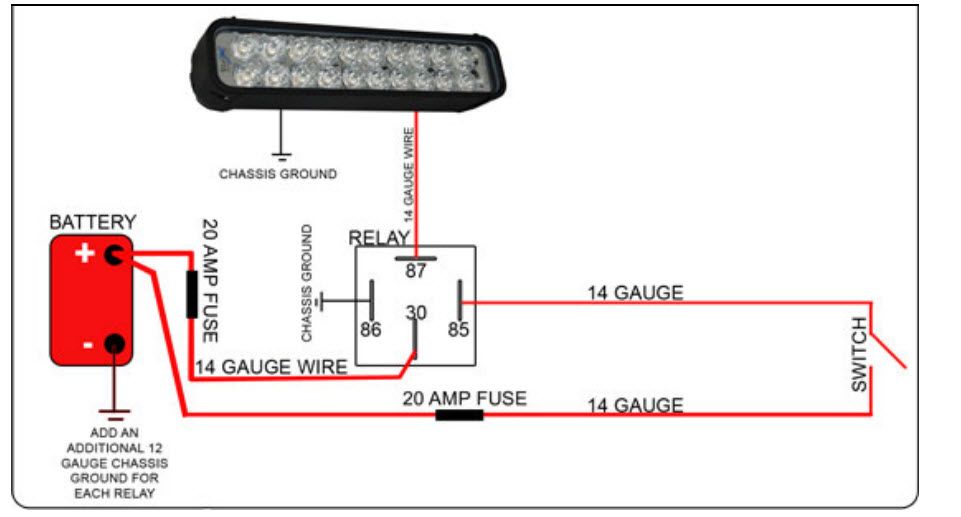
Technical Breakdown: Wiring the Light Bar
The safest and most reliable method for wiring a light bar into your high beams is to use a relay. A relay is an electromagnetic switch that allows a low-current circuit (your high beam circuit) to control a high-current circuit (the light bar). This prevents overloading your existing headlight wiring and protects your vehicle's electrical system.
Components Required:
- Light Bar: Choose a light bar with appropriate wattage and amp draw.
- Relay (SPDT or SPST): A Single Pole Double Throw (SPDT) or Single Pole Single Throw (SPST) relay rated for at least the amperage draw of your light bar. A 30A relay is usually sufficient.
- Wiring: Automotive-grade wire of appropriate gauge (14 AWG or 12 AWG is generally suitable).
- Fuse Holder and Fuse: An inline fuse holder and a fuse rated slightly higher than the light bar's amp draw (e.g., if the light bar draws 15A, use a 20A fuse).
- Ring Terminals and Butt Connectors: For secure and reliable connections.
- Wire Strippers and Crimpers: For preparing and connecting wires.
- Multimeter: For testing and verifying connections.
- Heat Shrink Tubing: To insulate connections and prevent corrosion.
- Zip Ties: For securing wires and keeping things organized.
Wiring Steps:
- Mount the Light Bar: Securely mount the light bar to your vehicle using appropriate mounting hardware. Ensure it's properly aligned and doesn't obstruct your vision or other vehicle components.
- Locate the High Beam Wire: As described earlier, use a multimeter to identify the positive wire in your high beam circuit. This will be used to trigger the relay.
- Connect the Relay: Most relays have five pins, but some have four. The standard pin configuration is as follows:
- Pin 30: Connect this pin to the positive terminal of your battery, through the inline fuse holder. This is the power source for the light bar.
- Pin 87: Connect this pin to the positive wire of your light bar.
- Pin 85: Connect this pin to the chassis ground of your vehicle. Ensure a solid ground connection.
- Pin 86: Connect this pin to the positive high beam wire that you identified earlier. This will trigger the relay when the high beams are activated.
- Pin 87a (if present): This pin is not used in this configuration. Insulate it to prevent accidental shorts.
- Connect the Light Bar Ground: Connect the negative wire of your light bar directly to the chassis ground of your vehicle. Again, ensure a solid ground connection.
- Install the Fuse: Insert the appropriate amperage fuse into the inline fuse holder.
- Test the System: Reconnect the negative terminal of your battery. Turn on your high beams and verify that the light bar activates simultaneously. If it doesn't, double-check your wiring connections and ensure the relay is functioning correctly. A multimeter can be used to test the relay's coil resistance and contact continuity.
- Secure the Wiring: Use zip ties to secure the wiring harness to existing vehicle components, keeping it away from moving parts and heat sources. Ensure the wiring is neatly organized and protected from abrasion.
Common Issues and Maintenance Concerns
Even with careful installation, some issues may arise. Here are some common problems and troubleshooting tips:
- Light Bar Not Turning On:
- Check the fuse. A blown fuse is often the first sign of a problem.
- Verify the relay is functioning. You can test the relay by applying 12V directly to pins 85 and 86. You should hear a click. If not, the relay is likely faulty.
- Check your ground connections. A poor ground is a common cause of electrical problems. Clean and tighten all ground connections.
- Ensure the high beam wire is providing a signal to the relay. Use a multimeter to verify voltage when the high beams are activated.
- Light Bar Flicker:
- This can be caused by a loose connection or a poor ground. Inspect all wiring connections and ground points.
- Voltage drop can also cause flickering. Ensure you are using appropriate gauge wiring for the light bar's amperage draw.
- Relay Failure:
- Relays can fail over time, especially if subjected to harsh conditions. Replace the relay with a new one of the same specifications.
Do’s and Don’ts / Best Practices
Do’s:
- Do use a relay to protect your vehicle's electrical system.
- Do use automotive-grade wiring of appropriate gauge.
- Do use an inline fuse to protect the circuit.
- Do use heat shrink tubing to insulate connections.
- Do secure the wiring harness to prevent abrasion and damage.
- Do disconnect the negative battery terminal before starting any electrical work.
- Do test your connections with a multimeter before reconnecting the battery.
Don’ts:
- Don’t tap directly into the high beam wire without using a relay. This can overload the circuit and damage your vehicle's electrical system.
- Don’t use undersized wiring. This can cause voltage drop and overheating.
- Don’t use household wiring. It is not designed for the harsh environment of a vehicle.
- Don’t skip the fuse. It protects your vehicle from short circuits.
- Don’t leave bare wires exposed. This can cause short circuits and corrosion.
- Don’t run wires near moving parts or heat sources.
Conclusion
Wiring a light bar into your high beams can significantly enhance your nighttime driving experience. By following these steps, using the right components, and adhering to best practices, you can achieve a safe and reliable installation. Always prioritize safety and double-check your work. If you are unsure about any aspect of the installation, consult a qualified automotive electrician. Remember, a little extra effort in planning and execution can prevent costly repairs and ensure years of reliable performance.