How To Wire Light Bar To High Beams
Wiring a light bar to your high beams allows you to control your auxiliary lighting system with the vehicle's existing switch, providing convenient and seamless operation. This means when you activate your high beams, the light bar automatically illuminates, significantly enhancing visibility during nighttime driving, especially in rural areas or off-road environments.
Why Wire Your Light Bar to Your High Beams?
There are several compelling reasons to wire your light bar to your high beams:
- Enhanced Visibility: This is the primary benefit. A light bar, when paired with high beams, dramatically increases the range and intensity of your vehicle's lighting, allowing you to see further down the road and react more quickly to potential hazards like animals, potholes, or debris.
- Convenience: Integrating the light bar with your high beams eliminates the need for a separate switch, simplifying operation and reducing clutter in your vehicle's cabin. You're using an existing control you're already familiar with.
- Legality: In some regions, it's legally required to have auxiliary lights activated only when high beams are engaged. Wiring them together ensures compliance with local traffic laws and avoids potential fines. Always check your local regulations regarding auxiliary lighting.
- Simplified Wiring: While requiring some electrical knowledge, tapping into the high beam circuit can be a simpler wiring solution compared to running a completely independent circuit from the battery.
Choosing the Right Light Bar and Components
Before diving into the wiring process, it's crucial to select the right light bar and necessary components. Here's what to consider:
Light Bar Selection:
- Size and Output: Light bars come in various sizes and light outputs (measured in lumens). Consider the intended use and mounting location. A smaller light bar might suffice for supplemental lighting on a passenger car, while a larger, more powerful bar is better suited for off-road vehicles. Higher lumen output generally translates to brighter light.
- Beam Pattern: Light bars offer different beam patterns, including spot, flood, and combo beams. Spot beams provide concentrated light for long-distance visibility. Flood beams offer wider illumination for peripheral vision. Combo beams combine both spot and flood patterns for a balanced approach.
- Durability: Opt for a light bar with a rugged construction, typically featuring an aluminum housing and polycarbonate lens, to withstand harsh weather conditions and vibrations.
- Voltage Compatibility: Ensure the light bar is compatible with your vehicle's electrical system (typically 12V DC).
Essential Components:
- Wiring Harness: A dedicated wiring harness simplifies the installation process and provides crucial components like a relay, fuse, and switch. While you might not use the switch, the relay and fuse are essential for safety. Look for a harness with adequate wire gauge (thickness) to handle the light bar's current draw.
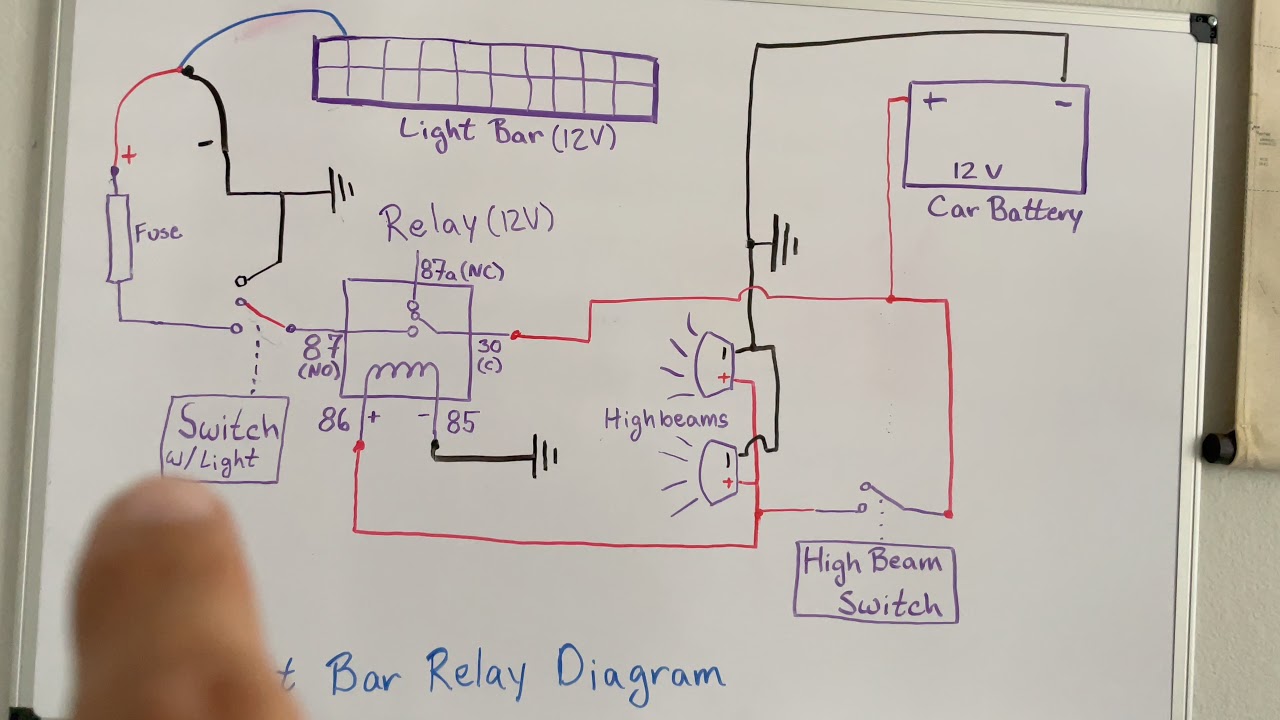
- Relay: A relay is an electrically operated switch that allows a low-current circuit (the high beam circuit) to control a high-current circuit (the light bar). This prevents overloading the high beam circuit and protects your vehicle's electrical system. A relay is absolutely critical for safe and reliable operation.
- Fuse: A fuse protects the circuit from overcurrent and potential damage. Choose a fuse with the appropriate amperage rating based on the light bar's power consumption.
- Wire Connectors: Use high-quality, weatherproof wire connectors (e.g., butt connectors, T-taps) to ensure secure and reliable connections. Crimp connectors are generally preferred over twist-on connectors.
- Electrical Tape: Use high-quality electrical tape to insulate and protect exposed wires and connections.
- Multimeter: A multimeter is essential for testing voltage and continuity during the wiring process.
- Tools: You'll need basic tools like wire strippers, crimpers, a socket set, screwdrivers, and potentially a drill for mounting the light bar.
Wiring the Light Bar: A Step-by-Step Guide
Important Safety Note: Before starting any electrical work on your vehicle, disconnect the negative battery terminal to prevent accidental shorts or shocks. If you are not comfortable working with electrical systems, consult a qualified professional.
- Mount the Light Bar: Securely mount the light bar to your vehicle using appropriate brackets. Choose a location that provides optimal visibility and complies with local regulations.
- Connect the Wiring Harness to the Battery: Route the positive (+) and negative (-) wires of the wiring harness to the vehicle's battery. Connect the positive wire to the positive terminal and the negative wire to the negative terminal. Ensure the fuse is installed in the positive wire's fuse holder.
- Locate the High Beam Wire: Identify the wire that carries power to the high beam headlight. You can use a multimeter to test which wire becomes energized when the high beams are activated. Refer to your vehicle's wiring diagram for assistance. This is a critical step; getting the wrong wire can damage your electrical system.
- Connect the Relay Trigger Wire: The wiring harness will have a wire (often blue or another distinct color) intended to trigger the relay. This is the wire you need to connect to the high beam wire you identified in the previous step. You can use a T-tap connector or carefully splice the wire. Avoid cutting the high beam wire completely.
- Connect the Light Bar to the Wiring Harness: Connect the positive and negative wires from the light bar to the corresponding wires on the wiring harness.
- Test the Connection: Reconnect the negative battery terminal. Turn on your high beams and verify that the light bar illuminates. If it doesn't, double-check all your connections and ensure the relay and fuse are functioning correctly.
- Secure the Wiring: Use zip ties or other fasteners to secure the wiring harness and prevent it from dangling or rubbing against sharp edges. This will help prevent damage and ensure long-term reliability.
Real-World Owner Experiences
Many vehicle owners have successfully wired their light bars to their high beams and reported significant improvements in nighttime visibility. Some common tips and experiences include:
- Proper Grounding: A poor ground connection can cause intermittent problems. Ensure the ground wire from the wiring harness is securely connected to a clean, unpainted metal surface on the vehicle's chassis.
- Weatherproofing: Protect all connections from moisture and corrosion. Use dielectric grease on the connectors to prevent corrosion and ensure long-term reliability.
- Professional Installation: If you're uncomfortable with electrical work, consider having a professional install the light bar. This will ensure proper wiring and avoid potential damage to your vehicle's electrical system.
- Legal Compliance: Always be mindful of local regulations regarding auxiliary lighting. Improper use of light bars can result in fines.
Frequently Asked Questions (FAQs)
Here are some common questions about wiring light bars to high beams:
Q: Is it legal to wire my light bar to my high beams?
A: Regulations vary by location. Some jurisdictions allow it, while others require a separate switch. Check your local laws before wiring your light bar.
Q: Can I wire the light bar directly to the high beam wire without a relay?
A: No! This is strongly discouraged. The light bar draws significant current, and wiring it directly to the high beam circuit can overload the circuit, damage the wiring, and potentially cause a fire. A relay is essential for safe and reliable operation.
Q: What size fuse should I use for the light bar wiring harness?
A: The fuse size depends on the light bar's power consumption (wattage). Divide the wattage by the voltage (typically 12V) to calculate the current draw. Choose a fuse with an amperage rating slightly higher than the calculated current draw. The wiring harness instructions should also provide guidance.
Q: How do I find my vehicle's wiring diagram?
A: You can often find wiring diagrams in your vehicle's owner's manual or online through vehicle-specific forums or subscription-based services. Your local auto parts store may also be able to provide assistance.
Q: My light bar works when I test it, but then stops working. What could be the problem?
A: Possible causes include a loose connection, a blown fuse, a faulty relay, or a poor ground connection. Check all connections, replace the fuse if necessary, and test the relay with a multimeter. Also, ensure the ground connection is clean and secure.
Q: Can I use this method to wire multiple light bars?
A: Yes, but you may need a more robust relay and wiring harness to handle the increased current draw. Ensure the wiring harness and relay are rated for the total wattage of all the light bars combined. It's also crucial to consider the vehicle's alternator capacity to avoid overloading the electrical system.
By following these steps and carefully selecting the right components, you can safely and effectively wire your light bar to your high beams, significantly enhancing your nighttime driving experience.