What Causes Oil Leaks In A Car
Oil leaks. Those dreaded words can strike fear into the heart of any car enthusiast, whether you're meticulously maintaining a classic or wrenching on a modern performance machine. Identifying and fixing the source of an oil leak is crucial to preserving your engine's health, preventing potentially catastrophic damage, and avoiding a greasy mess in your driveway. This article will dive deep into the common causes of oil leaks, equipping you with the knowledge to diagnose and address them effectively.
Why Understanding Oil Leaks Matters
Understanding the causes of oil leaks is paramount for several reasons. First and foremost, neglecting leaks can lead to severe engine damage due to insufficient lubrication. Oil is the lifeblood of your engine, and a drop in oil pressure can quickly lead to accelerated wear and tear on critical components like bearings, pistons, and camshafts. Furthermore, leaks can create safety hazards, especially if oil drips onto hot exhaust components, potentially causing a fire. Repairing oil leaks promptly also prevents environmental contamination and helps maintain the value of your vehicle. Finally, diagnosing these issues yourself saves money and the satisfaction of knowing you solved the problem.
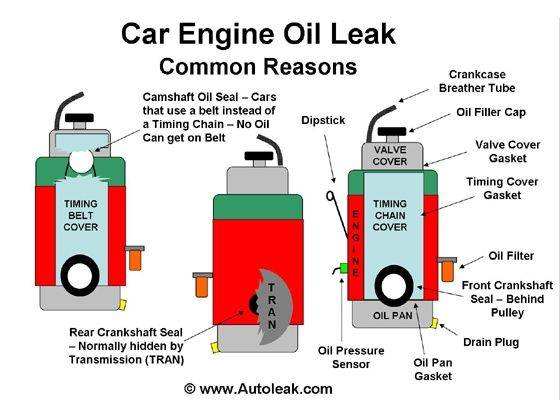
Key Components and Their Role in Oil Leaks
To understand where leaks originate, it's essential to know the key components within your engine's lubrication system:
- Oil Pan: The reservoir that holds the engine's oil supply. Often made of stamped steel or cast aluminum, it's sealed to the engine block with a gasket or sealant.
- Oil Pump: Driven by the crankshaft or camshaft, the oil pump circulates oil throughout the engine under pressure.
- Oil Filter: Removes contaminants from the oil, preventing damage to engine components.
- Oil Pressure Sensor/Switch: Monitors oil pressure and alerts the driver if it drops below a safe level.
- Valve Cover(s): Cover the valvetrain components (rocker arms, valves, etc.) at the top of the engine. Sealed with gaskets.
- Crankshaft Seals (Front & Rear): Seal the crankshaft where it exits the engine block at the front (near the timing belt/chain) and rear (near the transmission).
- Camshaft Seals: Seal the camshaft(s) where they exit the cylinder head.
- Oil Cooler (if equipped): Helps regulate oil temperature, especially in high-performance applications.
- Oil Lines/Hoses (if equipped): Connect the oil cooler, turbocharger (if applicable) and other components to the main oil system.
Common Causes of Oil Leaks
Let's explore the most frequent culprits behind those pesky oil leaks:
Gasket and Seal Failures
This is arguably the most common cause. Over time, gaskets and seals, made of rubber, cork, or synthetic materials, can degrade due to heat, age, and exposure to oil. They become brittle, lose their elasticity, and develop cracks, allowing oil to seep through. Common culprits include:
- Valve Cover Gasket: Leaks often manifest as oil around the valve cover, potentially dripping onto the exhaust manifold.
- Oil Pan Gasket: Leaks usually appear as oil accumulating on the bottom of the oil pan or dripping onto the ground.
- Crankshaft Seals (Front and Rear): Front seal leaks can splatter oil around the timing belt/chain area, while rear seal leaks often show up as oil between the engine and transmission.
- Camshaft Seals: Similar to crankshaft seals, leaks occur around the camshaft pulleys.
- Oil Filter Gasket: Occurs when the oil filter isn't properly tightened or if the old gasket wasn't removed before installing a new filter.
- Oil Drain Plug Washer: A small crush washer that seals the drain plug. Often forgotten or reused, leading to leaks.
Worn or Damaged Seals
Seals, such as the crankshaft and camshaft seals, are designed to prevent oil from leaking around rotating shafts. Over time, these seals can harden, crack, or become dislodged, especially from heat cycles. High mileage and infrequent oil changes exacerbate this issue. Damage during installation can also be a factor.
Over-Tightening Fasteners
While tightening fasteners is important, over-tightening them can damage gaskets and seals. For example, over-tightening an oil pan drain plug can crush the washer or even crack the oil pan itself. Always use a torque wrench and adhere to the manufacturer's specified torque values.
Clogged PCV Valve
The Positive Crankcase Ventilation (PCV) valve is a crucial component that relieves pressure within the engine's crankcase. A clogged PCV valve can cause excessive pressure to build up, forcing oil past seals and gaskets, resulting in leaks. Replacing the PCV valve is often an overlooked but critical step when addressing oil leaks.
Damaged Oil Pan
The oil pan, being located at the very bottom of the engine, is vulnerable to damage from road debris, speed bumps, or accidents. Dents or cracks in the oil pan can obviously lead to oil leaks. Rust can also be a factor in older vehicles.
Worn Piston Rings
While not a direct external leak, worn piston rings can cause excessive blow-by, which is combustion gases leaking past the piston rings into the crankcase. This increases crankcase pressure, putting stress on seals and gaskets and making them more prone to leaking. This often leads to bluish smoke from the exhaust.
Oil Cooler Lines/Fittings (if equipped)
Vehicles equipped with an oil cooler have oil lines running to and from the cooler. These lines and their fittings are susceptible to leaks due to age, vibration, and heat. Check for cracks, leaks, or loose connections.
Turbocharger Oil Lines (if equipped)
Turbochargers require oil for lubrication and cooling. The oil supply and return lines connecting the turbocharger to the engine's oil system are prone to leaks, especially at the fittings. High heat and pressure contribute to their degradation.
Real-World Troubleshooting Tips
Here's a basic troubleshooting approach to pinpointing oil leaks:
- Clean the Engine: Before starting, thoroughly clean the engine with degreaser. This will make it easier to spot the source of the leak.
- Inspect Visually: Carefully examine the engine for signs of oil accumulation. Use a flashlight to inspect hard-to-reach areas.
- Check Oil Level: Monitor your oil level regularly to gauge the severity of the leak.
- Look for Oil Stains: Check for oil stains on the ground under the vehicle. The location of the stain can provide clues about the leak's origin.
- Pressure Test (Advanced): A pressure test can help identify leaks that are difficult to find visually. This involves pressurizing the engine's oil system and looking for leaks. This is a more involved process requiring specialized equipment.
- UV Dye Test (Advanced): Add UV dye to the engine oil and use a UV light to trace the leak back to its source. This is a very effective method for finding elusive leaks.
Safety Precautions
Working on your car involves inherent risks. Here are some safety considerations when dealing with oil leaks:
- Hot Exhaust: Never work on an engine immediately after it has been running. Allow the exhaust system to cool completely to prevent burns.
- Jack Stands: Always use jack stands to support the vehicle when working underneath it. Never rely solely on a jack.
- Eye Protection: Wear safety glasses to protect your eyes from oil and debris.
- Gloves: Wear gloves to protect your skin from oil and chemicals.
- Flammable Materials: Keep flammable materials away from the engine compartment.
- Proper Ventilation: Work in a well-ventilated area to avoid inhaling fumes.
Remember
Diagnosing and repairing oil leaks can be a complex task. If you're not comfortable performing the work yourself, it's best to consult with a qualified mechanic.
We have a detailed diagram available for download that illustrates the common oil leak locations mentioned above, including the types of gaskets and seals used. Contact us to get the file.