What Color Is Reverse Light Wire
Understanding automotive wiring is crucial for anyone tackling DIY repairs, upgrades, or even just general troubleshooting. Among the various circuits in your vehicle, the reverse light circuit is a relatively simple yet essential system. Knowing the color code of the reverse light wire can save you a lot of time and prevent potential damage when working with your car's electrical system. This article will delve into the specifics of identifying the reverse light wire, its purpose, and how the circuit operates. We also have a detailed wiring diagram available for download, linked at the end of this article, to help you further.
Purpose of Identifying the Reverse Light Wire
Why is it important to know the color of the reverse light wire? Several reasons make this knowledge valuable:
- Repairing Damaged Wiring: Accidentally cutting or damaging a wire is a common occurrence during car repairs. Identifying the reverse light wire allows you to quickly and accurately reconnect it.
- Installing Aftermarket Accessories: Many aftermarket accessories, such as backup cameras, parking sensors, and additional lighting, require tapping into the reverse light circuit to activate when the vehicle is in reverse.
- Troubleshooting Electrical Issues: A non-functional reverse light could indicate a blown fuse, a faulty bulb, a bad switch, or a broken wire. Knowing the wire color helps you isolate the problem.
- Learning Automotive Electrical Systems: Understanding how the reverse light circuit works is a great starting point for learning about more complex automotive electrical systems.
Key Specs and Main Parts of the Reverse Light Circuit
The reverse light circuit, while simple, comprises several key components that work together. Understanding these components is fundamental to troubleshooting and modifying the system:
- Reverse Light Switch: This switch is typically located on the transmission or transaxle. It's activated when the gear selector is placed in reverse. This switch closes the circuit, allowing power to flow to the reverse lights.
- Wiring Harness: The wiring harness carries the electrical signals throughout the vehicle. The reverse light wire is part of this harness, connecting the reverse light switch to the reverse lights themselves.
- Reverse Lights: These are the white lights located at the rear of the vehicle, signaling to other drivers that you are backing up. They typically use incandescent bulbs or LEDs.
- Fuse: A fuse protects the reverse light circuit from overloads. If the circuit draws too much current, the fuse will blow, preventing damage to the wiring and components. The fuse amperage is usually specified in your vehicle's owner's manual or on the fuse box cover.
- Ground Connection: A proper ground connection is essential for any electrical circuit. The reverse lights need a reliable ground connection to complete the circuit.
The color code of the reverse light wire itself is not universal across all makes and models. However, there are some common patterns:
- Light Green or Green with a Stripe: This is a frequently observed color for the reverse light wire.
- White with a Stripe: Some manufacturers use a white wire with a colored stripe (often black) to identify the reverse light wire.
Important Note: *Always* consult your vehicle's wiring diagram to confirm the correct wire color before making any connections. Relying on general assumptions can lead to miswiring and potentially damage your vehicle's electrical system. The diagram, available for download at the end of this article, will be invaluable for this purpose.
Symbols on a Wiring Diagram
Wiring diagrams use standardized symbols to represent various components and connections. Understanding these symbols is essential for interpreting the diagram effectively:
- Solid Lines: Represent wires. The thickness of the line doesn't usually indicate wire gauge, but rather visual clarity.
- Dotted Lines: May represent shielded cables or less critical connections.
- Circles: Often represent connectors or junctions where multiple wires connect.
- Squares or Rectangles: Typically represent components like switches, relays, or control modules.
- Zigzag Line: Represents a resistor.
- Ground Symbol (usually a downward-pointing triangle or parallel lines): Indicates a connection to the vehicle's chassis ground.
- Fuse Symbol (a wavy line inside a rectangle): Represents a fuse. The diagram will often indicate the fuse's amperage rating.
Color Coding: The wiring diagram will often indicate the color of each wire using abbreviations, such as 'GRN' for green, 'WHT' for white, 'BLK' for black, and so on. These abbreviations are crucial for identifying the correct wire in the harness.
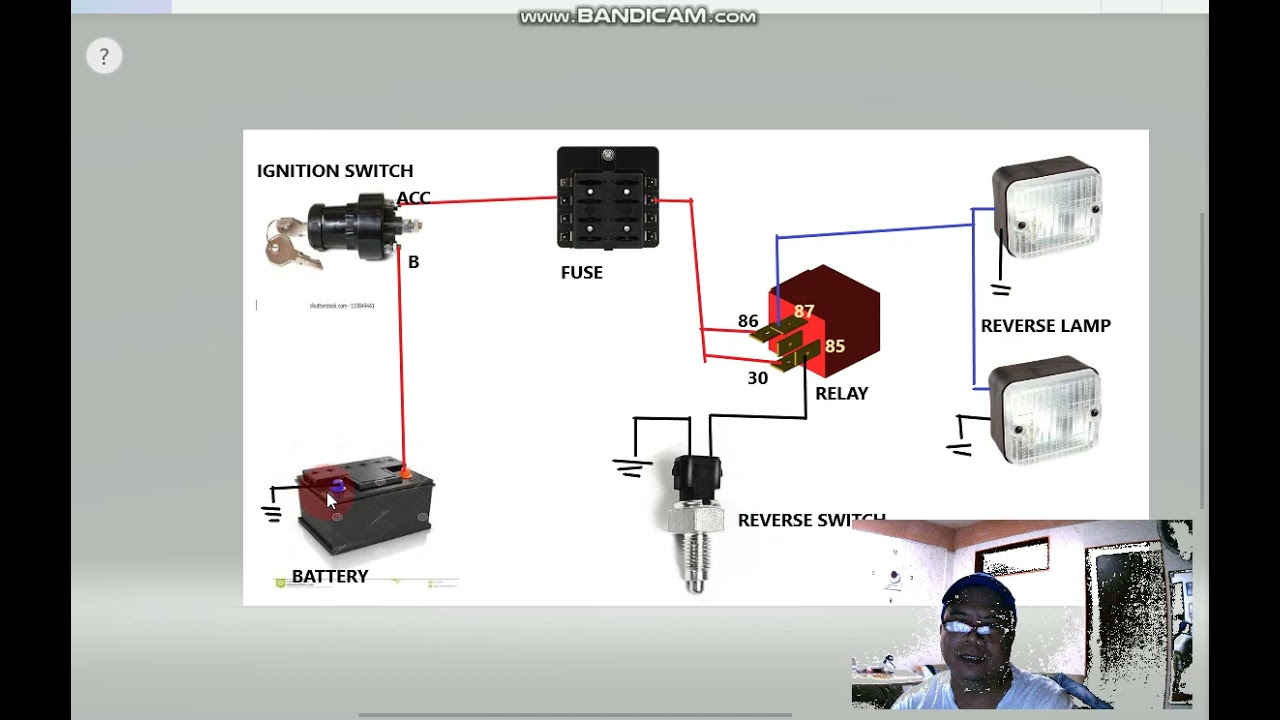
How the Reverse Light Circuit Works
The reverse light circuit is a relatively simple circuit:
- When the driver shifts the vehicle into reverse, the gear selector mechanically activates the reverse light switch, which is typically mounted on the transmission or transaxle.
- Activating the reverse light switch closes the circuit, providing a path for current to flow from the battery (via a fuse) to the reverse lights.
- The current flows through the reverse light wire to the reverse light bulbs, illuminating them.
- The current then flows through the ground wire, completing the circuit and returning to the battery.
The entire process happens quickly and automatically, providing a visual indication to other drivers that you are backing up.
Real-World Use – Basic Troubleshooting Tips
If your reverse lights are not working, here are some basic troubleshooting steps:
- Check the Bulbs: This is the easiest and most common problem. Make sure the bulbs are not burned out.
- Check the Fuse: Locate the fuse for the reverse lights (consult your owner's manual or the fuse box cover) and check if it is blown. Replace it with a fuse of the correct amperage rating.
- Check the Reverse Light Switch: Use a multimeter to test the reverse light switch. With the vehicle in reverse, the switch should show continuity (close the circuit). If not, the switch may be faulty and need replacement.
- Check the Wiring: Visually inspect the wiring harness for any signs of damage, such as cuts, breaks, or corrosion. Use a multimeter to check for continuity in the reverse light wire between the switch and the lights. Also, check the ground connection to ensure it is clean and secure.
- Use the Wiring Diagram: This is where having the wiring diagram becomes invaluable. Use the diagram to trace the circuit and identify potential problem areas. You can download our detailed diagram from the link provided at the end of this article.
Safety Considerations
Working with automotive electrical systems can be dangerous. Always take the following precautions:
- Disconnect the Battery: Before working on any electrical circuit, disconnect the negative terminal of the battery to prevent accidental shorts or shocks.
- Use Proper Tools: Use insulated tools designed for automotive electrical work.
- Avoid Working in Wet Conditions: Water can conduct electricity, increasing the risk of electric shock.
- Never Bypass Fuses: Fuses are designed to protect the circuit from overloads. Bypassing a fuse can lead to serious damage and potentially start a fire.
- Be Careful with Airbags: Some wiring harnesses may be located near airbag modules. Disconnecting or tampering with airbag wiring can cause the airbags to deploy, resulting in serious injury. If you are unsure about working near airbags, consult a qualified technician.
The reverse light switch, often located on the transmission, can be difficult to access and may require specialized tools. The transmission area can also be hot, so allow the vehicle to cool down before working on it.
Understanding the color code of the reverse light wire, along with the basic principles of automotive electrical systems, empowers you to perform basic repairs and modifications safely and effectively. Remember, when in doubt, consult a qualified mechanic.
We have prepared a detailed wiring diagram for various makes and models. To access it, please click here to download the file. This diagram will be invaluable for identifying the correct reverse light wire in your specific vehicle.