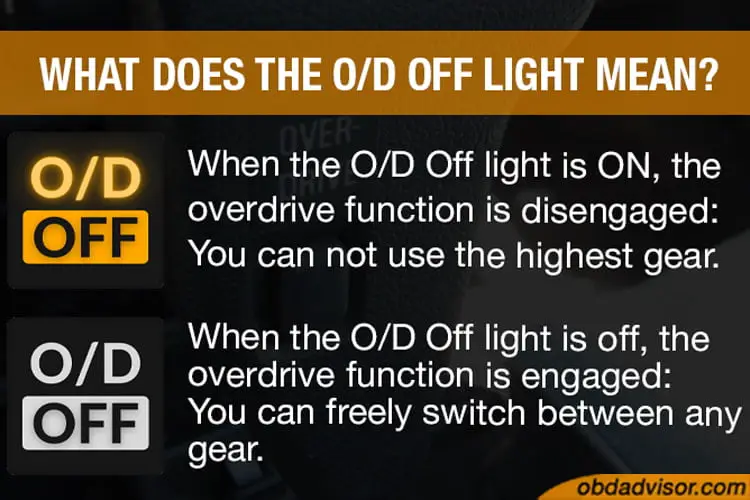
What Does O D Off Mean
Understanding your car's electrical system is crucial for both routine maintenance and tackling more complex modifications. An "O/D Off" diagram, referring to the Overdrive Off system, is a vital piece of documentation for anyone working on the transmission control system. This article will delve into the specifics of the O/D Off system, its diagram, and how you can use it for diagnostics and repairs. We will be providing a simplified understanding, similar to a trusted mechanic explaining it to an experienced DIYer. Furthermore, a link to download a typical O/D Off system diagram will be provided at the end of this article.
Purpose of an O/D Off Diagram
An O/D Off diagram serves several key purposes:
- Troubleshooting: When your Overdrive system isn't functioning correctly, the diagram allows you to trace the electrical circuit, identify potential faults in wiring, switches, solenoids, or the Transmission Control Module (TCM).
- Repair: After identifying a faulty component, the diagram helps you locate and replace it correctly, ensuring proper wiring and connections.
- Modification: For those modifying their vehicle, such as installing a new transmission or integrating aftermarket components, the diagram provides critical information about the existing electrical system and how to interface with it.
- Learning: Even if you're not currently experiencing issues, studying the diagram can deepen your understanding of your car's inner workings, making you a more informed owner.
Key Specs and Main Parts of the O/D Off System
The O/D Off system typically involves the following key components:
- Overdrive Switch: Usually located on the gear shift lever or dashboard, this switch allows the driver to manually disable the overdrive function.
- Overdrive Solenoid: Located within the transmission, this solenoid controls the engagement and disengagement of the overdrive gear. It's electrically actuated.
- Transmission Control Module (TCM): This is the "brain" of the transmission, receiving signals from various sensors (including vehicle speed, throttle position, and the O/D Off switch) and controlling the overdrive solenoid. In older vehicles, this function might be integrated into the Engine Control Module (ECM).
- Wiring Harness: The network of wires that connects all these components.
- Indicators: Either a light on the dash labeled "O/D Off" or a similar indication that tells the driver overdrive has been disabled.
Key Specifications to look for on the diagram are: voltage levels (typically 12V or 5V), wire gauge (determines current carrying capacity), and connector pinouts (identifies the specific wires connected to each terminal).
Symbols on the O/D Off Diagram
Understanding the symbols used in the diagram is essential for interpreting it correctly. Common symbols include:
- Lines: Solid lines represent wires, while dashed lines may represent shielded cables or connections within a component. The thickness of the line may indicate the wire gauge, with thicker lines representing heavier gauge wires.
- Colors: Wires are often color-coded, and the diagram will typically include a legend explaining the color codes (e.g., BLK = Black, RED = Red, GRN = Green). This is absolutely critical for tracing circuits.
- Resistors: A zigzag line represents a resistor, with its value (in ohms) often indicated nearby.
- Capacitors: Two parallel lines represent a capacitor.
- Grounds: A series of downward-pointing lines, often resembling a pitchfork, indicates a ground connection. This is the return path for the electrical current.
- Switches: A break in a line with an arrow pointing to the gap represents a switch. The arrow's position indicates whether the switch is normally open (NO) or normally closed (NC).
- Solenoids: A coil symbol with connecting wires indicates a solenoid.
- Connectors: Represented by interlocking shapes. The diagram will often show the pin numbers and wire colors for each connector.
Understanding these symbols will let you effectively "read" the schematic.
How the O/D Off System Works
The O/D Off system is designed to give the driver more control over the transmission's behavior, particularly in situations where overdrive might be undesirable (e.g., towing, driving in hilly terrain). Here's a simplified explanation:
- Driver Input: The driver presses the O/D Off switch.
- Signal Transmission: The switch sends a signal to the TCM (or ECM).
- TCM Processing: The TCM receives the signal and, based on other factors (e.g., vehicle speed, engine load), determines whether to disable overdrive.
- Solenoid Control: If overdrive is disabled, the TCM deactivates the overdrive solenoid within the transmission. This prevents the transmission from shifting into the overdrive gear.
- Indicator Illumination: The TCM activates the "O/D Off" indicator light on the dashboard, informing the driver that overdrive is disabled.
The TCM uses complex algorithms to prevent damage to the transmission. For example, the TCM might not allow overdrive to engage until the engine reaches a certain temperature or the vehicle reaches a certain speed.
Real-World Use: Basic Troubleshooting Tips
Here are some basic troubleshooting tips using the O/D Off diagram:
- O/D Off Light Not Working: Use the diagram to check the wiring and the bulb (or LED) itself. A multimeter can be used to verify voltage and continuity.
- Overdrive Not Engaging: Check the O/D Off switch for proper operation. Use a multimeter to test its continuity when pressed and released. Verify the overdrive solenoid is receiving power when overdrive should be engaged (consult the diagram for the correct conditions).
- Transmission Shifting Erratically: This could be related to a faulty TCM or a problem with the wiring harness. Use the diagram to check the connections and wiring between the TCM and the transmission. Check for damaged or corroded connectors.
Remember, always start with the simplest possible explanations. A blown fuse can cause all sorts of seemingly complex problems.
Safety Considerations
Working on a car's electrical system can be dangerous. Here are some important safety precautions:
- Disconnect the Battery: Always disconnect the negative battery cable before working on any electrical component. This prevents accidental shorts and potential electrocution.
- Handle the TCM with Care: The TCM is a sensitive electronic device. Handle it with care to avoid damaging it. Avoid touching the pins directly.
- Be Aware of High-Voltage Components: In some vehicles, the ignition system may have high-voltage components. Be careful when working near these components.
- Use Proper Tools: Use insulated tools to prevent electrical shocks. Use a multimeter to test for voltage and continuity before touching any wires.
- Consult the Service Manual: Always refer to the vehicle's service manual for specific instructions and warnings.
- Never work under a vehicle supported only by a jack. Use jack stands.
The TCM is a sensitive electronic component, and mishandling can render it useless. A damaged TCM can be very expensive to replace.
Downloadable Diagram
To aid your understanding and application of the knowledge shared in this article, we have prepared a sample O/D Off system diagram. This file is available for download, allowing you to examine the schematic closely and use it as a reference for your own troubleshooting and repair activities.