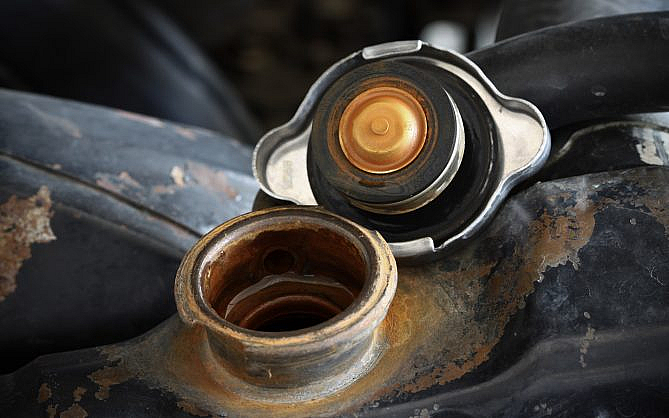
What Does Radiator Cap Look Like
Let's talk about radiator caps. It might seem like a small, insignificant component, but it's actually a critical part of your car's cooling system. Understanding the radiator cap is crucial for proper maintenance, troubleshooting cooling issues, and even making informed decisions when upgrading your cooling system. This guide will give you a solid technical overview, covering its purpose, components, function, and real-world use. We even have a detailed diagram available for download that you can use for reference while you're working on your car.
Why This Matters
Knowing what a radiator cap looks like and how it functions can save you time, money, and frustration. Whether you're performing routine maintenance, diagnosing overheating issues, or even planning a performance upgrade, this knowledge is essential. By understanding the components and operation of the cap, you'll be able to:
- Accurately diagnose cooling system problems.
- Choose the correct replacement cap for your vehicle.
- Understand the pressure rating and its importance.
- Perform basic troubleshooting.
- Contribute more effectively to discussions about your car's performance with a mechanic.
Key Specs and Main Parts
A radiator cap isn't just a solid piece of metal or plastic; it's a carefully engineered component with several key features.
Parts Breakdown:
- Pressure Spring: The heart of the cap. It's a calibrated spring that determines the pressure at which the cap will release excess pressure from the cooling system.
- Pressure Valve (Main Valve): This valve is held closed by the pressure spring. When the pressure inside the cooling system exceeds the cap's rating, this valve opens, allowing coolant to escape into the overflow tank.
- Vacuum Valve (Secondary Valve): This smaller valve allows coolant to be drawn back into the radiator from the overflow tank as the engine cools and pressure decreases. This prevents the radiator hoses from collapsing.
- Sealing Gaskets (Main and Secondary): These rubber or silicone gaskets provide a tight seal between the cap and the radiator neck, preventing leaks. The quality of these gaskets is vital.
- Lever or Tabs (for Removal): These allow you to grip and rotate the cap for removal and installation. The design varies by manufacturer and vehicle.
- Cap Body: The main housing that contains all the other components. It's usually made of metal (steel or aluminum) or durable plastic.
Key Specifications:
- Pressure Rating (PSI or kPa): This is the most crucial spec. It indicates the maximum pressure the cooling system can handle before the cap releases pressure. Always replace with a cap of the same pressure rating as the original. Using a cap with a higher pressure rating than recommended can damage your cooling system components (radiator, hoses, water pump). Using a lower rated cap could lead to excessive coolant loss.
- Material: Caps can be made from various materials, including stamped steel, stainless steel, or durable plastic. The material affects durability and corrosion resistance.
- Size and Thread Type: Radiator caps come in different sizes and with different thread patterns to fit specific radiator necks. Ensure the cap is compatible with your vehicle.
Symbols and Interpretation
Unfortunately, radiator cap diagrams don't usually use a wide array of symbols. Instead, they rely on clear labeling and cross-sectional views. However, you might encounter these conventions:
- Solid Lines: Indicate the physical boundaries of the components.
- Dashed Lines: May represent the path of coolant flow, especially when showing the operation of the pressure and vacuum valves.
- Arrows: Show the direction of coolant flow when the valves are open.
- Color Coding: Some diagrams use color to differentiate components. For example, red might indicate areas under pressure, blue might represent coolant, and green might denote sealing surfaces. Refer to the diagram's legend for clarification.
How It Works
The radiator cap's operation is relatively simple but incredibly important for maintaining a stable cooling system. Here's the process:
- Pressure Build-up: As the engine runs, it generates heat, which increases the temperature of the coolant. This, in turn, increases the pressure within the cooling system.
- Pressure Regulation: The radiator cap's pressure spring maintains a specific pressure level. This elevated pressure raises the boiling point of the coolant, preventing it from boiling over and improving cooling efficiency. A typical passenger car might operate around 15-16 PSI.
- Pressure Release: When the pressure exceeds the cap's rating (e.g., 16 PSI), the pressure valve opens, allowing excess coolant to flow through a hose to the overflow tank.
- Vacuum Relief: As the engine cools down, the coolant contracts, creating a vacuum in the cooling system. The vacuum valve then opens, drawing coolant back from the overflow tank into the radiator, preventing hose collapse and air pockets.
The overflow tank acts as a reservoir to accommodate the expansion and contraction of the coolant. This closed-loop system helps to maintain a constant coolant level in the radiator and prevents coolant loss.
Real-World Use – Basic Troubleshooting
Here are some common symptoms indicating a potential problem with your radiator cap:
- Overheating: A faulty cap might not maintain proper pressure, allowing the coolant to boil prematurely and leading to overheating.
- Coolant Leaks: Cracks or damage to the cap or its sealing gaskets can cause coolant leaks around the cap.
- Constant Coolant Loss: Excessive coolant loss, even without visible leaks, can be a sign of a malfunctioning pressure valve.
- Collapsing Radiator Hoses: If the vacuum valve is stuck closed, the radiator hoses might collapse when the engine cools down.
- Coolant Overflow: Continuous overflow into the overflow tank even when the engine isn't overheating can point to a cap that is relieving pressure too soon.
Troubleshooting Steps:
- Visual Inspection: Check the cap for cracks, damage, or signs of corrosion. Inspect the sealing gaskets for wear or damage.
- Pressure Test: Use a radiator pressure tester to check the cap's pressure release point. The tester connects to the radiator neck, and you pump it up to the specified pressure rating. The gauge will show if the cap holds pressure correctly.
- Replacement: If the cap fails the pressure test or shows any signs of damage, replace it with a new cap of the correct pressure rating and size.
Safety Considerations
The cooling system operates under considerable pressure and temperature. Exercise extreme caution when working near the radiator cap.
- Never remove the radiator cap when the engine is hot. Doing so can cause a geyser of scalding hot coolant to erupt, resulting in severe burns. Let the engine cool down completely before attempting to remove the cap. If you absolutely *must* remove it while warm, use a thick rag and wear eye protection, and release the pressure slowly.
- Be aware of the pressure rating. Using the wrong cap can damage your cooling system.
- Dispose of used coolant properly. Coolant is toxic and should not be poured down drains or onto the ground.
- If you suspect a faulty cap, address it promptly. Overheating can lead to severe engine damage.
By following these precautions, you can safely diagnose and address radiator cap issues.
Now that you have a better understanding of the radiator cap, you're well-equipped to maintain your cooling system and troubleshoot any potential problems. Don't forget to download our detailed diagram of a typical radiator cap. This will be a valuable resource for you when working on your car!