What Does Valve Cover Gasket Do
Alright, let's talk valve cover gaskets. If you're wrenching on your own car, especially diving into engine maintenance, understanding the valve cover gasket is crucial. We're going to break down what it does, how it works, common issues, and a few safety tips to keep you out of trouble. This knowledge is essential for anything from routine maintenance like checking valve clearances to more involved repairs like replacing a leaky valve cover or even swapping out a camshaft.
Purpose and Key Specs
The valve cover gasket's primary role is to create a leak-proof seal between the valve cover and the cylinder head. Think of it as a barrier preventing oil from escaping the engine's top end. This is absolutely vital because the top end, including the valve train, is constantly being lubricated by oil under pressure. Without a proper seal, you'll experience oil leaks, which can lead to a multitude of problems:
- Low oil levels: Obviously, losing oil means less lubrication, potentially causing engine damage.
- Fire hazard: Oil leaking onto hot exhaust components is a serious fire risk.
- Damaged components: Oil can degrade rubber and plastic components in the engine bay.
- Reduced engine performance: Low oil pressure can impact engine efficiency and power.
Key specifications for a valve cover gasket often include:
- Material: Common materials include rubber (nitrile, silicone), cork, cork-rubber blends, and increasingly, high-performance elastomers.
- Dimensions: The gasket's precise dimensions are critical for a proper seal. This includes its thickness, width, and overall shape, conforming perfectly to the valve cover and cylinder head mating surfaces.
- Torque specification: The valve cover bolts need to be tightened to a specific torque value. Overtightening can crush the gasket, while undertightening can lead to leaks. This spec is absolutely crucial and is typically found in your vehicle's repair manual.
- Operating temperature range: The gasket must be able to withstand the high temperatures inside the engine compartment.
Main Parts: Beyond Just a Gasket
While the gasket itself is the star of the show, the entire assembly includes a few other important parts:
- Valve Cover: This metal (or sometimes plastic) cover encloses the valve train and provides a mounting surface for the gasket.
- Valve Cover Bolts/Studs: These fasteners secure the valve cover to the cylinder head. They often have rubber grommets or washers to help maintain even pressure on the gasket.
- Grommets/Washers: These components sit between the valve cover and the bolt heads, providing cushioning and preventing overtightening. Degraded grommets are a common cause of leaks.
- Spark Plug Tube Seals (on some engines): Many engines have spark plugs that run through the valve cover. Small seals around the spark plug tubes prevent oil from leaking into the spark plug wells.
How It Works
The valve cover gasket works on a simple principle: compression. When the valve cover bolts are tightened to the specified torque, the gasket is compressed between the valve cover and the cylinder head. This compression creates a tight seal, preventing oil from escaping. The key to a successful seal is:
- Cleanliness: Both the valve cover and cylinder head mating surfaces must be clean and free of debris. Old gasket material, dirt, and oil residue can prevent the new gasket from sealing properly.
- Even Pressure: The valve cover bolts must be tightened in the correct sequence and to the correct torque specification to ensure even pressure distribution across the gasket. A torque wrench is essential for this step.
- Proper Gasket Material: Using the correct type of gasket material for your engine is crucial. Some engines require specific gasket materials to withstand the operating temperatures and chemical environment.
- Gasket Sealer (Optional): Some mechanics apply a thin layer of gasket sealer to the gasket before installation. This can help to improve the seal, especially on older engines with slightly uneven mating surfaces. However, using too much sealant can actually cause leaks, so less is more. Consult your vehicle's repair manual or a trusted mechanic for guidance.
Real-World Use: Troubleshooting and Basic Tips
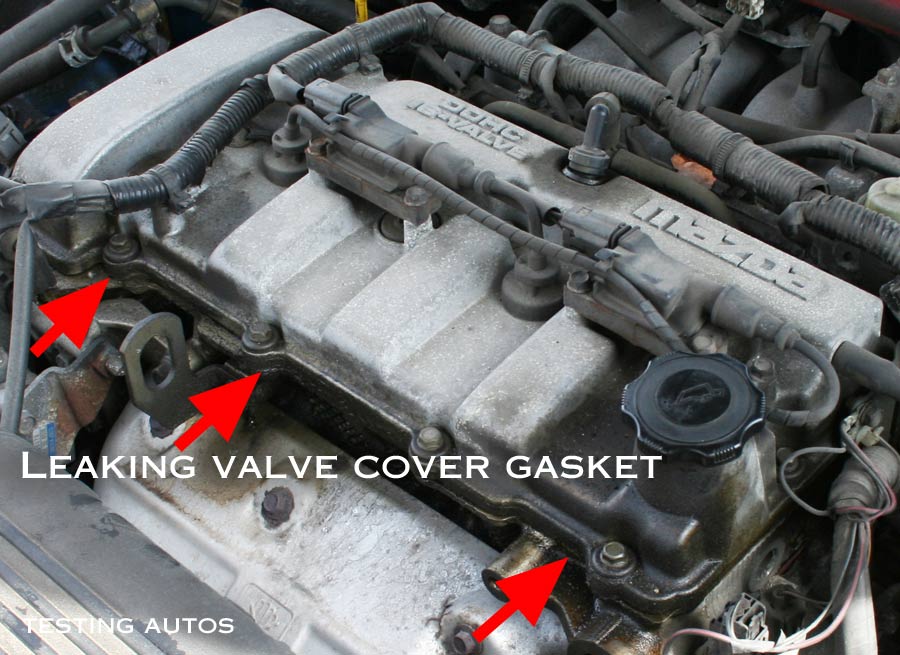
The most common symptom of a failing valve cover gasket is, of course, an oil leak. Look for oil residue around the valve cover, especially along the edges. You might also smell burning oil, especially after the engine has been running for a while.
Here are a few basic troubleshooting tips:
- Inspect the Gasket: If you suspect a leak, carefully inspect the valve cover gasket. Look for cracks, tears, or signs of deterioration. A hardened or brittle gasket is a sure sign that it needs to be replaced.
- Check the Bolts: Make sure all the valve cover bolts are tightened to the correct torque specification. Loose bolts are a common cause of leaks.
- Look for Other Leaks: Sometimes, oil leaks can be difficult to trace. Before replacing the valve cover gasket, rule out other potential sources of leaks, such as the oil filler cap or the oil pressure sensor.
- Spark Plug Wells: If you find oil in the spark plug wells, you likely need to replace the spark plug tube seals in addition to the valve cover gasket.
Replacing a valve cover gasket is generally a straightforward DIY job, but it's important to follow these steps carefully:
- Disconnect the Negative Battery Cable: This is a crucial safety step to prevent electrical shorts.
- Remove Components as Needed: You may need to remove air intake components, hoses, or wiring harnesses to access the valve cover.
- Clean the Mating Surfaces: Thoroughly clean the valve cover and cylinder head mating surfaces with a scraper and solvent.
- Install the New Gasket: Position the new gasket correctly on the valve cover or cylinder head.
- Torque the Bolts: Tighten the valve cover bolts in the correct sequence and to the specified torque specification. Use a torque wrench!
- Reassemble Components: Reinstall any components that you removed to access the valve cover.
- Check for Leaks: After starting the engine, carefully check for any oil leaks around the valve cover.
Safety Precautions
Working on your car involves inherent risks, and the valve cover is no exception. Here are some key safety considerations:
- Hot Engine: Never work on the valve cover while the engine is hot. Allow the engine to cool completely before starting any work. Exhaust manifolds get extremely hot and can cause severe burns.
- Electrical Components: Be mindful of electrical wiring and connectors near the valve cover. Disconnect the negative battery cable before starting any work to prevent electrical shorts.
- Fuel Lines: Be aware of fuel lines and injectors in the vicinity of the valve cover. Avoid smoking or using open flames near fuel lines.
- Sharp Edges: The valve cover and cylinder head may have sharp edges. Wear gloves to protect your hands.
- Eye Protection: Wear safety glasses to protect your eyes from debris and solvents.
- Proper Ventilation: Work in a well-ventilated area when using solvents or cleaners.
- Torque Specifications: Always use a torque wrench and follow the manufacturer's torque specifications. Overtightening bolts can damage the valve cover or cylinder head.
The most risky components are the exhaust manifold due to its heat, and electrical components because of short circuit dangers.
By understanding the purpose, function, and potential issues related to the valve cover gasket, you'll be better equipped to diagnose and repair oil leaks, ensuring the longevity and performance of your engine.
We have a detailed diagram of a typical valve cover assembly available for download. This diagram illustrates the components and their relationship to each other, providing a valuable visual aid for your repairs. The file is ready and waiting!