What Is A Dome Light In A Car
The humble dome light, often overlooked, is a critical component of your car's interior lighting system. This article dives deep into the functionality of a car's dome light circuit, providing the knowledge you need for troubleshooting, modifications, or simply understanding how this essential feature works. We’ll cover key components, wiring diagrams, safety precautions, and basic troubleshooting tips, all geared toward the intermediate car owner and DIY mechanic. We have a detailed dome light wiring diagram available for download, so stick around to learn how to use it.
Purpose of Understanding Dome Light Circuits
Understanding your car's dome light circuit is important for several reasons. It's not just about flipping a switch and getting light. A broken dome light can point to deeper electrical problems, especially those tied to the car's door sensors or central locking system. Having a working knowledge allows you to perform:
- Troubleshooting: Diagnose and fix problems like a constantly on or completely dead dome light.
- Modification: Upgrade to LED bulbs, add custom lighting features, or integrate aftermarket security systems.
- Preventative Maintenance: Identify potential wiring issues before they escalate into bigger problems.
- Learning: Gain a deeper understanding of your car's electrical system.
Key Specs and Main Parts
The dome light circuit, while seemingly simple, interacts with several key components of your car's electrical system. Here’s a breakdown of the main parts involved:
- Dome Light Fixture: This is the physical housing containing the bulb, switch, and potentially other features like map lights.
- Bulb: The light source itself. Traditionally, this was an incandescent bulb, but modern cars increasingly use LED bulbs. Bulb specifications include voltage (typically 12V DC), wattage (e.g., 5W, 10W), and bulb type (e.g., festoon, bayonet).
- Door Jamb Switches (Door Sensors): These switches are located on the door frames and are responsible for triggering the dome light when a door is opened. They are normally closed (NC) switches, meaning they provide a ground connection when the door is closed.
- Dimmer Switch (If Equipped): Some vehicles feature a dimmer switch that allows you to adjust the brightness of the dome light.
- Timer Module (If Equipped): Many modern cars have a timer module that keeps the dome light on for a short period after the doors are closed, then gradually dims and turns it off. This provides a convenient "courtesy lighting" feature.
- Fuse: A crucial safety component that protects the circuit from overloads. The dome light circuit has its dedicated fuse, usually located in the car's fuse box.
- Wiring: The wires that connect all the components together. Wire gauge (thickness) is important; it must be adequate to handle the current flowing through the circuit.
- Body Control Module (BCM): In many modern vehicles, the BCM controls the dome light's operation, integrating it with other systems like the central locking, alarm, and remote start.
Understanding Wiring Diagram Symbols
Wiring diagrams use standardized symbols to represent electrical components and connections. Here are some common symbols you'll encounter when looking at a dome light circuit diagram:
- Solid Lines: Represent wires. The thickness of the line doesn't necessarily indicate wire gauge; it's just for visual clarity.
- Dashed Lines: May represent shielded cables or wires running through a conduit.
- Circles: Often represent light bulbs or other small components.
- Squares or Rectangles: Represent larger components like relays, modules, or switches.
- Ground Symbol (often looking like an upside-down triangle): Indicates a connection to the vehicle's chassis ground.
- Fuse Symbol (often a squiggly line inside a rectangle): Represents a fuse.
- Switch Symbols: Vary depending on the type of switch (e.g., single-pole single-throw (SPST), single-pole double-throw (SPDT)).
- Colors: Wires are often color-coded to help identify them. Common colors include red (power), black (ground), and various other colors for signal wires. The diagram's legend will specify the color code.
A dome light circuit diagram will show how all these components are connected together, allowing you to trace the flow of electricity and identify potential faults. Understanding these symbols is crucial for interpreting the diagram and troubleshooting the circuit effectively.
How the Dome Light Circuit Works
The basic principle of the dome light circuit is simple: provide power to the bulb when a door is opened or when the dome light switch is turned on. However, the actual implementation can vary depending on the vehicle's design.
Here's a simplified explanation of how the circuit typically works:
- Power Supply: The circuit receives power from the car's battery, usually through a fuse.
- Door Jamb Switches: When a door is closed, the door jamb switch is pressed in, creating a ground connection. When the door is opened, the switch is released, breaking the ground connection.
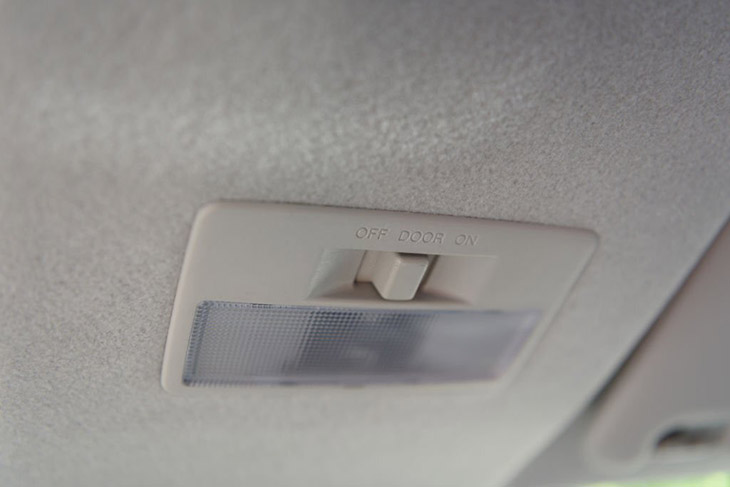
- Dome Light Switch: The dome light switch typically has three positions: ON, OFF, and DOOR. In the ON position, the switch provides a direct path to ground, turning on the light regardless of the door status. In the OFF position, the switch breaks the ground connection, turning off the light. In the DOOR position, the switch allows the door jamb switches to control the light.
- Timer Module (If Equipped): If the car has a timer module, it will monitor the door jamb switches and control the dome light accordingly. When a door is opened, the module activates the dome light. When the door is closed, the module keeps the dome light on for a preset time, then gradually dims and turns it off.
- Body Control Module (BCM): In vehicles with a BCM, the BCM acts as the central control unit for the dome light circuit. The door jamb switches and dome light switch send signals to the BCM, which then controls the dome light based on these signals and other inputs, such as the central locking system.
Real-World Use: Basic Troubleshooting Tips
Here are some common dome light problems and how to troubleshoot them:
- Dome Light Doesn't Turn On At All:
- Check the Fuse: This is the first and easiest step. Use a multimeter to test the fuse for continuity.
- Check the Bulb: Make sure the bulb is not burned out. Replace it with a new bulb of the correct type and wattage.
- Check the Wiring: Look for any loose or damaged wires in the circuit. Pay attention to the connections at the dome light fixture, door jamb switches, and fuse box.
- Check the Dome Light Switch: Use a multimeter to test the switch for continuity in the ON and DOOR positions.
- Dome Light Stays On Constantly:
- Check the Door Jamb Switches: One or more of the door jamb switches may be stuck in the open position or have a faulty ground connection. Try pressing each switch manually to see if it turns off the light.
- Check the Dome Light Switch: Make sure the switch is not stuck in the ON position.
- Check for Short Circuits: Look for any short circuits in the wiring that could be providing a constant ground connection.
- Timer Module Malfunction: If your vehicle has a timer module, it may be malfunctioning and keeping the dome light on indefinitely.
- Dome Light Flickers:
- Loose Connections: Check all the connections in the circuit for looseness.
- Faulty Bulb: A flickering bulb may be nearing the end of its life. Replace it with a new bulb.
- Voltage Drop: Check for excessive voltage drop in the circuit, which could be caused by corroded connections or undersized wiring.
Safety Precautions
Working on your car's electrical system can be dangerous if you don't take the necessary precautions. Here are some important safety tips:
- Disconnect the Battery: Before working on any electrical circuit, disconnect the negative terminal of the car's battery to prevent shocks and short circuits.
- Use Proper Tools: Use insulated tools to avoid accidental shorts.
- Test Before Touching: Use a multimeter to test circuits for voltage before touching any wires or components.
- Be Careful with Wiring: Handle wires carefully to avoid damaging them. Don't pull on wires excessively.
- Replace Fuses Correctly: Always replace a blown fuse with a fuse of the same amperage rating. Using a higher amperage fuse can damage the circuit.
- Capacitors in Modules: Some modules contain capacitors that can hold a charge even after the battery is disconnected. Be careful when handling these modules to avoid electric shock.
By following these safety precautions, you can minimize the risk of injury or damage when working on your car's dome light circuit.
Now that you have a solid understanding of the dome light circuit and its components, you're well-equipped to tackle troubleshooting, repairs, or even modifications. Remember to always prioritize safety and consult a professional if you're unsure about any aspect of the work. For a detailed wiring diagram that you can use as a reference, please follow the link to download it. Good luck!