What Is Rpt In Car Stereo
Alright, let's dive into understanding what "RPT" means in the context of your car stereo. You might have seen this abbreviation on wiring diagrams, troubleshooting guides, or even stamped on some of the components themselves. Understanding its purpose is crucial whether you're diagnosing a blown fuse, planning a stereo upgrade, or simply trying to decipher the maze of wires behind your dashboard.
Purpose
Why does this information matter? Car stereo systems are intricate networks of power, signal, and control. Having a handle on what "RPT" signifies, especially when coupled with a comprehensive wiring diagram, empowers you to:
- Diagnose Issues Accurately: Pinpoint the source of problems like speakers not working, no power to the head unit, or distorted sound.
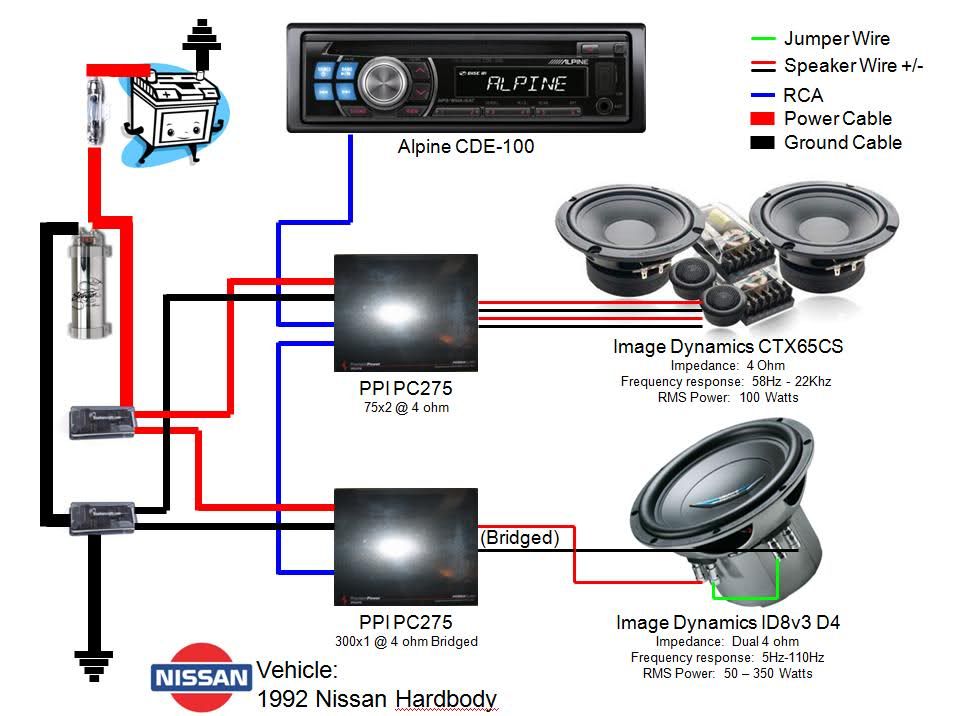
- Plan Upgrades Safely: Understand how to properly connect aftermarket components like amplifiers, subwoofers, and new head units without causing damage to your vehicle's electrical system.
- Perform Repairs Confidently: Replace faulty components, repair damaged wiring, and troubleshoot electrical problems without relying solely on a mechanic.
- Gain a Deeper Understanding: Expand your knowledge of automotive electrical systems and how different components interact.
Key Specs and Main Parts
The acronym "RPT" in car stereo schematics most commonly stands for Repeat. It's a function related to the head unit (the receiver) that is responsible for a few different things depending on which make and model. Generally speaking "RPT" controls the repeating of songs/folders/entire CDs. Sometimes, depending on the context, it can also refer to Remote Playback Trigger, which can be used to start or stop devices connected to the head unit via remote control.
Key parts associated with the "RPT" function, depending on whether its *Repeat* or *Remote Playback Trigger* include:
- Head Unit (Receiver): The central control unit of the stereo system. It houses the processing circuitry for audio signals, radio tuning, and playback control.
- Wiring Harness: The bundle of wires that connects the head unit to the vehicle's electrical system and other components.
- Speakers: The devices that convert electrical signals into audible sound.
- Amplifiers (Optional): Devices that boost the audio signal from the head unit to provide more power to the speakers.
- Remote Control (Optional): Allows controlling playback from a distance.
Symbols and Wiring Color Codes
Wiring diagrams are like roadmaps for electrical circuits. They use standardized symbols and color codes to represent different components and their connections. Understanding these is crucial for interpreting the diagram correctly.
Common Symbols:
- Solid Lines: Represent wires. The thickness of the line doesn't necessarily indicate wire gauge, but it might in some diagrams.
- Dashed Lines: Often indicate shielded wires, ground connections, or connections that are not directly related to the RPT circuit but nearby.
- Circles with a letter inside: Denote connectors or junction points. The letter identifies the specific connector.
- Rectangles: Typically represent components like relays, switches, or integrated circuits within the head unit.
- Ground Symbol ( /\/\/\ ): Indicates a connection to the vehicle's chassis ground, which serves as a common return path for electrical current.
Wiring Color Codes:
While color codes vary slightly between manufacturers, there are some common conventions:
- Red: Usually indicates a constant +12V power supply.
- Yellow: Often represents a switched +12V power supply (activated when the ignition is on).
- Black: Typically used for ground connections.
- Blue: Frequently indicates remote turn-on for amplifiers.
- Other Colors (Green, White, Gray, etc.): Typically used for speaker wires. The color often has a stripe of another color to differentiate between positive and negative speaker connections.
The specific wire associated with the "RPT" function (if it's a remote play trigger) would depend on the manufacturer's design. You'd need to consult the specific wiring diagram for your vehicle or head unit to identify the correct wire color and its function.
How It Works
The "RPT" function operates in one of the following ways, depending on whether it's a *Repeat* function, or a *Remote Playback Trigger* function:
Repeat: When activated through a button on the head unit (or a remote control), the "RPT" setting signals the head unit's internal processor to repeatedly play the current track, folder, or entire CD. The specific behavior is determined by the user's selection in the head unit's menu system. When in the Repeat Track mode, the current song will replay until the mode is turned off. When in the Repeat Folder mode, all tracks within a folder will repeat until the mode is turned off, or moved to a different folder. Similar functionality exists for repeating the entire contents of a CD.
Remote Playback Trigger: This function relies on a specific wire that is connected to an external device. When this wire receives a signal (often a voltage change), the head unit interprets it as a command to start or stop playback on the connected device. This is commonly used to control external media players, CD changers, or even other audio devices. In a wiring diagram, you will see that wire coming out of the head unit and going to the other device. This is a lower-power signal wire.
Real-World Use – Basic Troubleshooting Tips
Let's say your "RPT" button on the head unit isn't working, or a device connected through the remote play trigger isn't responding. Here's a basic troubleshooting approach:
- Check the Head Unit's Menu: Ensure the "RPT" function (if it's a repeat function) is enabled in the head unit's settings. Sometimes, it can be accidentally disabled.
- Verify the Wiring: Inspect the wiring harness for any loose connections, damaged wires, or corrosion, if its remote play trigger. Pay particular attention to the wire associated with the "RPT" function. Make sure the remote control is working properly, and sending a signal.
- Test the Remote Signal: If you have a multimeter, check for voltage changes on the RPT wire when you press the remote control button (if its remote play trigger). A lack of voltage change indicates a problem with the remote control or the wiring between the remote receiver and the head unit.
- Check the Connection to the Device: Insure the device you are trying to trigger via the RPT wire (if its remote play trigger), has a solid connection to the head unit.
- Consult the Manual: Refer to the head unit's owner's manual for specific troubleshooting steps related to the "RPT" function.
Safety
Working with car electrical systems can be dangerous if proper precautions are not taken. Always disconnect the negative terminal of the battery before working on any electrical components. This will prevent accidental short circuits and potential electrical shocks.
Risk Factors:
- Short Circuits: Can damage the vehicle's electrical system, start a fire, or cause injury.
- Electrical Shock: Can occur if you come into contact with exposed wires carrying voltage.
- Airbag Deployment: Accidentally triggering an airbag can cause serious injury. Be careful when working near airbags and follow the manufacturer's instructions for disabling them.
Important Note: Some components, such as capacitors in amplifiers or the head unit itself, can store a charge even after the battery is disconnected. Allow sufficient time for these components to discharge before touching them.
By understanding the role of "RPT" in your car stereo system and following safe work practices, you can confidently troubleshoot, repair, and upgrade your system. We have a comprehensive wiring diagram available for download, which will further assist you in your project. Please reach out and we can send you the relevant file.