What Two Colours Make Light Blue
If you've ever tried to mix paint to perfectly match a faded patch on your classic ride, or customize the underglow lighting on your modern tuner, you've probably wrestled with the fundamental question: what two colors make light blue? While it might seem simple, the science behind color mixing, especially when dealing with light, is a little more nuanced than you might expect. This breakdown will give you the practical knowledge you need to accurately achieve the perfect light blue, whether you're retrofitting LEDs, tinting lenses, or just trying to understand how your car's lighting system works.
Why Understanding Color Mixing Matters
The knowledge of additive color mixing is invaluable for a number of automotive-related tasks. Consider these scenarios:
- LED Modifications: Swapping out stock bulbs for LEDs offers brighter, more efficient lighting. But to achieve custom colors for accent lighting, underglow, or even instrument panel displays, you need to understand how red, green, and blue LEDs combine.
- Lens Tinting: While less common these days, tinted lenses for headlights or taillights are still popular for customization. Understanding how color filters work (which subtract light) is crucial for achieving the desired hue and maintaining safe light output.
- Troubleshooting Electrical Systems: Sometimes, a seemingly simple lighting problem can be traced to a faulty wire or component that's subtly altering the color of the emitted light. Knowing the base colors helps you identify deviations.
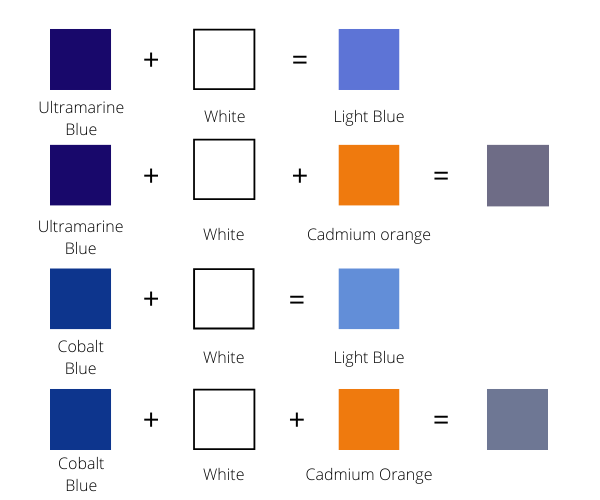
- Repairing Faded Paint: While paint mixing is *subtractive* color mixing (using pigments), understanding the underlying principles of how light interacts with paint is still beneficial when trying to match colors.
- Understanding Automotive Lighting Standards: Many automotive lighting standards are based on specific color temperature and chromaticity values. While you won't necessarily be mixing light to meet these standards, understanding the relationship between colors and these values can be helpful.
Key Specs and Main Parts: Additive Color Mixing
Unlike mixing paints, which is a subtractive process (removing wavelengths of light), mixing light is an additive process. This means that the more light you add, the brighter the resulting color. The key principle at play here is based on the properties of light itself.
The core components we need to understand are:
- Primary Colors (of light): Red, Green, and Blue (RGB). These are the fundamental building blocks of color in additive mixing.
- Secondary Colors: Colors created by mixing two primary colors. In the case of light, these are Cyan (Blue + Green), Magenta (Red + Blue), and Yellow (Red + Green).
- White Light: The combination of all three primary colors (Red + Green + Blue) in equal proportions.
- Intensity: The brightness or luminance of a light source. Adjusting the intensity of each primary color changes the final color produced.
- Color Temperature: A way of describing the color of light emitted by a black body radiator heated to a given temperature. Measured in Kelvin (K), it's relevant when dealing with white light and affects the perceived "warmth" or "coolness" of a color.
To get light blue, you’ll need to combine:
- Blue Light: This is the base color.
- Green Light: Adding green to blue shifts it towards cyan, which is a shade of light blue.
Crucially, the *intensity* of the blue light must be *higher* than the intensity of the green light. If the green is too strong, you'll end up closer to cyan or even a green-leaning turquoise.
Understanding the Color Wheel (RGB Additive)
Imagine a triangle with red, green, and blue at each corner. In the center is white. Mixing any two corners creates the color between them:
- Red + Green = Yellow
- Green + Blue = Cyan (a shade of light blue)
- Blue + Red = Magenta
To get *light* blue (cyan), you need a roughly equal mix of green and blue light.
How It Works: Additive Mixing in Practice
The additive color mixing process can be explained with the following steps:
- Generating Primary Colors: Modern LEDs are highly efficient light sources that can emit specific wavelengths of light corresponding to red, green, or blue. Other technologies, like discharge lamps (though less common in cars these days), can also be filtered to produce primary colors.
- Controlling Intensity: The intensity of each primary color is controlled independently, often using Pulse Width Modulation (PWM). PWM rapidly switches the LED on and off, and the proportion of time the LED is on (the "duty cycle") determines its apparent brightness.
- Mixing the Light: The light from the red, green, and blue LEDs is then combined. This can be done simply by placing the LEDs close together so their light overlaps, or by using lenses or diffusers to blend the light more evenly.
- Perception by the Human Eye: Our eyes have three types of cone cells, sensitive to red, green, and blue light. The brain interprets the relative stimulation of these cones as different colors. When light blue (cyan) light enters the eye, both the blue and green cone cells are stimulated, leading to the perception of light blue.
Think about the pixels on your car's infotainment screen, or even the daytime running lights on some modern vehicles. Each pixel (or light unit) contains tiny red, green, and blue LEDs. By varying the intensity of each LED, the system can create a vast range of colors, including light blue.
Real-World Use: Troubleshooting Light Blue
Let's say you're working on an LED underglow setup and are aiming for light blue but keep getting a darker blue or a green-tinged blue. Here's how to troubleshoot:
- Verify LED Output: Ensure all LEDs (red, green, blue) are functioning correctly. A burnt-out green LED will obviously prevent you from achieving light blue. Use a multimeter to test the voltage at each LED.
- Check Wiring Connections: Loose or corroded connections can reduce the current flow to specific LEDs, affecting their intensity. Clean and tighten all connections. Pay special attention to ground connections, as a poor ground can cause erratic behavior.
- Inspect Resistors: LEDs often require resistors to limit the current and prevent them from burning out. Make sure the correct value resistors are used for each LED. An incorrect resistor value can significantly affect the LED's brightness.
- Adjust PWM Control: If you're using a microcontroller or other PWM controller, carefully examine the code to ensure the blue and green LEDs are being driven with the correct duty cycles. Slight adjustments to the duty cycle can dramatically alter the perceived color.
- Consider Ambient Light: The perceived color can be affected by ambient lighting. Test your light setup in a dark environment to get a true representation of the color.
- Check Color Consistency: Even LEDs from the same batch can exhibit slight variations in color. If you're particularly picky, test and select LEDs that produce the most consistent colors.
Safety: Handling LED Lighting Systems
While LEDs themselves are generally safe, working with automotive electrical systems always presents some risks:
- Battery Disconnect: Always disconnect the negative terminal of the battery before working on any electrical system to prevent short circuits and potential electrical shocks.
- Proper Grounding: Ensure all components are properly grounded. A floating ground can cause voltage fluctuations and damage sensitive electronic components.
- Heat Dissipation: High-power LEDs generate heat. Make sure they are properly heat-sinked to prevent overheating and premature failure. Use thermal paste between the LED and the heat sink to improve heat transfer.
- Eye Safety: Avoid looking directly at high-intensity LEDs, especially blue LEDs, for extended periods. They can potentially damage your eyes. Wear appropriate eye protection if necessary.
- Wire Gauge: Use appropriately sized wiring for the current draw of the LED circuit. Undersized wiring can overheat and create a fire hazard. Consult a wiring chart to determine the correct wire gauge.
Remember, when dealing with your car's electrical system, proceed cautiously and double-check your work. If you're uncomfortable working on electrical systems, it's always best to consult a qualified automotive electrician.
We have a detailed schematic illustrating RGB additive color mixing, including intensity ranges for achieving various shades of light blue. You can download it here. This diagram provides a visual reference that you can use when designing and troubleshooting your own lighting projects.