
03 Ford Taurus Serpentine Belt Diagram
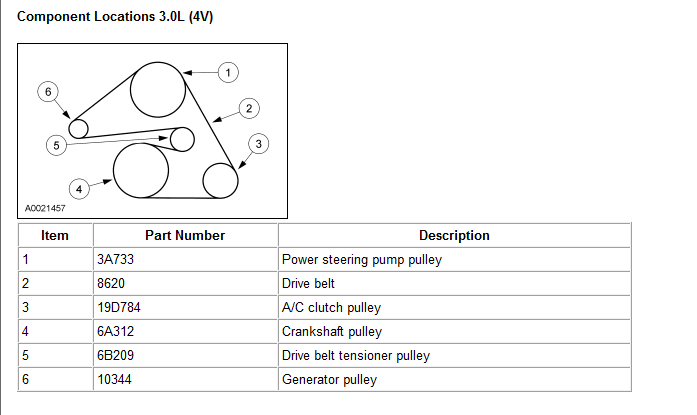
Alright, let's dive into the serpentine belt diagram for your 2003 Ford Taurus. This isn't just some fancy picture; it's the roadmap to understanding and maintaining a critical system that keeps your engine humming. Whether you're tackling a noisy belt, replacing a failing component, or just want to get a better grasp of your engine's layout, this diagram is your best friend.
Purpose of the Serpentine Belt Diagram
Why bother with a diagram? Well, the serpentine belt is responsible for driving several vital accessories. It's not just about spinning around prettily. The diagram helps you:
- Properly route the belt during replacement: This is the number one reason. An incorrectly routed belt can lead to component failure and even engine damage.
- Identify components: The diagram clearly labels each pulley and accessory, helping you diagnose problems.
- Troubleshoot issues: If something's not working right (power steering, A/C, etc.), the diagram can help you trace the problem back to a potentially faulty belt or accessory.
- Understand belt tension: The diagram shows the location of the tensioner, which is crucial for maintaining proper belt tension.
Essentially, the diagram is your visual guide to ensure everything is connected correctly and functioning as it should. We have the official 2003 Ford Taurus serpentine belt diagram available for download, which you'll find helpful as we go through this.
Key Specs and Main Parts
The 2003 Ford Taurus came with a couple of different engine options, primarily the 3.0L Vulcan and the 3.0L Duratec. The serpentine belt layout will differ slightly between these engines. Make sure you're using the correct diagram for *your* specific engine!
The main components you'll see on the diagram are:
- Crankshaft Pulley: This is driven directly by the engine and powers the entire serpentine belt system. It's the big one at the bottom.
- Alternator: This charges your car's battery and provides power to electrical components while the engine is running.
- Power Steering Pump: This provides hydraulic assistance for steering. You'll know it's there if you have power steering!
- Air Conditioning Compressor: This compresses the refrigerant to cool the air inside your car. Say hello to cold air!
- Water Pump: This circulates coolant through the engine to prevent overheating. Keeping things cool is the name of the game.
- Idler Pulley(s): These pulleys don't drive anything. They simply guide the belt around the other components to ensure proper routing and tension.
- Belt Tensioner: This spring-loaded mechanism maintains the correct tension on the serpentine belt. Proper tension is absolutely crucial.
Understanding these components and their locations is the first step to understanding the serpentine belt system. The belt itself is a multi-ribbed belt made of a durable rubber compound, designed to withstand high speeds and temperatures.
Symbols and Diagram Conventions
Serpentine belt diagrams aren't exactly works of art, but they do follow certain conventions to make them easier to understand. Here’s what to look for:
- Solid Lines: These represent the path of the serpentine belt. Follow them carefully when routing a new belt.
- Arrows: Arrows indicate the direction of rotation for each pulley. This is important for understanding how each component functions.
- Component Labels: Each pulley will be labeled with an abbreviation or full name (e.g., "ALT" for Alternator, "P/S" for Power Steering).
- Tensioner Location: The tensioner is usually indicated by a small icon resembling a spring or a lever. It's often labeled "TENSIONER."
Some diagrams may use color-coding to further differentiate between components, but this is less common in factory service manuals. The diagram we have available for download is clear and concise, making it easy to follow even without color-coding.
How It Works: The Serpentine Belt's Dance
The serpentine belt system is a marvel of efficiency. The crankshaft pulley, driven by the engine, sets the entire system in motion. The belt wraps around each accessory pulley, transferring rotational force from the engine to these components.
The key to the system's functionality is tension. The belt needs to be tight enough to prevent slippage, but not so tight that it puts excessive strain on the pulleys and bearings. That’s where the tensioner comes in. It automatically adjusts to maintain the correct tension as the belt wears or as the engine speed changes.
Think of it as a carefully choreographed dance. Each component plays a specific role, and the serpentine belt is the dancer that connects them all, ensuring they move in harmony.
Real-World Use: Troubleshooting Tips
Let's say you're experiencing some common serpentine belt issues. Here's how the diagram can help:
- Squealing Noise: This is often caused by a slipping belt. Check the belt tensioner to make sure it's functioning properly. Also, inspect the belt for cracks, glazing, or wear. The diagram helps you locate the tensioner quickly.
- Accessory Malfunction: If your power steering isn't working, for example, check the belt to see if it's properly routed around the power steering pump pulley. The diagram will confirm the correct routing.
- Visual Inspection: Use the diagram as a reference when visually inspecting the belt and pulleys. Look for signs of wear, damage, or misalignment.
Before replacing the serpentine belt, always make a sketch or take a picture of the belt's routing. This will save you a lot of headaches when it's time to install the new belt. Refer to the diagram, but your own visual record can be invaluable.
Safety First! Highlighting Risky Components
Working on the serpentine belt system involves some inherent risks. Here are a few things to keep in mind:
- Hot Engine: Never work on the serpentine belt system when the engine is hot. Allow the engine to cool completely before starting any work.
- Moving Parts: Keep your hands, tools, and clothing clear of the serpentine belt and pulleys when the engine is running. Serious injury can result.
- Battery Disconnect: Disconnect the negative battery cable before starting any work on the electrical components (alternator). This will prevent accidental shorts.
- Tensioner Spring: The belt tensioner is under considerable spring tension. Use the correct tools to relieve the tension and avoid injury.
The alternator, in particular, carries a risk of electrical shock if you're not careful. Always disconnect the battery before working on it. The crankshaft pulley, being directly connected to the engine, can cause serious injury if the engine is accidentally started while you're working on the belt. Safety is paramount.
With the diagram and a little careful work, you can confidently tackle serpentine belt maintenance on your 2003 Ford Taurus. Remember to consult the diagram, use the right tools, and always prioritize safety. Don't hesitate to consult a professional if you're unsure about any step in the process.
We have the complete 2003 Ford Taurus Serpentine Belt Diagram available for download. This will be a valuable asset as you work on your vehicle. Good luck!