03 Lincoln Town Car Fuse Box Diagram
So, you're tackling some electrical work on your 2003 Lincoln Town Car? Smart move. Knowing your way around the fuse box is absolutely crucial for diagnosing electrical issues, performing upgrades, or even just replacing a blown fuse. This article will walk you through understanding the fuse box diagram for your specific model year. Having a clear understanding of your fuse box layout and function is essential for both basic maintenance and more advanced electrical modifications. And, don't worry, we have the downloadable diagram ready for you.
Purpose of the Fuse Box Diagram
The fuse box diagram, in its simplest form, is a roadmap of your car's electrical system. It shows you exactly which fuse protects which circuit. This is incredibly important for several reasons:
- Troubleshooting Electrical Problems: Imagine your cigarette lighter (or auxiliary power outlet, these days) suddenly stops working. Without the diagram, you'd be guessing which fuse to check. The diagram tells you precisely which fuse is responsible, saving you time and frustration.
- Performing Electrical Repairs: When repairing or replacing a faulty component, it's often necessary to disconnect power to that circuit. The diagram allows you to quickly identify and remove the correct fuse.
- Adding Aftermarket Accessories: Planning to install a new stereo, alarm system, or auxiliary lighting? The diagram helps you identify suitable circuits to tap into for power, ensuring you don't overload existing circuits. A crucial aspect of any aftermarket installation involves the proper utilization of circuits and their corresponding fuses.
- General Understanding of Your Car's Electrical System: Simply studying the diagram can give you a better appreciation for how the various electrical components of your Town Car are interconnected.
Key Specs and Main Parts
Your 2003 Lincoln Town Car actually has *two* primary fuse boxes. Let's break them down:
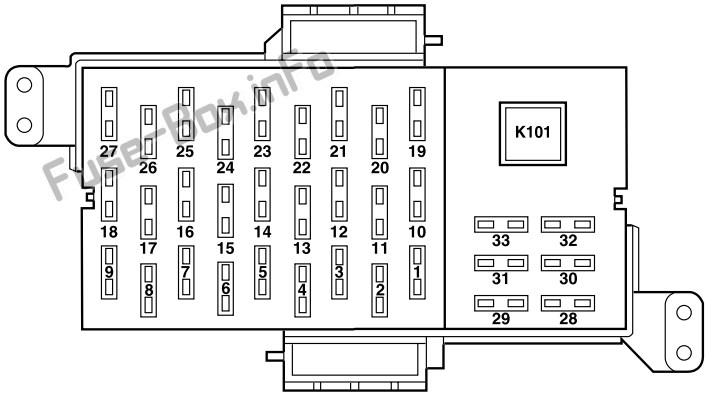
- Passenger Compartment Fuse Panel: Located under the dashboard, usually on the driver's side. This panel houses fuses for interior components like the radio, power windows, interior lights, climate control, and various control modules.
- Power Distribution Box (Under the Hood): This box, typically found near the battery, contains high-amperage fuses and relays that protect major systems like the engine control unit (ECU), anti-lock braking system (ABS), headlights, and starter motor.
Key Specs:
- Fuse Types: The 2003 Town Car uses a mix of blade-type fuses (also known as spade fuses) in various sizes and amperage ratings. These include mini, ATO (standard), and Maxi fuses.
- Amperage Ratings: Fuses are rated in amps (A), indicating the maximum current they can handle before blowing. Common ratings include 5A, 7.5A, 10A, 15A, 20A, 25A, 30A, and higher for the Maxi fuses. Always replace a blown fuse with one of the *same* amperage rating. Using a higher-rated fuse can cause damage to the circuit.
- Relays: These are electromechanical switches that control high-current circuits. Relays are typically used for components like the headlights, starter motor, and fuel pump. They are typically located in the power distribution box.
Understanding the Symbols on the Diagram
The fuse box diagram uses a standardized set of symbols to represent different components and connections. Here's a breakdown of the most common ones you'll encounter:
- Lines: Lines represent electrical wires. A solid line indicates a direct connection, while a dashed line might indicate a connection through a switch or relay.
- Boxes: Rectangular boxes usually represent fuses or relays. The amperage rating of a fuse is typically printed inside or next to the box.
- Circles: Circles can represent various components, such as sensors or switches, depending on what’s contained within the circle.
- Abbreviations: The diagram will use abbreviations to identify circuits and components. For example:
- PCM: Powertrain Control Module (the car's computer)
- ABS: Anti-lock Braking System
- A/C: Air Conditioning
- IGN: Ignition
- Colors (On Some Diagrams): While not always present, some diagrams use color-coding to distinguish different types of circuits (e.g., red for power, black for ground).
The diagram will also provide a legend that lists all the abbreviations and symbols used. Make sure to consult this legend if you're unsure about a particular symbol.
How It Works: The Electrical Flow
Understanding how the electrical system works is key to using the fuse box diagram effectively. Electricity flows from the battery, through the wiring harness, and to the various electrical components. Each circuit is protected by a fuse. If the current in a circuit exceeds the fuse's amperage rating (due to a short circuit, overload, or component failure), the fuse blows, interrupting the flow of electricity and preventing damage to the circuit and components. Think of the fuse as a sacrificial element designed to protect the rest of the system. The relay acts as an electrically controlled switch, enabling low-current circuits to control high-current circuits. For example, the ignition switch sends a low-current signal to a relay, which then closes the high-current circuit to the starter motor.
Real-World Use: Basic Troubleshooting
Let's say your power windows stop working on your 2003 Town Car.
- Consult the Diagram: Refer to the fuse box diagram for the passenger compartment fuse panel. Locate the fuse labeled "Power Windows" or something similar.
- Locate the Fuse: Find the corresponding fuse in the fuse box. The diagram will usually indicate the fuse's location using a grid coordinate or a numerical identifier.
- Inspect the Fuse: Visually inspect the fuse. A blown fuse will have a broken filament or a darkened appearance.
- Replace the Fuse: If the fuse is blown, replace it with a new fuse of the *same* amperage rating.
- Test the Circuit: After replacing the fuse, test the power windows to see if they now work.
- If the Fuse Blows Again: If the new fuse blows immediately or shortly after being replaced, there's likely a short circuit in the power window circuit. Further diagnosis will be required, potentially involving tracing the wiring and testing the window motors.
Safety Precautions
Working with automotive electrical systems can be dangerous. Here are some key safety precautions to keep in mind:
- Disconnect the Battery: Before working on any electrical components, disconnect the negative (-) terminal of the battery to prevent accidental short circuits. This is paramount.
- Use the Correct Fuses: Always replace a blown fuse with one of the *same* amperage rating. Using a higher-rated fuse can damage the circuit and even cause a fire.
- Avoid Working in Wet Conditions: Water and electricity don't mix. Never work on electrical components in wet conditions.
- Be Careful Around High-Voltage Components: Some components, like the ignition system and air conditioning system, can carry high voltage even with the battery disconnected. Exercise extreme caution when working around these components.
- The PCM and Airbag System: Treat the PCM (Powertrain Control Module) and Airbag system with extreme caution. Incorrectly handling these circuits could lead to malfunctions or even airbag deployment.
Remember, if you're not comfortable working on electrical systems, it's always best to consult a qualified mechanic.
Now that you have a solid understanding of your 2003 Lincoln Town Car's fuse box diagram, you're well-equipped to tackle basic electrical repairs and modifications. Remember to always prioritize safety and consult the diagram whenever you're working on the electrical system.
Ready to download the actual fuse box diagram? We have it available for you! It contains all the specifics you need for a succesful repair!