04 Pontiac Grand Prix Serpentine Belt Diagram
Alright folks, let's dive into the serpentine belt system on a 2004 Pontiac Grand Prix. Understanding this system is crucial for maintenance, diagnosing issues, and even planning some performance upgrades. This article is your guide to deciphering the serpentine belt diagram for your '04 Grand Prix, empowering you to tackle common repairs and avoid costly trips to the shop.
Purpose of the Serpentine Belt Diagram
Why bother learning about this diagram? Simple: it's your roadmap to the entire accessory drive system. The serpentine belt is responsible for powering several critical components in your engine. This includes your alternator (charging the battery), power steering pump, air conditioning compressor, and, in some cases, the water pump. A failed serpentine belt means a dead battery, no power steering, no AC, and potentially an overheating engine – all things you definitely want to avoid.
The diagram is essential for:
- Replacing a worn or broken belt: Knowing the exact routing ensures you install the new belt correctly. Incorrect routing can cause premature wear, component damage, or even a complete failure of the system.
- Troubleshooting accessory drive problems: A slipping belt, squealing noises, or malfunctioning accessories can often be traced back to a problem within the serpentine system. The diagram helps you identify the components involved and their relationships.
- Planning accessory upgrades: If you're thinking about adding a supercharger, upgrading your alternator, or modifying your AC system, you'll need to understand how the serpentine belt routing will be affected.
Key Specs and Main Parts of the 2004 Grand Prix Serpentine System
The 2004 Grand Prix, depending on the engine (3.8L V6 or 5.3L V8 in the GXP model), will have a specific serpentine belt routing and component layout. The main components you'll find in the system are:
- Crankshaft Pulley (Harmonic Balancer): This is the main driving pulley, connected directly to the engine's crankshaft. It's responsible for transferring the engine's rotational force to the serpentine belt.
- Alternator Pulley: Powers the alternator, which charges the battery and provides electricity to the vehicle's electrical system.
- Power Steering Pump Pulley: Operates the power steering pump, providing hydraulic assistance for steering.
- Air Conditioning Compressor Pulley: Drives the AC compressor, which circulates refrigerant to cool the cabin.
- Water Pump Pulley: (Sometimes driven by the serpentine belt) Circulates coolant through the engine to regulate its temperature.
- Tensioner Pulley: This spring-loaded pulley maintains the correct tension on the serpentine belt. Proper tension is crucial for preventing slippage and ensuring optimal accessory performance.
- Idler Pulley(s): These pulleys are smooth and serve to guide the belt around the various components, optimizing its path and preventing interference.
- Serpentine Belt: The belt itself, a multi-ribbed belt made of reinforced rubber, transmits power from the crankshaft to the accessories. The ribs engage with the grooves on the pulleys.
Belt Length: The serpentine belt length is crucial and varies based on the engine and specific accessory configuration. Consult the diagram or your vehicle's service manual for the correct belt length. Using the wrong belt length will result in either insufficient tension (leading to slippage) or excessive tension (causing premature wear and component damage).
Decoding the Symbols on the Diagram
The serpentine belt diagram isn't just a pretty picture; it's a technical drawing with specific conventions. Here's what to look for:
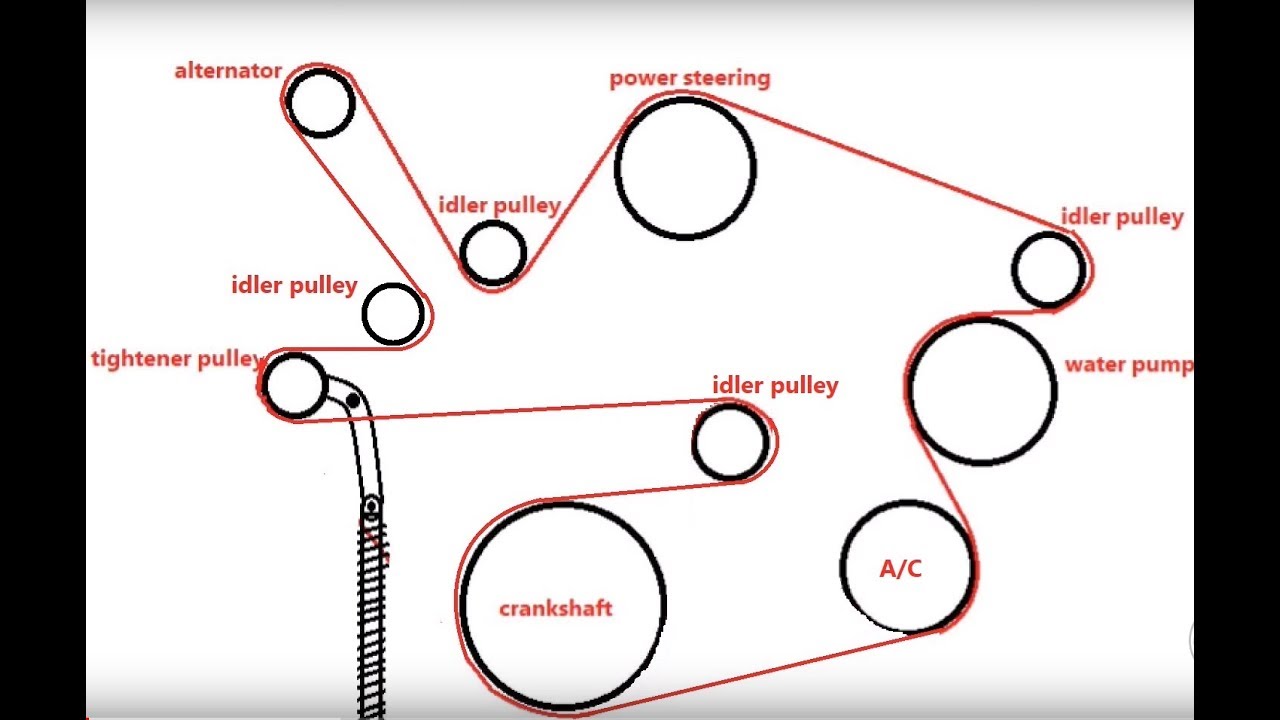
- Solid Lines: Represent the path of the serpentine belt. The lines usually follow the center of the belt.
- Arrows: Indicate the direction of belt travel. Follow the arrows to understand how the belt wraps around each pulley.
- Pulley Icons:
- Grooved Pulleys: Typically represent pulleys that drive accessories (alternator, power steering pump, AC compressor). The grooves are where the ribs of the serpentine belt engage.
- Smooth Pulleys: Usually represent idler pulleys, which guide the belt.
- Tensioner Icon: The tensioner pulley is often depicted with a spring symbol, indicating its spring-loaded mechanism. It's important to know where the tensioner is located because you'll need to relieve the tension on it to remove or install the belt.
- Component Labels: Each pulley will be labeled with the name of the component it drives (e.g., ALT for alternator, P/S for power steering).
How the Serpentine System Works
The crankshaft pulley, driven by the engine's crankshaft, spins the serpentine belt. The belt, in turn, wraps around and drives the pulleys of the various accessories. The tensioner pulley applies constant pressure to the belt, maintaining the necessary tension to prevent slippage. When the engine is running, the serpentine belt is constantly rotating, powering all the accessories simultaneously. A worn or damaged belt, a faulty tensioner, or a seized accessory pulley can disrupt this system, leading to performance issues or complete accessory failure.
Real-World Use: Basic Troubleshooting
Here are some common problems and how the diagram can help:
- Squealing Noise: A squealing noise often indicates a slipping belt. The diagram can help you identify the tensioner pulley. Check the tensioner to see if it's functioning correctly. If the tensioner is weak, it may not be providing enough tension on the belt. Also, inspect the belt for signs of wear, cracking, or glazing.
- Accessory Failure: If an accessory (e.g., AC compressor) stops working, the diagram can help you isolate the problem. Check the belt routing to ensure the belt is properly engaged with the accessory's pulley. Also, check the pulley itself to make sure it's spinning freely. A seized pulley can cause the belt to slip or break.
- Belt Breaking: A broken belt can be caused by several factors, including a worn belt, a faulty tensioner, or a seized accessory pulley. The diagram can help you identify the cause of the problem. Inspect all the pulleys for signs of damage or misalignment.
Troubleshooting Steps:
- Visual Inspection: Start by visually inspecting the belt for wear, cracks, or missing ribs. Also, check the pulleys for damage or misalignment.
- Tension Check: Check the tension of the belt. The belt should feel firm but not excessively tight. A loose belt can slip, while an overly tight belt can put excessive strain on the accessories.
- Pulley Spin Test: With the engine off, try spinning each accessory pulley by hand. They should spin freely without any binding or resistance.
- Alignment Check: Use a straight edge to check the alignment of the pulleys. Misaligned pulleys can cause the belt to wear prematurely and make noise.
Safety Considerations
The serpentine belt system operates while the engine is running, so it's crucial to take safety precautions:
- Never work on the serpentine belt system with the engine running.
- Disconnect the negative battery cable before working on any electrical components.
- Be aware of the rotating components. Keep your hands and tools clear of the belt and pulleys when the engine is running.
- The tensioner pulley is spring-loaded and can snap back forcefully. Use the correct tools and techniques to relieve the tension on the belt. Most tensioners have a square hole where you can insert a breaker bar or tensioner tool to relieve the tension.
- Hot components! The engine and exhaust components can get very hot. Allow the engine to cool down before working on the serpentine belt system.
Risky Components: The tensioner pulley and the crankshaft pulley are particularly risky. The tensioner can snap back with significant force if released improperly, and the crankshaft pulley is directly connected to the engine's rotation, posing a severe entanglement hazard if the engine is accidentally started.
By understanding the diagram, you can save yourself time, money, and frustration when dealing with serpentine belt issues on your 2004 Pontiac Grand Prix. Remember to consult your vehicle's service manual for specific instructions and torque specifications.
We have a downloadable version of the 2004 Pontiac Grand Prix Serpentine Belt Diagram available for your convenience. This diagram will provide you with a clear and detailed reference for your maintenance and repair tasks. Happy wrenching!