
05 Honda Odyssey Serpentine Belt Diagram
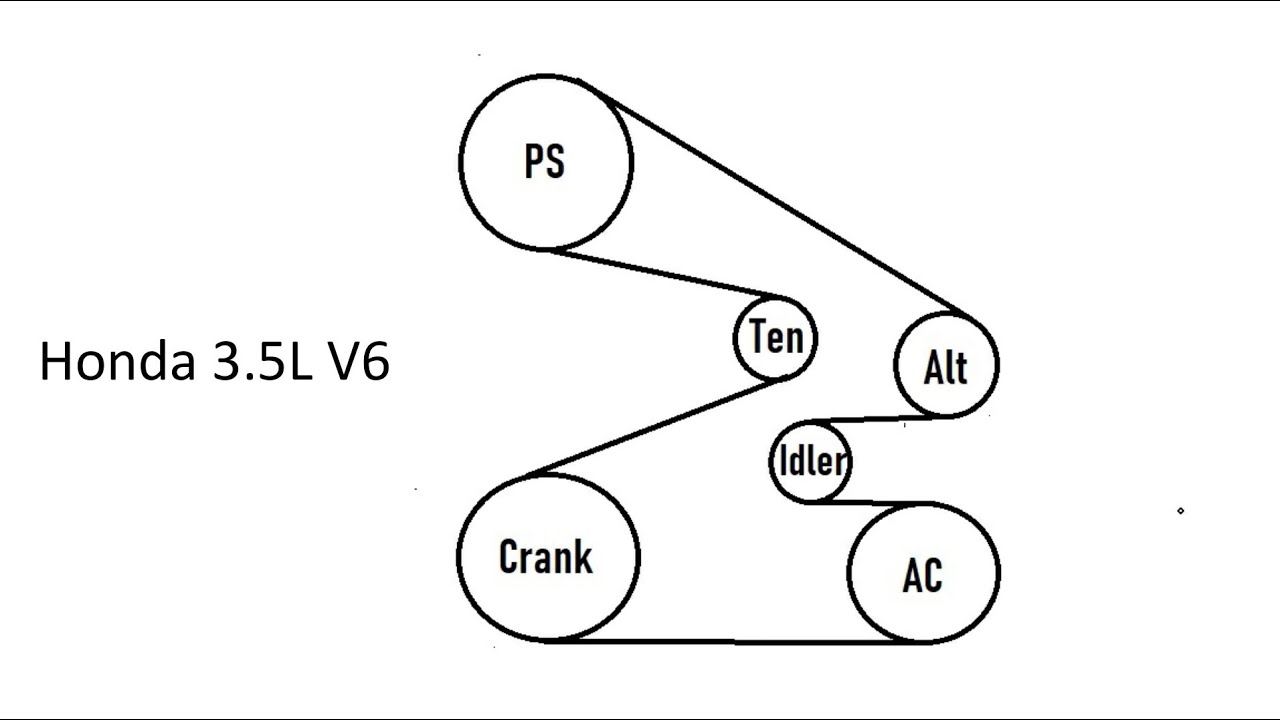
Let's dive into the serpentine belt system of a 2005 Honda Odyssey. Understanding this system and having the correct diagram is crucial for maintenance, troubleshooting, and repairs. This isn't just about swapping a belt; it's about ensuring your van runs smoothly and reliably. We're going to cover the diagram in detail, so you can confidently tackle this common repair.
Why You Need the Serpentine Belt Diagram
The serpentine belt diagram is more than just a pretty picture; it's your roadmap for navigating the belt routing in your 2005 Honda Odyssey. It's essential for several reasons:
- Belt Replacement: When replacing a worn or damaged serpentine belt, the diagram ensures you route the new belt correctly. Incorrect routing can lead to belt slippage, component failure, and potentially serious engine damage.
- Troubleshooting: If you're experiencing squealing noises, power steering issues, or AC problems, the diagram helps you identify which components are driven by the belt and pinpoint potential sources of the problem.
- Preventative Maintenance: Familiarizing yourself with the belt routing allows you to visually inspect the belt and associated pulleys for wear and tear during routine maintenance.
- Understanding System Function: Even if you’re not actively repairing the system, understanding how the belt connects different components gives you insight into your engine's overall operation.
Key Specs and Main Parts
Before we examine the diagram, let's identify the key components and their approximate locations within the 2005 Honda Odyssey's engine bay:
- Crankshaft Pulley: The heart of the system. Connected directly to the crankshaft, it's the driving force behind the serpentine belt.
- Alternator Pulley: Driven by the serpentine belt, the alternator generates electrical power to charge the battery and run the electrical components.
- Power Steering Pump Pulley: Provides hydraulic pressure for the power steering system, making steering easier.
- Air Conditioning Compressor Pulley: Engages when the AC is turned on, compressing refrigerant to cool the cabin.
- Idler Pulleys: Smooth, non-driven pulleys that guide the belt and maintain proper tension.
- Tensioner Pulley: A spring-loaded pulley that automatically adjusts to maintain consistent belt tension. This is critical for proper system function.
- Water Pump Pulley: While the 2005 Honda Odyssey's water pump is driven by the timing belt, and not the serpentine belt, it's important to differentiate these systems.
The 2005 Honda Odyssey uses a single serpentine belt to drive these accessories. The specific length of the belt can vary slightly depending on the exact engine configuration, but it’s generally around 85-86 inches. Always consult your vehicle's owner's manual or a parts catalog to confirm the correct belt length for your specific model.
Decoding the Serpentine Belt Diagram Symbols
A good serpentine belt diagram isn't just a drawing; it's a communication tool. Let’s break down the common symbols you'll encounter:
- Solid Lines: Represent the belt itself. The thicker the line, typically, the easier it is to see, but thickness doesn't have specific meaning.
- Arrows: Indicate the direction of belt travel. This is extremely important because the belt must be routed in the correct direction around each pulley.
- Pulleys: Represented as circles or discs. Each pulley will usually be labeled with an abbreviation indicating its function (ALT for alternator, P/S for power steering, AC for air conditioning, etc.).
- Tensioner: Usually shown with a spring symbol or an arrow indicating the direction the tensioner arm moves to relieve tension for belt removal. The location of the tensioner is vital for belt replacement.
- Smooth Pulleys vs. Grooved Pulleys: The diagram should differentiate between smooth (idler) pulleys and grooved pulleys (driven components). The belt runs on the smooth side of idler pulleys and in the grooves of the driven pulleys.
- Dotted Lines (Sometimes): May indicate the path of the belt behind other components, providing a visual representation of the full route.
How the Serpentine Belt System Works
The serpentine belt system is a relatively simple, yet crucial system. The crankshaft pulley, driven by the engine's rotation, turns the serpentine belt. This belt then transmits rotational force to the various accessory pulleys. The tensioner maintains the appropriate amount of tension on the belt, preventing slippage and ensuring efficient power transfer to each component. Insufficient tension leads to squealing and reduced performance of the driven accessories. Excessive tension can damage the belt and the bearings in the pulleys.
The accessories powered by the belt are essential for vehicle operation: the alternator charges the battery, the power steering pump provides assist, and the AC compressor cools the cabin. A malfunctioning serpentine belt system can therefore lead to a variety of issues, from a dead battery to a loss of power steering or AC.
Real-World Use: Basic Troubleshooting Tips
Here are some common problems and how the diagram can help you diagnose them:
- Squealing Noise: Often caused by a loose or worn belt. Use the diagram to check the tensioner's operation. Is it moving freely and maintaining adequate tension? Also, visually inspect the belt for cracks, fraying, or glazing. Glazing refers to a hardened, shiny surface on the belt that reduces its grip.
- Power Steering Failure: If the power steering suddenly stops working, check the belt. Has it snapped? Is it slipping on the power steering pump pulley? The diagram confirms that the power steering pump is indeed driven by the serpentine belt.
- AC Not Working: Similar to power steering, check the belt and the AC compressor pulley. Is the pulley spinning when the AC is turned on? If not, the compressor might be seized, or the belt might be slipping.
- Alternator Not Charging: Check the belt's condition and its routing to the alternator pulley. A loose or damaged belt can prevent the alternator from generating sufficient power. Use a multimeter to check the alternator's output.
- Visual Inspection: Use the diagram to guide your visual inspection of the belt and pulleys. Look for signs of wear, damage, or misalignment. Misalignment can cause the belt to wear unevenly and eventually fail.
Safety Precautions
Working on the serpentine belt system can be hazardous if proper precautions aren't taken:
- Disconnect the Battery: Always disconnect the negative battery terminal before working on any electrical components.
- Hot Engine: Never work on the serpentine belt system when the engine is hot. Allow the engine to cool completely before proceeding.
- Moving Parts: Keep your hands, hair, and clothing away from the belt and pulleys when the engine is running. The spinning pulleys can cause serious injury.
- Tensioner Release: Use the correct tool to release the tension on the belt tensioner. Improperly releasing the tension can cause the tool to slip and potentially injure you.
- Eye Protection: Wear safety glasses to protect your eyes from debris.
The 2005 Honda Odyssey's serpentine belt system is a critical component of your vehicle's operation. By understanding the diagram, its components, and potential issues, you can confidently perform maintenance and repairs, saving money and ensuring reliable performance. Remember to always consult your vehicle's service manual for specific instructions and torque specifications.
We have the complete serpentine belt diagram for the 2005 Honda Odyssey available for download. This will give you a detailed visual guide to refer to as you work on your vehicle.