05 Nissan Altima 2.5 Belt Diagram
Alright, let's dive into the serpentine belt system of your 2005 Nissan Altima 2.5L. Understanding this system and having a clear belt diagram is crucial for maintaining your engine's performance and preventing costly breakdowns. Whether you're planning a routine belt replacement, diagnosing a squealing noise, or just expanding your automotive knowledge, this guide will provide the necessary information to navigate the serpentine belt system confidently.
Purpose of the 2005 Nissan Altima 2.5L Serpentine Belt Diagram
The serpentine belt diagram serves as a visual roadmap for routing the serpentine belt around various engine accessories. Without a diagram, replacing the belt becomes a guessing game, potentially leading to incorrect routing. Incorrect routing can cause accessories like the alternator, power steering pump, and air conditioning compressor to malfunction or even fail completely. The diagram is indispensable for:
- Belt Replacement: The most obvious use – ensuring the new belt is installed exactly as the old one.
- Troubleshooting: Identifying which accessory is driven by which part of the belt can help pinpoint the source of noises or accessory failures.
- General Maintenance: Familiarizing yourself with the system's layout.
- Understanding Engine Operation: Seeing how accessories are mechanically linked to the engine's crankshaft.
Key Specs and Main Parts of the Serpentine Belt System
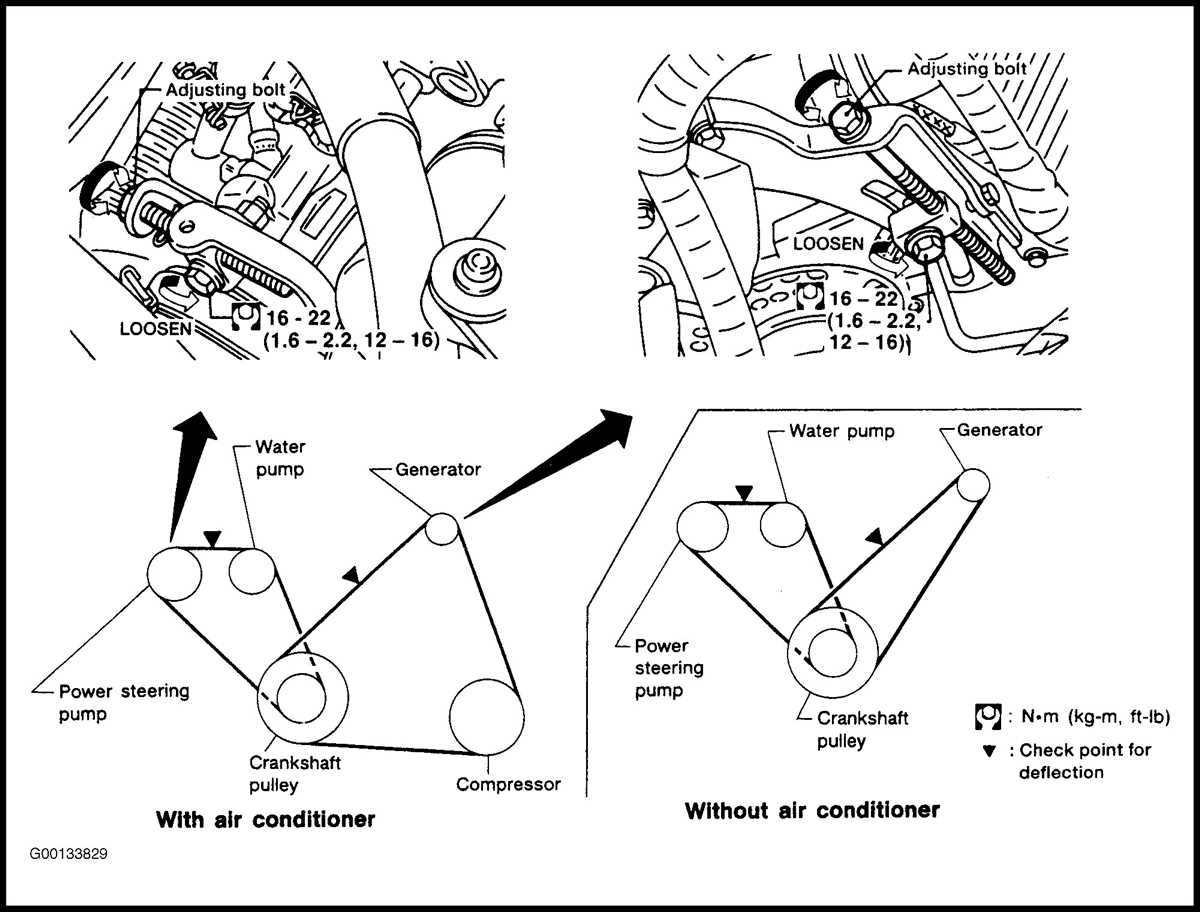
The 2005 Nissan Altima 2.5L uses a single, long serpentine belt to drive several key engine accessories. Here's a breakdown of the major components:
- Crankshaft Pulley (Damper): Located at the bottom of the engine, this pulley is directly connected to the crankshaft and provides the rotational power for the entire system.
- Alternator Pulley: The alternator generates electrical power for the vehicle. The serpentine belt turns the alternator's rotor.
- Power Steering Pump Pulley: Provides hydraulic pressure to assist in steering.
- Air Conditioning Compressor Pulley: Compresses refrigerant to provide cooling for the cabin. It only engages when the A/C is turned on, via the compressor clutch.
- Idler Pulley(s): Smooth, bearing-mounted pulleys that guide the belt and maintain optimal tension, ensuring the belt runs smoothly and avoids obstructions.
- Tensioner Pulley: This is a spring-loaded pulley that automatically maintains the correct tension on the serpentine belt. It's critical for proper operation and belt longevity. Failing to properly relieve tension on the tensioner pulley during belt removal or installation can lead to damage to the tensioner or even the engine.
- Serpentine Belt: A long, multi-ribbed belt made of reinforced rubber, designed to withstand high speeds and temperatures. The belt material is crucial for durability and preventing slippage. Check the belt periodically for cracks, fraying, or glazing.
Serpentine Belt Diagram Symbols and Conventions
Understanding the symbols used in a serpentine belt diagram is key to interpreting it accurately. Here's a common breakdown:
- Solid Lines: Represent the path of the outer surface of the belt.
- Dotted Lines: Often indicate the path of the inner (ribbed) surface of the belt. This helps show how the belt wraps around pulleys.
- Arrows: Indicate the direction of rotation for each pulley. This is important for ensuring the belt is routed correctly.
- Component Symbols: Each accessory (alternator, power steering pump, etc.) is typically represented by a simplified icon or symbol resembling its physical appearance.
- Text Labels: Each component is clearly labeled with its name (e.g., "ALT" for alternator, "P/S" for power steering).
- Color Coding (Less Common): Some diagrams might use different colors to highlight specific sections of the belt path or to differentiate between different components. However, most standard diagrams rely on line styles and labels.
How the Serpentine Belt System Works
The serpentine belt system is a relatively straightforward but critical part of your engine. The crankshaft pulley, driven directly by the engine's crankshaft, is the primary source of power. As the crankshaft rotates, it spins the serpentine belt, which, in turn, drives all the connected accessory pulleys. The tensioner pulley maintains consistent tension on the belt, preventing slippage and ensuring efficient power transfer. Without proper tension, the belt can slip, causing reduced performance from the accessories and potentially leading to overheating or other damage.
The order in which the belt wraps around the pulleys is carefully designed to optimize the angle of wrap on each pulley. A greater angle of wrap increases the friction between the belt and the pulley, improving power transfer and reducing the risk of slippage. Idler pulleys are strategically placed to maximize these angles and guide the belt along the optimal path.
Real-World Use and Basic Troubleshooting
Here are some practical tips for using the serpentine belt diagram in real-world scenarios:
- Squealing Noise: A common symptom of a worn or loose serpentine belt is a high-pitched squealing noise, especially during cold starts or acceleration. Inspect the belt for cracks, glazing (a shiny, smooth surface), or missing ribs. Also, check the tensioner pulley for proper operation. If it feels loose or wobbly, it may need to be replaced.
- Accessory Malfunction: If you notice that your alternator isn't charging correctly, your power steering is difficult to use, or your A/C isn't blowing cold air, the serpentine belt might be slipping or broken. Check the belt's condition and tension.
- Belt Replacement Procedure: Before removing the old belt, carefully study the diagram and note the exact routing. Take a picture for reference. Use a wrench or socket to relieve the tension on the tensioner pulley, allowing you to remove the old belt. Install the new belt, ensuring it's properly seated on all the pulleys, and then release the tensioner. Double-check the routing against the diagram before starting the engine.
- Visual Inspection: Regularly inspect the belt for signs of wear and tear. Look for cracks, fraying, missing ribs, and glazing. Replace the belt if you notice any of these issues. A good rule of thumb is to replace the serpentine belt every 50,000 to 75,000 miles, or as recommended in your owner's manual.
Safety Precautions
Working on the serpentine belt system can be dangerous if you're not careful. Here are some important safety precautions:
- Disconnect the Battery: Always disconnect the negative battery terminal before working on any electrical components. This will prevent accidental shorts and electric shocks.
- Engine Off and Cool: Never work on the serpentine belt system with the engine running or while it's still hot. Allow the engine to cool down completely before starting any work.
- Keep Fingers Clear: Be extremely careful when working near moving parts, especially the crankshaft pulley and the tensioner pulley. Keep your fingers and hands clear of these areas to avoid injury.
- Eye Protection: Wear safety glasses or goggles to protect your eyes from debris.
- Understand the Tensioner: The spring-loaded tensioner can snap back forcefully if released improperly. Use the correct tool (usually a wrench or socket) and apply controlled pressure to relieve the tension. Never attempt to remove or install the belt without properly relieving the tension.
The crankshaft pulley and the tensioner pulley are the most potentially dangerous components. The crankshaft pulley rotates at high speed when the engine is running, and the tensioner pulley can snap back forcefully if mishandled. Use extreme caution when working near these components.
By understanding the serpentine belt system and following these guidelines, you can confidently maintain your 2005 Nissan Altima 2.5L's engine and prevent costly repairs. Remember to always prioritize safety and consult the service manual for specific instructions and torque specifications.
For your convenience, we have a detailed, high-resolution 2005 Nissan Altima 2.5L serpentine belt diagram available for download. This diagram provides a clear and accurate visual representation of the belt routing, making it easier to perform belt replacements and troubleshoot issues. With this resource at your fingertips, you'll be well-equipped to keep your Altima running smoothly.