05 Nissan Sentra Fuse Box Diagram
Alright, let's dive into the fuse box diagram for your 2005 Nissan Sentra. This isn't just some piece of paper; it's a critical resource for diagnosing electrical issues, performing modifications, and generally understanding how your car's electrical system ticks. Whether you're chasing a blown fuse causing a malfunctioning radio or planning to add aftermarket accessories, knowing your way around this diagram is essential.
Purpose of the Fuse Box Diagram
Think of the fuse box diagram as a roadmap for your car's electrical circuits. Its primary purpose is threefold:
- Identification: It allows you to quickly identify which fuse corresponds to a specific electrical component (lights, wipers, radio, etc.). No more guessing!
- Troubleshooting: When a circuit malfunctions, the diagram helps you pinpoint the potential culprit – a blown fuse. This saves time and prevents you from needlessly replacing parts.
- Modification: If you're adding aftermarket accessories like a new stereo system or auxiliary lights, the diagram helps you find suitable circuits to tap into, ensuring proper wiring and preventing overloads.
Key Specs and Main Parts
The 2005 Nissan Sentra, like most vehicles, has multiple fuse boxes. The two most common locations are:
- Interior Fuse Box: Located, in most Sentras, under the dashboard on the driver's side (sometimes behind a small access panel). This box primarily houses fuses for interior components like the radio, lights, and power windows.
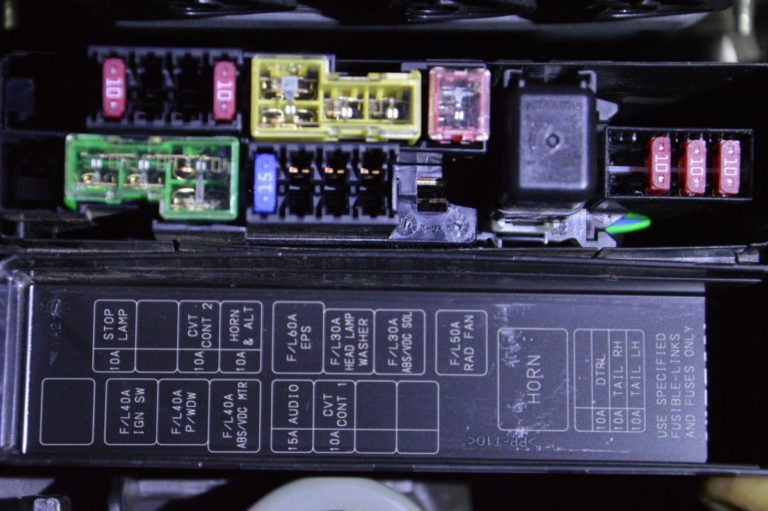
- Engine Compartment Fuse Box: Typically found near the battery in the engine bay. This one handles fuses for engine management systems, headlights, and other critical under-the-hood components.
Key components you'll find in the diagram include:
- Fuses: These are sacrificial devices designed to protect electrical circuits from overcurrent. They consist of a thin wire or strip that melts and breaks the circuit when the current exceeds a predetermined level. Different fuses are rated for different amperages (e.g., 5A, 10A, 15A, 20A, 30A).
- Relays: Relays are electromagnetic switches that allow a low-current circuit to control a high-current circuit. They are often used to power components like headlights, horns, and fuel pumps. The diagram will show their location within the fuse box.
- Circuit Breakers: Some circuits might use circuit breakers instead of fuses. Circuit breakers are resettable protection devices. They trip (open the circuit) when overloaded, but can be reset once the overload is removed.
It's crucial to have the correct diagram for your specific Sentra model year (2005). While variations between sub-models are usually minor, they can affect the fuse assignments. Double-check the diagram matches the fuse box layout in your car.
Understanding the Symbols
Fuse box diagrams use a variety of symbols to represent different components and their functions. Here's a breakdown of common symbols:
- Lines: Lines indicate the electrical connections between components. Thicker lines usually represent higher current-carrying capacity. Dotted lines might indicate ground connections.
- Rectangles: Rectangles typically represent fuses. The amperage rating is usually written inside or next to the rectangle.
- Circles/Squares with Internal Symbols: These represent various components. A circle with a zig-zag line might represent the horn, while a square with a lightbulb symbol represents the headlights. Always refer to the diagram's legend for specific symbol definitions.
- Colors: Color-coding can be used to indicate the function of a circuit. For example, red might indicate a circuit powered directly from the battery, while blue might indicate a circuit that's switched on by the ignition. However, color-coding is not always consistent, so rely primarily on the component label.
- Relay Symbols: Relays are often represented by a square with a coil symbol inside, along with switch contacts. The diagram will show which components the relay controls.
The legend accompanying the diagram is essential. It decodes the symbols and abbreviations used. Without it, interpreting the diagram can be difficult.
How It Works: The Electrical Flow
The fuse box diagram illustrates the path of electricity through various circuits in your car. Power flows from the battery, through the fuse box, and then to the individual components. The fuses act as bottlenecks in these circuits. If a component draws excessive current (due to a short circuit or malfunction), the corresponding fuse blows, interrupting the flow of electricity and preventing damage to the component and the wiring harness. This simple mechanism protects the entire electrical system.
Relays are used to control high-current circuits. A low-current signal from a switch (e.g., the headlight switch) activates the relay, which then closes a high-current circuit to power the headlights. This prevents the headlight switch from having to handle a large current, which could damage it.
Real-World Use: Basic Troubleshooting
Let's say your cigarette lighter (or accessory power outlet) isn't working. Here's how you'd use the fuse box diagram to troubleshoot:
- Locate the Diagram: Keep a copy of the diagram in your glove compartment or consult a digital version.
- Identify the Fuse: Find the fuse labeled "Cigarette Lighter" or "Accessory Power Outlet" on the diagram. Note its location and amperage rating.
- Inspect the Fuse: Locate the corresponding fuse in the fuse box. Use a fuse puller (a small plastic tool designed for this purpose) to remove the fuse.
- Check for Damage: Visually inspect the fuse. If the wire inside the fuse is broken or blackened, the fuse is blown.
- Replace the Fuse: Replace the blown fuse with a new fuse of the same amperage rating. Never use a fuse with a higher amperage rating, as this could damage the circuit.
- Test the Circuit: Turn on the ignition and test the cigarette lighter to see if it's working.
- Further Investigation: If the fuse blows again immediately, there's likely a short circuit in the wiring or the component itself. Further diagnostics are required, potentially involving a multimeter and wiring diagrams.
Safety First!
Working with electrical systems can be dangerous. Here are some safety precautions:
- Disconnect the Battery: Before working on any electrical circuit, disconnect the negative (-) terminal of the battery. This will prevent accidental short circuits and electric shock.
- Use Proper Tools: Use insulated tools to avoid electrical shock.
- Never Bypass Fuses: Never bypass a fuse by using a piece of wire or other conductive material. This can overload the circuit and cause a fire.
- Identify High-Voltage Components: Be extremely careful when working near high-voltage components, such as the ignition coil and the alternator. These components can deliver a dangerous shock even with the battery disconnected.
- When in Doubt, Consult a Professional: If you're not comfortable working on electrical systems, take your car to a qualified mechanic. Electrical problems can be complex and dangerous to diagnose and repair.
Important Note: Always consult the 2005 Nissan Sentra's owner's manual for specific information about fuse box locations and fuse assignments. Manuals are the single best source to confirm the proper information for the vehicle.
We have a high-resolution version of the 2005 Nissan Sentra fuse box diagram available for download. This will provide you with a clear and detailed visual reference for your troubleshooting and modification projects.