05 Nissan Titan Fuse Box Diagram
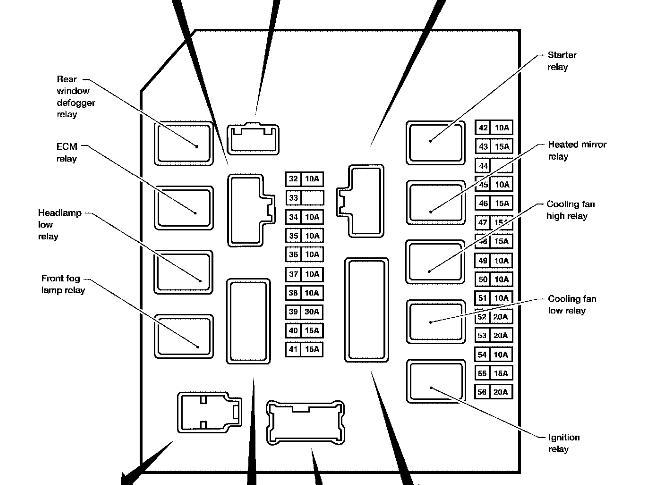
Alright, let's dive into the fuse box diagram for your 2005 Nissan Titan. If you're anything like me, you appreciate understanding how your vehicle's electrical system functions, whether you're diagnosing a faulty tail light, planning an aftermarket accessory installation, or simply trying to avoid a costly trip to the mechanic. This diagram is your roadmap to the Titan's electrical heart. We have the complete file, and you can download the diagram [link would be inserted here] at your convenience.
Purpose: Why a Fuse Box Diagram Matters
A fuse box diagram isn't just a pretty picture; it's a crucial tool. Think of it as a Rosetta Stone for your truck's electrical system. It serves several essential purposes:
- Troubleshooting Electrical Issues: When something electrical goes haywire – a power window stops working, the radio goes silent, or a turn signal refuses to blink – the fuse box is one of the first places you should check. The diagram allows you to quickly identify the specific fuse protecting that circuit.
- Installing Aftermarket Accessories: Planning to add a winch, upgraded stereo, or auxiliary lights? The diagram helps you locate suitable power sources and, more importantly, choose the correct fuse rating to protect your new accessories and the existing vehicle wiring.
- Preventing Further Damage: A blown fuse is a symptom, not the disease. Repeatedly replacing a blown fuse without addressing the underlying issue can lead to more severe electrical problems, potentially damaging components or even causing a fire. The diagram helps you understand the circuit's purpose and trace the fault.
- General Understanding: Even if you don't have a problem, studying the fuse box diagram gives you a better understanding of your Titan's electrical architecture. This knowledge is invaluable for preventative maintenance and informed decision-making regarding vehicle modifications.
Key Specs and Main Parts of the 2005 Titan Fuse Box
The 2005 Nissan Titan typically has two primary fuse box locations:
- Interior Fuse Box: Located inside the cabin, usually under the dashboard on the driver's side or behind a small access panel. This fuse box primarily protects circuits related to interior components like the radio, climate control, power windows, interior lights, and the instrument cluster.
- Engine Compartment Fuse Box: Found under the hood, often near the battery or the engine's firewall. This fuse box handles high-current circuits related to engine management, headlights, taillights, the anti-lock braking system (ABS), and other critical vehicle systems.
Key Components:
- Fuses: The heart of the protection system. Fuses are designed to interrupt a circuit when the current exceeds a predetermined level, protecting the wiring and components from damage. They are rated in amperes (amps), indicating the maximum current they can safely handle. The 2005 Titan uses a mix of blade-type fuses, typically ATO/ATC (standard blade) and mini-blade fuses.
- Relays: Electrically operated switches that control high-current circuits using a low-current signal. Relays are used for components like headlights, the starter motor, and the fuel pump. Identifying the correct relay is vital for diagnosing problems with these systems.
- Fuse Puller: A small plastic tool (often integrated into the fuse box cover) used to safely remove fuses without damaging them or the fuse box terminals. Always use a fuse puller; pliers can damage the fuse box.
- Fuse Box Cover/Diagram: The cover itself often has a printed or labeled diagram showing the location and function of each fuse and relay. This is the primary reference source.
Understanding Fuse Box Diagram Symbols
Fuse box diagrams use a variety of symbols, lines, and colors to represent different components and circuits. Here's a breakdown of the most common:
- Lines: Solid lines generally represent wires or conductive paths. Dashed lines may indicate ground connections or signal paths.
- Colors: While the diagram itself might not be in color, specific color codes often refer to the color of the actual wire in the vehicle's harness. Common colors include red (typically power), black (ground), and various other colors for different circuits. Refer to a wiring diagram alongside the fuse box diagram for color-specific information.
- Fuse Symbols: Fuses are usually represented by a simple rectangular or square shape with a number indicating the amperage rating (e.g., "10A" for a 10-amp fuse).
- Relay Symbols: Relays are typically depicted as a square or rectangle with connecting terminals and a coil symbol. The diagram might indicate the type of relay (e.g., SPDT – Single Pole Double Throw).
- Component Symbols: Other symbols may represent specific components, such as lights, motors, or sensors. These symbols are often standardized across automotive diagrams. The legend on the diagram will define those symbols for that diagram.
How It Works: The Fuse Protection System
The fuse protection system is based on a simple principle: a fuse is a sacrificial component designed to break the circuit if the current exceeds its rating. When an overcurrent condition occurs (e.g., a short circuit or a component drawing excessive power), the fuse element melts, opening the circuit and preventing further damage. Think of it as a weak link in a chain, strategically placed to protect the rest of the system.
Relays play a different role. They allow a low-current circuit (e.g., a switch on the dashboard) to control a high-current circuit (e.g., the headlights). When the low-current circuit is activated, it energizes the relay coil, which then closes the relay contacts, allowing current to flow through the high-current circuit.
Real-World Use: Basic Troubleshooting Tips
Here's a simple troubleshooting procedure using the fuse box diagram:
- Identify the Problem: Determine which component or system is malfunctioning.
- Consult the Diagram: Locate the fuse or relay associated with the malfunctioning component in the fuse box diagram.
- Inspect the Fuse: Use the fuse puller to remove the fuse. Visually inspect the fuse element. If the element is broken or blackened, the fuse is blown.
- Test the Fuse (Optional): For a more definitive test, use a multimeter set to continuity mode. Place the probes on each end of the fuse. If the multimeter shows continuity (a reading close to zero ohms), the fuse is good. If there's no continuity, the fuse is blown.
- Replace the Fuse: Replace the blown fuse with a new fuse of the exact same amperage rating. Never use a fuse with a higher amperage rating; this could bypass the protection and lead to serious damage.
- Test the System: After replacing the fuse, test the component or system to see if it's working correctly.
- If the Fuse Blows Again: If the new fuse blows immediately or shortly after being replaced, there's a more serious underlying problem in the circuit. This could be a short circuit, a faulty component, or damaged wiring. Further investigation is required.
Safety Precautions
Working with electrical systems can be dangerous. Here are some important safety precautions:
- Disconnect the Battery: Whenever possible, disconnect the negative terminal of the battery before working on the electrical system. This reduces the risk of accidental short circuits and electrical shocks.
- Work in a Well-Lit Area: Good visibility is essential to avoid mistakes.
- Use the Right Tools: Always use the correct tools for the job, especially a fuse puller. Avoid using pliers or other tools that could damage the fuse box.
- Never Bypass Fuses: Bypassing a fuse by inserting a wire or other conductive material is extremely dangerous and can lead to electrical fires.
- High-Current Components: Be especially cautious around high-current components like the starter motor, alternator, and battery. These components can deliver a significant electrical shock.
- Don't Work Alone: If you're not comfortable working on electrical systems, seek the help of a qualified mechanic.
Understanding the 2005 Nissan Titan fuse box diagram is an important step in maintaining and modifying your vehicle. By following these guidelines and taking the necessary safety precautions, you can confidently troubleshoot electrical issues and enhance your understanding of your truck's electrical system. Remember, the file we discussed is available for download [link would be inserted here], providing you with a convenient reference guide for your future projects. Happy wrenching!