07 Camry 2007 Toyota Camry Fuse Box Diagram
Hey gearheads! Let's dive deep into the 2007 Toyota Camry's fuse box diagram. Whether you're tackling a pesky electrical issue, adding aftermarket accessories, or just expanding your automotive knowledge, understanding this diagram is absolutely crucial. This guide is designed for intermediate DIYers like you, breaking down the complexities into manageable, understandable chunks. We'll cover everything from the symbols to real-world troubleshooting, making you a fuse box pro in no time.
Why This Diagram Matters: Your Electrical Roadmap
The fuse box diagram is essentially the roadmap to your Camry's electrical system. Without it, you're navigating blindly. Here's why it's so important:
- Troubleshooting Electrical Problems: When a circuit malfunctions (e.g., your radio suddenly dies), the fuse box is the first place to look. The diagram helps you pinpoint the correct fuse associated with that circuit.
- Safe Modifications: Adding aftermarket components like lights, amplifiers, or remote starters requires tapping into the electrical system. The diagram ensures you choose the correct circuit and fuse size to avoid overloading and potential damage.
- Preventing Major Damage: A blown fuse is a safety mechanism. It sacrifices itself to protect more expensive components. Understanding the diagram helps you replace fuses with the correct amperage, preventing further damage from overcurrent.
- Understanding Your Car: Even if you're not actively working on your car, knowing how the electrical system is organized gives you a deeper understanding of its inner workings.
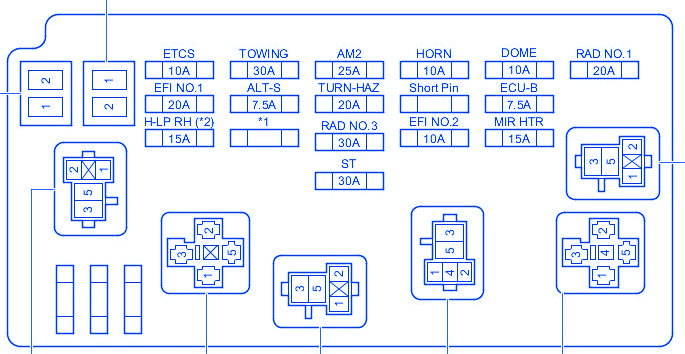
Key Specs and Main Parts of the Fuse Box
The 2007 Camry typically has two fuse boxes: one located in the engine compartment and another under the dashboard (usually on the driver's side). Knowing the location of each is the first crucial step.
Engine Compartment Fuse Box
This fuse box generally houses fuses and relays that protect high-current circuits, such as:
- Headlights: High and low beams.
- Starting System: Starter motor, ignition system.
- Cooling System: Radiator fan motor.
- ABS (Anti-lock Braking System): ABS pump and control module.
- Power Windows & Door Locks: Main power for these systems.
Interior Fuse Box
The interior fuse box protects lower-current circuits, including:
- Radio/Infotainment System: Head unit, speakers, amplifier (if equipped).
- Interior Lights: Dome light, map lights.
- Cigarette Lighter/Power Outlets: Auxiliary power sources.
- Instrument Panel: Gauges, indicators.
- ECU (Engine Control Unit): The "brain" of the engine. Note that some ECU fuses might be in the engine compartment.
Key Specs: Each fuse is rated for a specific amperage (measured in Amps or "A"). This indicates the maximum current the fuse can handle before blowing. The diagram specifies the correct amperage for each fuse location. Using the wrong amperage can be dangerous, leading to electrical fires or damage to components.
Decoding the Symbols: Lines, Colors, and Icons
The fuse box diagram isn't just a collection of numbers; it's a visual language. Let's decipher some common symbols:
- Lines: Represent electrical wires or circuits. Thicker lines often indicate higher-current circuits.
- Colors: Each wire is color-coded to help trace the circuit. Common colors include red (power), black (ground), and various other colors for signal wires. Consult a wiring diagram (separate from the fuse box diagram) for a complete color code chart.
- Icons: These represent the component that the fuse protects. For example:
- Headlight icon: Protects the headlight circuit.
- Radio icon: Protects the radio circuit.
- Fan icon: Protects the fan motor circuit.
- Square with a wavy line: Represents a relay.
The diagram will usually have a legend that clearly explains each symbol. Take your time to study it. Also, be aware that there could be slight variations in fuse box configurations depending on the specific trim level and options of your 2007 Camry (LE, SE, XLE, etc.). Always refer to the diagram specific to your vehicle.
How It Works: A Basic Electrical Circuit
To truly understand the fuse box, you need to grasp the concept of an electrical circuit. A circuit is a closed loop that allows electricity to flow from a power source (the battery), through a component (like a light bulb), and back to the power source (ground). The fuse is inserted into this circuit as a sacrificial safety device.
When the current in a circuit exceeds the fuse's amperage rating (due to a short circuit or overload), the fuse's internal filament melts, breaking the circuit. This prevents excessive current from reaching the component, potentially causing damage or a fire.
Real-World Use: Basic Troubleshooting Tips
Okay, let's get practical. Here's how to use the fuse box diagram for troubleshooting:
- Identify the Problem: What's not working? Is it a headlight, the radio, or something else?
- Locate the Correct Fuse Box: Engine compartment or interior?
- Consult the Diagram: Find the fuse associated with the malfunctioning component. The diagram will show its location (fuse number) and amperage rating.
- Inspect the Fuse: Use a fuse puller (usually included in the fuse box) or a pair of needle-nose pliers to remove the fuse. Visually inspect it. A blown fuse will have a broken filament. You can also use a multimeter to test for continuity – a good fuse will have continuity (a reading of 0 ohms or a beep on most multimeters).
- Replace the Fuse: If the fuse is blown, replace it with a new fuse of the exact same amperage rating. Never use a higher amperage fuse.
- Test: After replacing the fuse, test the component to see if it's working.
- If the Fuse Blows Again: If the new fuse immediately blows, there's likely a more serious problem in the circuit, such as a short circuit. Further diagnosis is required, potentially involving checking wiring and components. Don't just keep replacing fuses!
Safety First: Handling Risky Components
Working with electricity can be dangerous. Here are some safety precautions:
- Disconnect the Battery: Before working on the fuse box, it's always a good idea to disconnect the negative battery terminal. This prevents accidental short circuits.
- Use Insulated Tools: Use insulated pliers and screwdrivers to avoid electric shock.
- Never Use a Higher Amperage Fuse: This can bypass the safety mechanism and lead to serious damage or fire.
- Be Careful Around Relays: Relays are electromechanical switches that can be sensitive. Avoid dropping or mishandling them.
- Avoid Working in Wet Conditions: Water and electricity don't mix.
Important: Certain fuses protect critical systems like the airbags and ABS. Mishandling these circuits can have serious consequences. If you're unsure about any procedure, consult a qualified mechanic.
Get Your Diagram!
You've learned a lot, but having the actual diagram is essential. We have a downloadable PDF of the 2007 Toyota Camry fuse box diagram available. It includes clear illustrations and detailed fuse descriptions. This is an invaluable resource for any DIYer working on their Camry's electrical system.
With this knowledge and the right resources, you're well-equipped to tackle many electrical issues on your 2007 Toyota Camry. Remember to always prioritize safety and consult a professional when needed.