
07 Ford Fusion Serpentine Belt Diagram
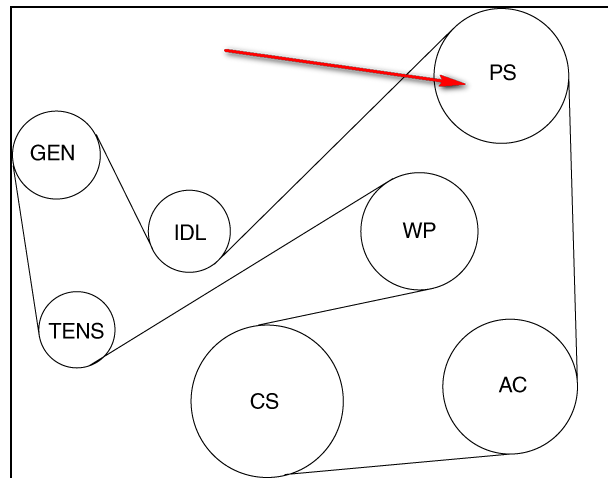
Navigating the serpentine belt system on a 2007 Ford Fusion can seem daunting, but with a good understanding of the diagram and how the system works, you can tackle many common repairs and maintenance tasks yourself. This guide will walk you through everything you need to know, from interpreting the diagram to troubleshooting common issues.
Purpose of a Serpentine Belt Diagram
A serpentine belt diagram is your roadmap to understanding the belt routing on your 2007 Ford Fusion. It's invaluable for several reasons:
- Replacement: When replacing a worn or broken serpentine belt, the diagram ensures you route the new belt correctly. Incorrect routing can lead to component failure and vehicle damage.
- Troubleshooting: If you're experiencing issues like squealing belts, power steering failure, or alternator problems, the diagram helps you identify which component is affected and understand how the belt drives it.
- Maintenance: The diagram is a handy reference when inspecting the belt and its components for wear and tear.
- Learning: Even if you're not currently working on your Fusion, understanding the serpentine belt system can increase your overall automotive knowledge.
Key Specs and Main Parts of the 2007 Ford Fusion Serpentine Belt System
The 2007 Ford Fusion came with several engine options, and the serpentine belt routing differs slightly depending on the engine. The most common engines are the 2.3L Duratec I4 and the 3.0L Duratec V6. We'll focus on the general principles that apply to both, but keep in mind that the specific routing will differ, highlighting the importance of using the correct diagram for *your* engine.
Key components driven by the serpentine belt include:
- Crankshaft Pulley: The driving force of the entire system. It's directly connected to the engine's crankshaft and transfers rotational energy to the belt.
- Alternator: Charges the battery and provides power to the electrical system when the engine is running.
- Power Steering Pump: Provides hydraulic pressure to assist in steering.
- Air Conditioning Compressor: Compresses refrigerant to cool the cabin.
- Water Pump: Circulates coolant through the engine to regulate temperature. In some configurations, the water pump is driven by the timing chain, not the serpentine belt. However, knowing the configuration is key!
- Idler Pulley(s): Smooth, non-driven pulleys that guide the belt and maintain proper tension.
- Tensioner Pulley: A spring-loaded pulley that automatically adjusts to maintain the correct belt tension. The tensioner is *critical* for proper system function and belt longevity.
The belt itself is typically a multi-ribbed, V-shaped belt made of durable rubber compounds. Specific belt length will vary depending on engine and options, so always verify the correct part number for your vehicle using a reliable parts catalog.
Understanding Serpentine Belt Diagram Symbols
Serpentine belt diagrams use a standardized set of symbols to represent components and belt routing. Here's a breakdown of what to look for:
- Solid Lines: Represent the path of the serpentine belt. Thicker lines often indicate the 'outside' of the belt, while thinner lines might be used to show the 'inside' (grooved) surface.
- Circles: Represent pulleys. These are typically labeled with abbreviations to indicate the component they're attached to (e.g., ALT for Alternator, PS for Power Steering, AC for Air Conditioning, WP for water pump).
- Arrows: Indicate the direction of belt travel around each pulley. This is crucial for ensuring correct routing.
- Text Labels: Identify each component and pulley by name or abbreviation. Also, may indicate belt specifications.
- Tensioner Symbol: The tensioner is often depicted with a spring symbol or a small arrow indicating the direction of tension. It is sometimes labeled with an unlock symbol showing the direction to apply force to release the tension to allow belt removal/installation.
- Color Coding (Less Common): Some diagrams may use color coding to differentiate sections of the belt or highlight specific components. However, most diagrams rely on line weight and text labels.
Pay close attention to the direction of the arrows and the orientation of the components in the diagram. Visualize how the belt wraps around each pulley to ensure you understand the routing.
How the Serpentine Belt System Works
The serpentine belt system is a closed-loop system powered by the crankshaft. When the engine is running, the crankshaft pulley rotates, driving the serpentine belt. The belt, in turn, drives the various components attached to it (alternator, power steering pump, AC compressor, etc.). The tensioner pulley maintains the correct belt tension, preventing slippage and ensuring efficient operation of all components.
Proper belt tension is *essential*. Too little tension can cause the belt to slip, leading to reduced performance of the driven components and premature belt wear. Too much tension can overload the bearings in the driven components and shorten their lifespan.
Real-World Use: Basic Troubleshooting Tips
Here are some common issues you might encounter and how the serpentine belt diagram can help:
- Squealing Belt: This often indicates a loose belt, worn belt, or misaligned pulley. Use the diagram to inspect the belt's routing and check the tensioner. Look for cracks, fraying, or glazing on the belt. A small amount of belt dressing *may* temporarily alleviate squealing, but it's a temporary fix for an underlying issue that needs to be addressed.
- Power Steering Failure: If the power steering suddenly stops working, check the serpentine belt to see if it's broken or slipping on the power steering pump pulley. The diagram will confirm the routing.
- Alternator Not Charging: If the battery isn't charging, the alternator may not be turning properly. Check the serpentine belt for proper routing and tension. Use a multimeter to test the alternator's output.
- Visible Belt Damage: Cracks, fraying, missing ribs, or signs of wear indicate the belt needs to be replaced. Consult the diagram to ensure correct installation.
- Unusual Noises: Grinding, rattling, or knocking noises could indicate a failing pulley bearing. Use the diagram to identify the potential source of the noise. A mechanics stethoscope can be a useful tool for pinpointing the exact location of the noise.
Safety Considerations
Working on the serpentine belt system involves several safety risks. Here are some important precautions:
- Disconnect the Battery: Before working on any electrical components, disconnect the negative battery cable to prevent accidental shocks.
- Engine Off and Cool: Never work on the serpentine belt system while the engine is running or hot. Allow the engine to cool completely before starting any repairs.
- Moving Parts: Be extremely cautious around moving parts. Keep your hands, clothing, and tools clear of the belt and pulleys while the engine is running (if you absolutely *must* run the engine to diagnose an issue).
- Spring Tension: The tensioner pulley is spring-loaded and can snap back with significant force. Use the correct tools to relieve tension safely. Often requires a special serpentine belt tool.
- Eye Protection: Wear safety glasses to protect your eyes from debris.
- Gloves: Wear gloves to protect your hands from grease, oil, and sharp edges.
- Proper Tools: Use the correct tools for the job. Using the wrong tools can damage components or cause injury.
The tensioner pulley in particular is a component to be treated with respect. Releasing the tension requires a specific procedure, and failing to follow it could lead to injury. Study the repair manual and watch instructional videos *before* attempting to release the tensioner.
We have the serpentine belt diagram file available for download. Having the correct diagram specific to your 2007 Ford Fusion engine will greatly simplify the troubleshooting and repair process. Be sure to reference it frequently during your work.