
12 Valve Cummins Serpentine Belt Diagram
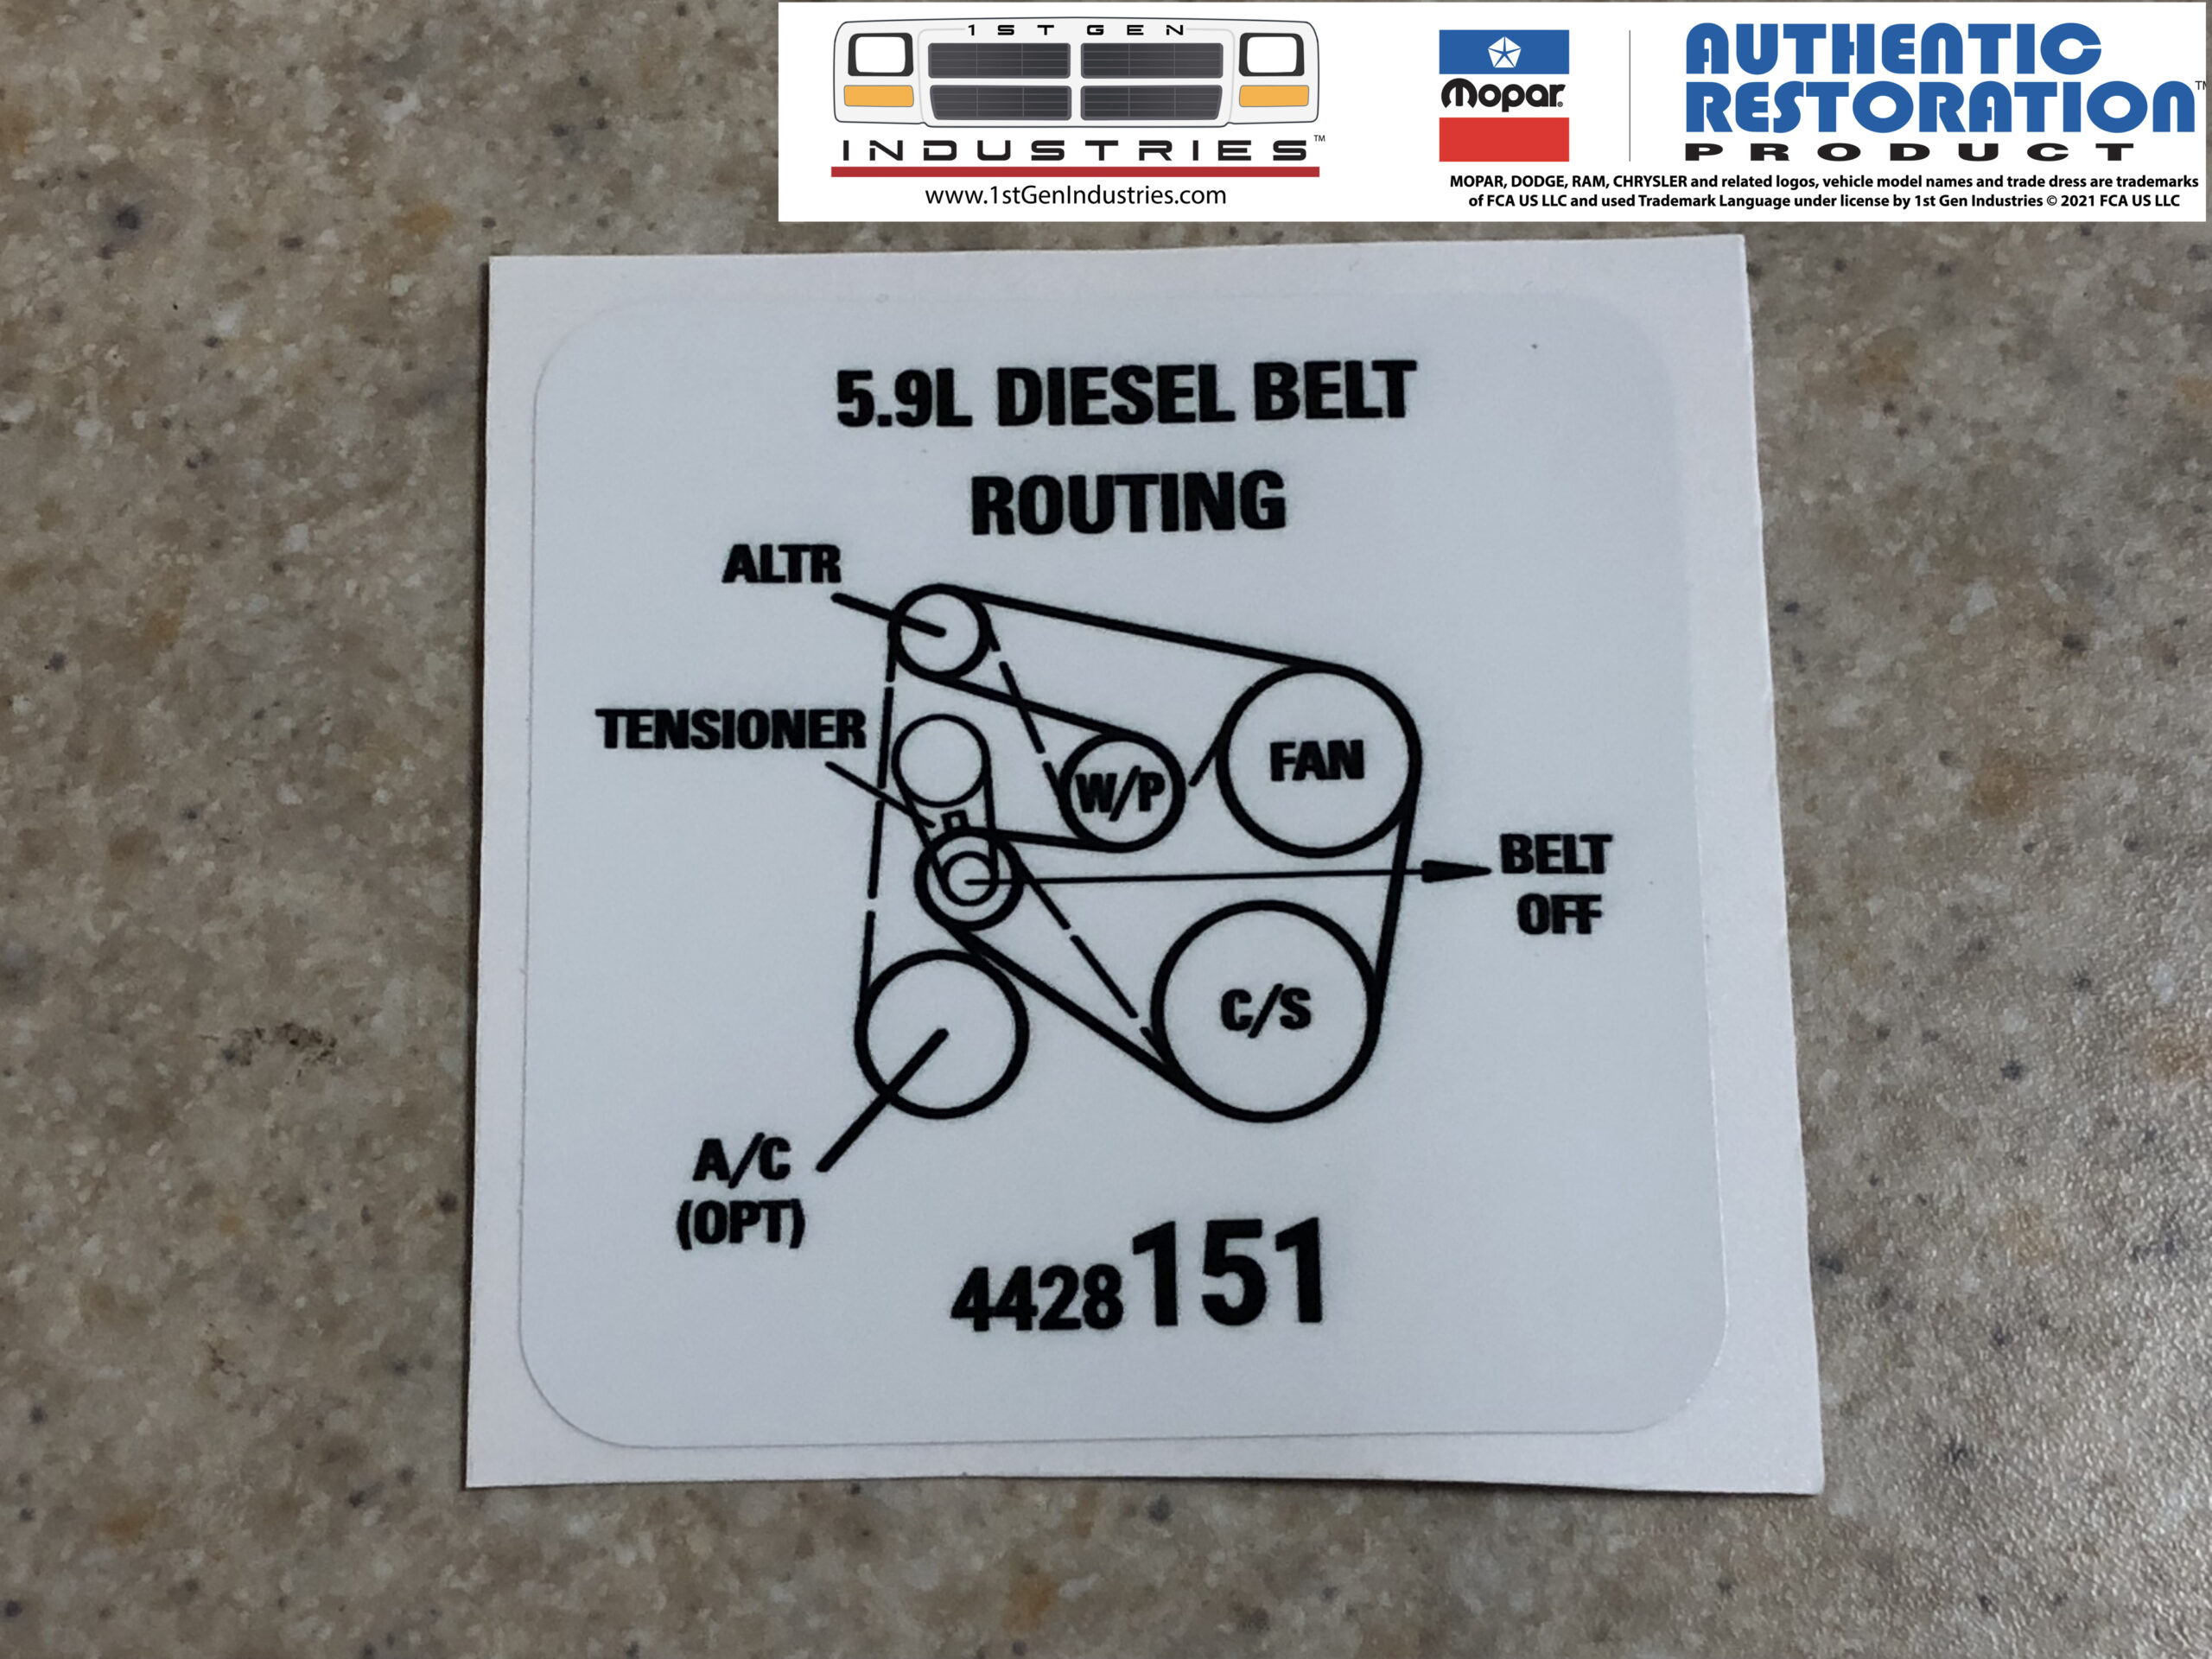
The 12-valve Cummins engine, known for its ruggedness and simplicity, is a favorite among diesel enthusiasts and those seeking reliable power. A crucial part of maintaining this engine is understanding and properly installing the serpentine belt. This article provides a detailed look at the 12-valve Cummins serpentine belt diagram, offering insights into its purpose, components, operation, and troubleshooting. Whether you're replacing a worn belt, diagnosing a squealing noise, or simply gaining a deeper understanding of your engine, this guide will equip you with the knowledge you need.
Purpose of the Serpentine Belt Diagram
The serpentine belt diagram is your roadmap for belt routing. Its primary purpose is to illustrate the correct path the serpentine belt takes around the various engine accessories. Understanding this diagram is crucial for several reasons:
- Proper Installation: Ensures the belt is routed correctly, preventing slippage, component damage, and potential engine failure.
- Maintenance & Repair: Serves as a reference during belt replacement, pulley inspection, and accessory repair.
- Troubleshooting: Helps identify potential issues based on belt condition, pulley alignment, or unusual noises.
- Understanding Engine Operation: Provides a visual representation of how the engine accessories are driven by the crankshaft.
In essence, having a clear understanding of the serpentine belt diagram saves you time, money, and potentially catastrophic engine damage. The diagram acts as a quick reference guide to ensure the belt runs through the various pulleys in the correct order.
Key Specs and Main Parts
The 12-valve Cummins serpentine belt system consists of several key components, each playing a vital role in powering the engine's accessories.
Main Components:
- Crankshaft Pulley (Harmonic Balancer): The engine's primary power source, driving the serpentine belt. It's critically important for dampening torsional vibrations.
- Alternator: Generates electrical power to charge the battery and run the vehicle's electrical systems.
- Power Steering Pump: Provides hydraulic pressure to assist with steering.
- Water Pump: Circulates coolant through the engine, preventing overheating.
- Air Conditioning Compressor (if equipped): Compresses refrigerant to cool the vehicle's cabin.
- Tensioner Pulley: Maintains proper belt tension, preventing slippage and extending belt life. The tensioner is spring-loaded and automatically adjusts to compensate for belt stretch.
- Idler Pulley: Provides a smooth path for the belt around the engine, often used to redirect the belt to avoid obstructions.
Key Specifications:
- Belt Length: The correct belt length is critical for proper tension and operation. Using the wrong length can cause slippage or premature wear. Common lengths vary depending on specific vehicle configuration, including A/C or non-A/C setups. Consult your vehicle's service manual for the correct belt length, or check the part number on the old belt.
- Belt Width: While less critical than length, using a belt with the incorrect width can also lead to issues. Refer to the manufacturer's specifications.
- Belt Material: Modern serpentine belts are typically made of EPDM (Ethylene Propylene Diene Monomer) rubber, known for its durability and resistance to heat and cracking.
Symbols and Diagram Interpretation
Understanding the symbols used in the serpentine belt diagram is essential for accurate interpretation:
- Solid Lines: Represent the path of the serpentine belt. The thickness of the line may indicate whether it shows the smooth or ribbed side of the belt.
- Arrows: Indicate the direction of belt rotation. Crucial for ensuring the belt is routed correctly.
- Circles/Pulleys: Represent the various pulleys driven by the belt. Each pulley is typically labeled with an abbreviation indicating its function (e.g., ALT for alternator, P/S for power steering).
- Spring Symbol: Indicates the location of the tensioner pulley.
- Text Labels: Identify each component and may include specifications such as pulley diameter or belt size.
A typical diagram will show the crankshaft pulley driving the belt, which then snakes around the other pulleys in a specific order. The tensioner pulley will usually be located on the "slack" side of the belt, applying pressure to maintain proper tension. Pay close attention to the direction of the arrows, as incorrect routing will prevent the accessories from functioning properly.
How It Works
The 12-valve Cummins serpentine belt system is a relatively simple yet effective power transmission system. The crankshaft's rotational energy is transferred to the belt via the crankshaft pulley. The belt, in turn, drives the various accessories, such as the alternator, power steering pump, water pump, and air conditioning compressor (if equipped).
The tensioner pulley plays a critical role in maintaining proper belt tension. As the belt stretches over time, the spring-loaded tensioner automatically adjusts to compensate, preventing belt slippage and ensuring optimal accessory performance. Without the tensioner, the belt would become loose, leading to squealing noises, reduced accessory performance, and eventually, belt failure. The idler pulley simply guides the belt around other engine components, without transferring any energy.
A properly tensioned belt transmits power efficiently to each accessory. Too loose, the belt slips, causing reduced accessory performance and overheating due to the water pump not spinning at full speed. Too tight, and the belt places undue stress on the bearings of each component. The tensioner's job is to manage these extremes to promote long service life of the entire system.
Real-World Use and Basic Troubleshooting
Here are some practical tips for using the serpentine belt diagram for troubleshooting:
- Squealing Noise: Often indicates a loose or worn belt, or a failing pulley bearing. Check the belt tension and condition. Inspect each pulley for signs of damage or excessive play.
- Battery Not Charging: Could be a slipping belt preventing the alternator from generating sufficient power. Verify belt tension and condition.
- Overheating: A slipping belt may prevent the water pump from circulating coolant effectively. Check belt tension and condition.
- Hard Steering: A slipping belt may reduce the power steering pump's output. Verify belt tension and condition.
- Cracked or Frayed Belt: Indicates wear and tear, requiring immediate replacement. Consult the diagram for proper routing.
- Misalignment: Using a straight edge, check the alignment of pulleys to prevent uneven belt wear and potential belt failure.
When replacing the serpentine belt, always refer to the diagram to ensure proper routing. Before removing the old belt, it's helpful to take a picture or make a sketch of its path. Use the tensioner to release tension on the belt, making it easier to remove and install. After installation, double-check the belt's routing and tension before starting the engine.
Safety Considerations
Working on the serpentine belt system involves inherent risks, so prioritize safety:
- Disconnect the Battery: Before working on any electrical components, disconnect the negative battery cable to prevent accidental shocks.
- Hot Engine: Allow the engine to cool completely before working on the serpentine belt system to avoid burns.
- Moving Parts: Never work on the serpentine belt system with the engine running. The belt and pulleys are moving at high speeds and can cause serious injury.
- Eye Protection: Wear safety glasses to protect your eyes from debris.
- Keep Hands Clear: Be extremely cautious when releasing or adjusting the tensioner pulley. The spring-loaded mechanism can snap back with considerable force.
- Sharp Objects: Be careful around the fan blades and other sharp objects in the engine compartment.
The crankshaft pulley or harmonic balancer is a weighty component and can cause serious injury if dropped. Always support it properly if removed.
The fan can have sharp edges and can cause injury if spun unexpectedly.
Important note: Remember that you can download a copy of the Serpentine Belt Diagram. Always refer to the manufacturer's service manual for the most accurate and up-to-date information specific to your vehicle.