12v Cigarette Lighter Socket Wiring Diagram
So, you're diving into the 12V cigarette lighter socket wiring – excellent choice! Whether you're troubleshooting a dead socket, adding a new one for accessories, or just leveling up your automotive electrical understanding, a solid grasp of the wiring diagram is absolutely crucial. This article will break down the anatomy of a typical 12V socket circuit, explain the diagram's elements, and arm you with the knowledge to tackle related projects safely and effectively. We'll cover the purpose, key specs, symbols, operation, troubleshooting, and safety considerations, all with the goal of making you a more confident and capable DIY mechanic.
Purpose of a 12V Cigarette Lighter Socket Wiring Diagram
Why bother with a diagram in the first place? Here's the breakdown:
- Troubleshooting and Repair: When your phone charger stops working, and you suspect the socket, the diagram becomes your map. It allows you to trace the circuit, identify potential breaks, shorts, or component failures, and pinpoint the exact location of the problem.
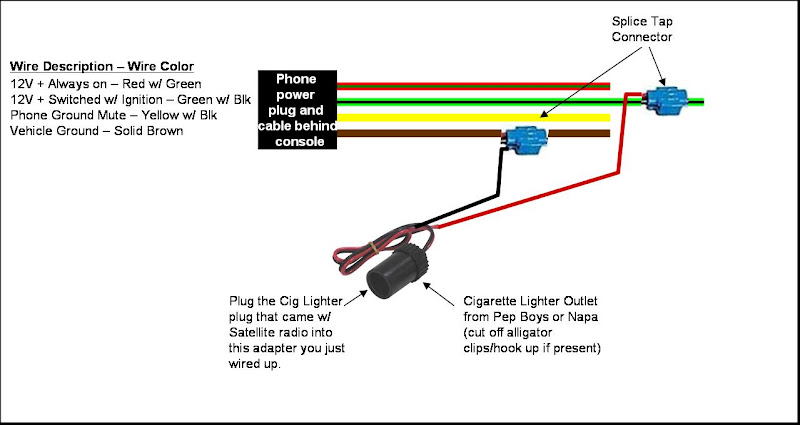
- Adding New Sockets: Want to install extra sockets for passengers or to power accessories in the trunk? The diagram shows you the correct wiring method, polarity, and how to safely integrate the new socket into the existing electrical system. Crucially, it highlights where to tap into power and ground.
- Understanding Automotive Electrical Systems: Even if your socket is working perfectly, studying the diagram is a great way to improve your general understanding of vehicle electrical systems. You'll learn about circuit protection (fuses), grounding, and how components interact.
- Modification and Customization: Many DIYers use 12V sockets to power custom projects. A wiring diagram is indispensable for designing and implementing these projects safely and ensuring compatibility with the vehicle's electrical system.
Key Specs and Main Parts of a 12V Socket Circuit
Before we decode the diagram, let's define the key components and their specifications:
- 12V Power Source: This is usually the vehicle's battery, providing the direct current (DC) power needed for the socket to function. The nominal voltage is 12 volts DC, but it can fluctuate between 12.6V (engine off, fully charged battery) and 14.4V (engine running, alternator charging).
- Fuse: A crucial safety device. The fuse protects the circuit from overcurrent. A blown fuse indicates a problem in the circuit, such as a short circuit. Typical fuse ratings for cigarette lighter sockets range from 10 to 20 amps, depending on the vehicle and the socket's intended use. Always replace a blown fuse with one of the same rating.
- Wiring: The wires conduct electricity. Wire gauge (thickness) is critical. A thicker wire can carry more current. For a typical 12V socket, 16-gauge or 14-gauge wire is generally sufficient, but consult your vehicle's service manual or the accessory manufacturer's recommendations. Heavier gauge wire might be needed for high-current applications.
- Switch (Optional): Some installations might include a switch to turn the socket on and off independently of the ignition. This allows you to prevent battery drain when the socket is not in use.
- 12V Socket: The physical receptacle where you plug in devices. It consists of a central positive (+) terminal and a grounded negative (-) outer shell.
- Ground Connection: A secure connection to the vehicle's chassis, providing a return path for the current. A good ground is essential for proper circuit operation. Poor grounding can lead to voltage drops, erratic behavior, and even damage to electrical components.
Symbols and Conventions in a 12V Socket Wiring Diagram
Understanding the symbols used in the wiring diagram is key to interpreting it correctly.
- Solid Lines: Represent wires connecting different components. The thickness of the line doesn't usually indicate wire gauge, but it is simply for visual clarity.
- Dashed Lines: May represent wiring that is optional or present only in certain vehicle configurations.
- Colors: Wire colors are often indicated on the diagram (e.g., Red for positive, Black for ground). This helps you identify wires in the vehicle's wiring harness.
- Fuse Symbol: A wavy line inside a rectangle or a straight line crossed by a diagonal line.
- Ground Symbol: Usually three horizontal lines decreasing in length, resembling an inverted pyramid.
- Battery Symbol: A long line and a short line, indicating the positive and negative terminals, respectively.
- Socket Symbol: Can vary, but often a circle with a positive (+) symbol in the center and a negative (-) symbol on the outer ring.
Key Color Conventions: Typically, red wires indicate positive (+) connections, while black wires indicate ground (-). However, always verify with a multimeter before making any connections, as wire colors can vary depending on the manufacturer and model year.
How a 12V Socket Circuit Works
Here's a step-by-step explanation of how the circuit functions:
- Power Source: The 12V power source (battery) provides the electrical potential.
- Fuse Protection: Current flows from the battery, through the fuse. The fuse is the first line of defense against overcurrent.
- Wiring Path: The current travels through the positive wire to the center terminal of the 12V socket.
- Device Connection: When you plug in a device, it completes the circuit. Current flows through the device, powering it.
- Return Path (Ground): After powering the device, the current returns to the battery through the negative wire and the ground connection to the vehicle's chassis.
- Closed Loop: The circuit forms a closed loop, allowing current to flow continuously and power the connected device. If any part of the loop is broken (e.g., a blown fuse, a disconnected wire), the circuit will not function.
Real-World Use: Basic Troubleshooting Tips
Here are some common troubleshooting scenarios and how to use the wiring diagram to diagnose them:
- Socket Not Working:
- Fuse Keeps Blowing:
- Low Voltage at the Socket:
Check the Fuse: This is the most common culprit. Use the wiring diagram to locate the correct fuse in the fuse box. Remove the fuse and inspect it. A blown fuse will have a broken filament. Replace the fuse with one of the same amperage rating.
Check the Wiring: Use the diagram to trace the wiring from the fuse to the socket. Look for loose connections, damaged wires, or corrosion. Use a multimeter to test for voltage at the socket's terminals.
Check the Ground: Ensure the ground connection is secure and free of corrosion. A poor ground can cause all sorts of problems.
Short Circuit: This indicates a short circuit somewhere in the wiring. Carefully inspect the wiring for any areas where the positive wire might be touching the vehicle's chassis (ground). Use the diagram to isolate sections of the circuit and pinpoint the location of the short.
Overload: The device you're plugging in might be drawing too much current. Check the device's power requirements and ensure they are within the socket's capacity. Also ensure the initial fuse was correct.
Voltage Drop: This can be caused by undersized wiring, poor connections, or a weak ground. Use the wiring diagram to check the wire gauge and the quality of the connections. A voltage drop test can help you identify the source of the voltage drop.
Safety: Highlighting Risky Components and Procedures
Working with automotive electrical systems can be dangerous if proper precautions are not taken.
- Battery Disconnection: Always disconnect the negative terminal of the battery before working on any electrical components. This prevents accidental short circuits and potential electrical shocks.
- Fuse Replacement: Always replace a blown fuse with one of the same amperage rating. Using a higher-rated fuse can bypass the circuit protection and lead to a fire.
- Wire Gauge: Use the correct wire gauge for the circuit's current requirements. Undersized wiring can overheat and cause a fire. Refer to the wiring diagram or your vehicle's service manual for the correct wire gauge.
- Proper Grounding: Ensure all ground connections are secure and free of corrosion. A poor ground can cause voltage drops, erratic behavior, and even damage to electrical components.
- Avoid Working on Live Circuits: Whenever possible, work on circuits with the power off. If you must work on a live circuit, use extreme caution and wear insulated gloves and tools.
- Short Circuits: Be extremely careful to avoid creating short circuits. A short circuit can cause a sudden surge of current, which can damage electrical components and even start a fire.
Important Note: Working with automotive electrical systems requires a basic understanding of electrical principles and safety precautions. If you are not comfortable working with electricity, consult a qualified mechanic.
We have a generic 12v Cigarette Lighter Socket Wiring Diagram file available for download to help you visualize and better understand the concepts we’ve discussed. It is crucial to always consult your vehicle's specific wiring diagrams. This generic one can be very useful, but is no substitute for the vehicle's wiring schematics.