1979 Pontiac Firebird Wiring Diagram
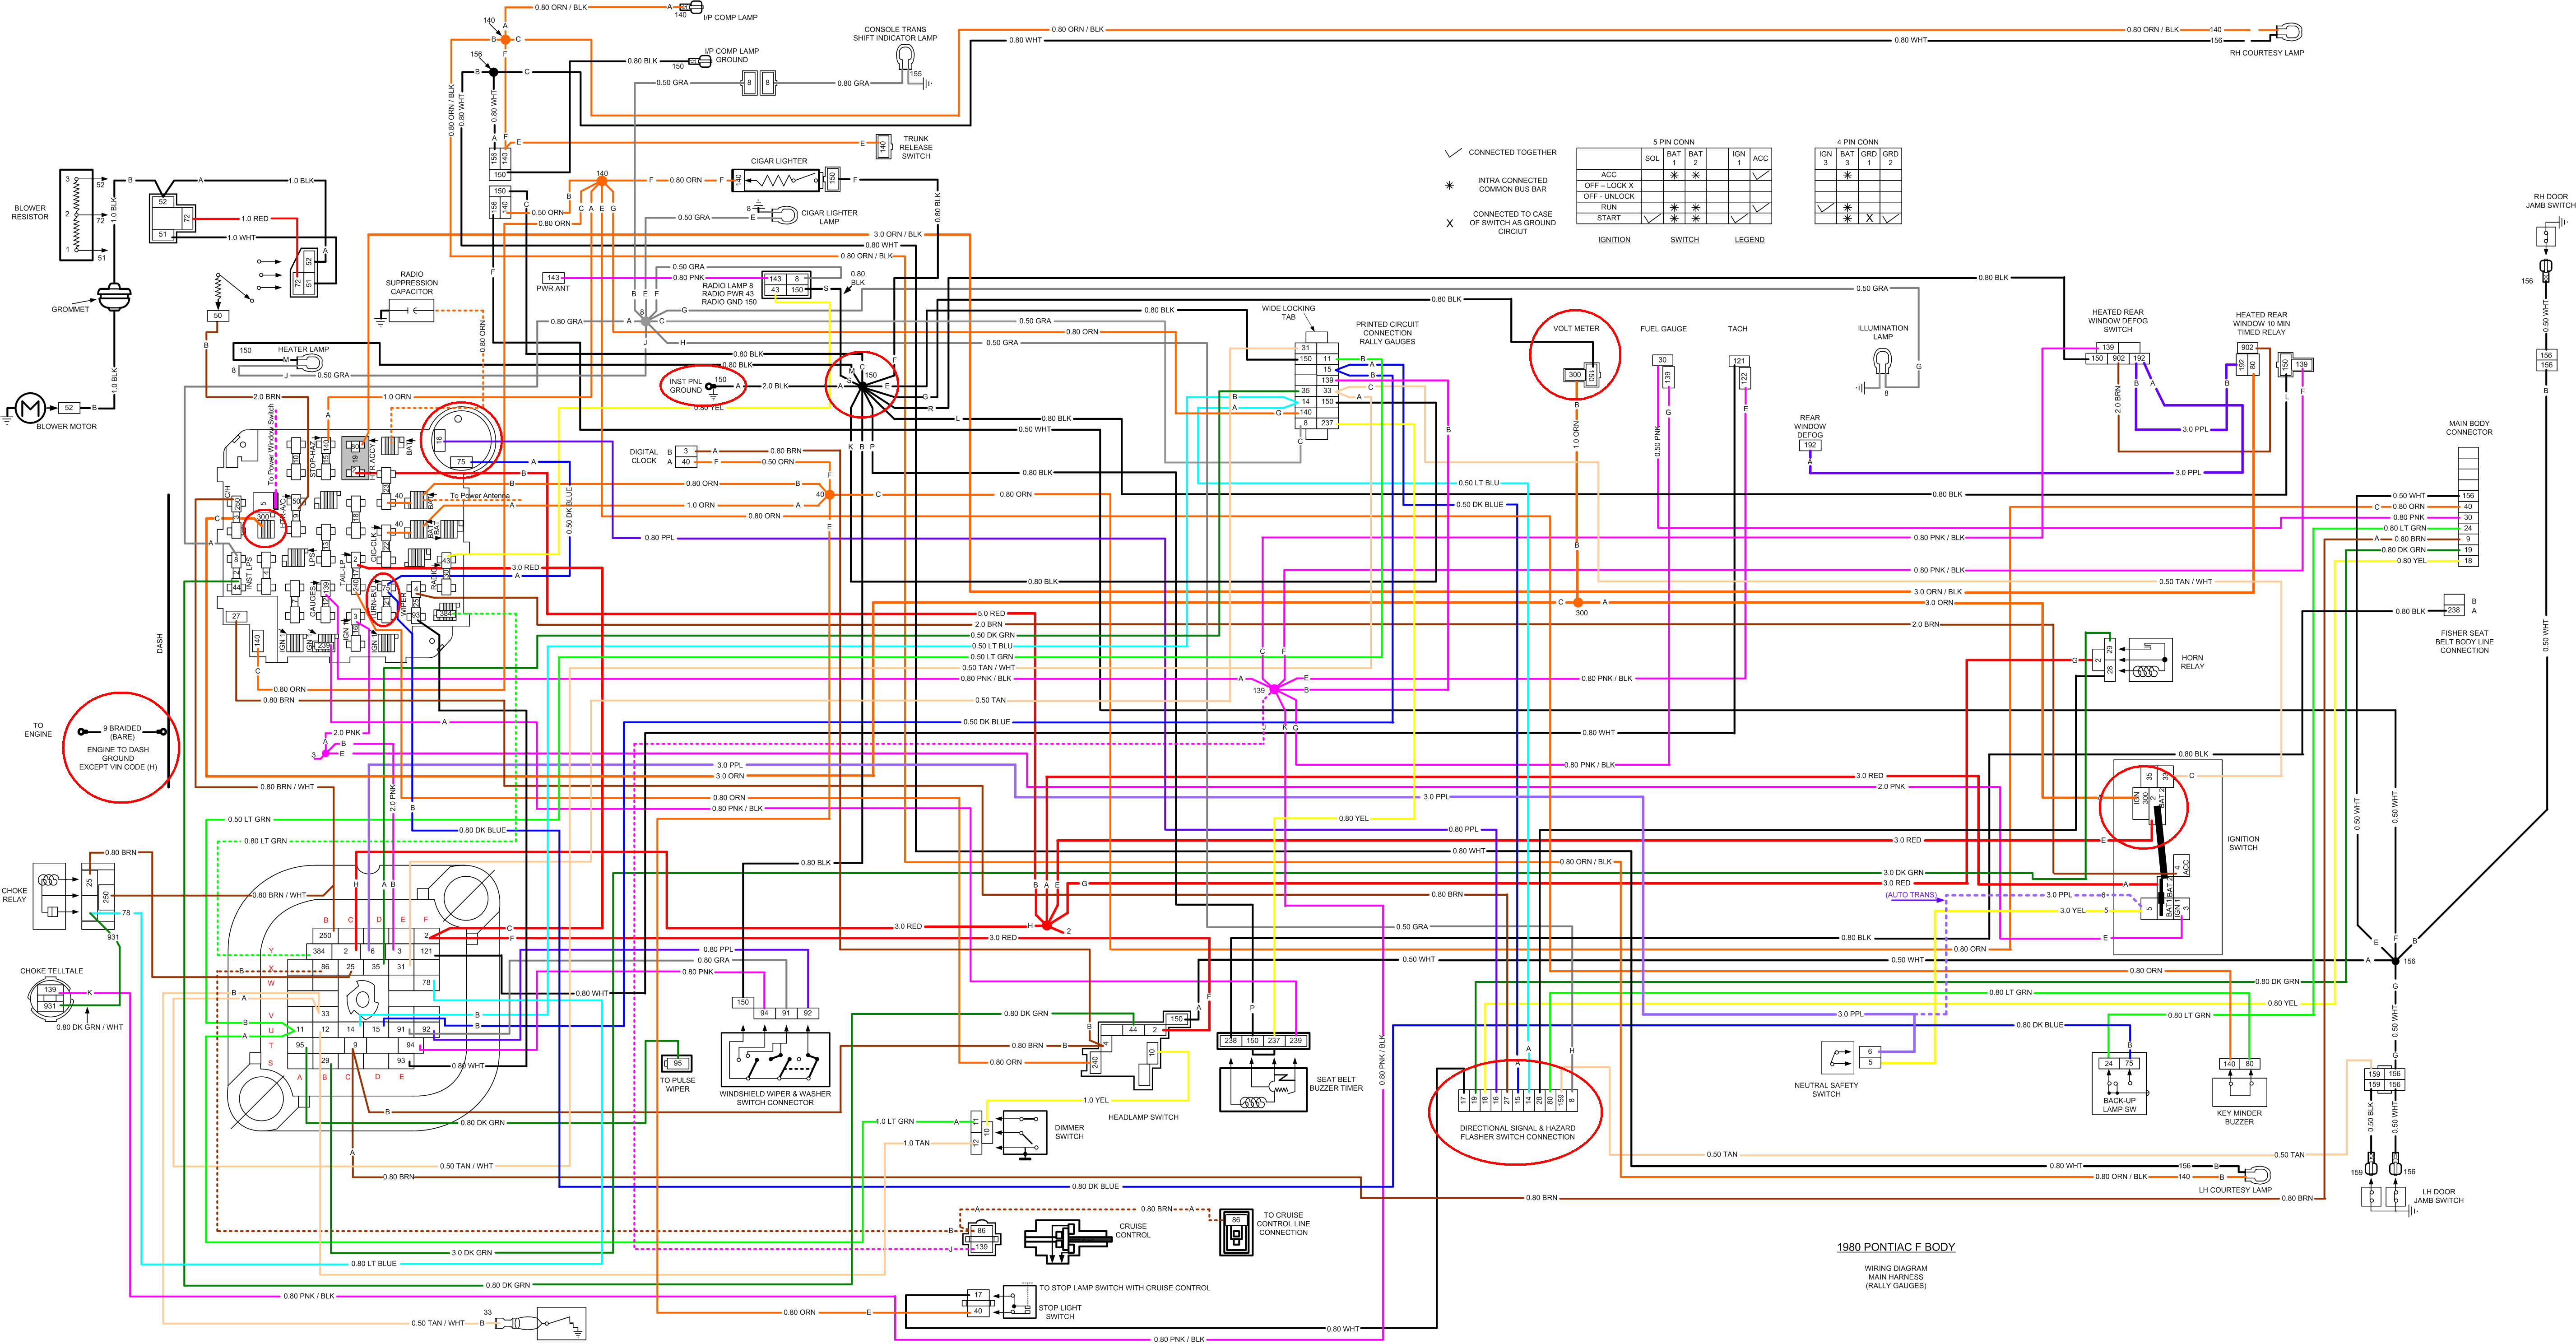
Understanding the 1979 Pontiac Firebird wiring diagram is crucial for any owner looking to maintain, repair, or modify their classic muscle car. These diagrams aren't just pretty pictures; they are roadmaps to the electrical system, the nervous system of your vehicle. Whether you're tackling a simple blown fuse or undertaking a complex engine swap, a solid grasp of the wiring diagram will save you time, money, and potentially a lot of frustration. We have the complete and detailed wiring diagram of the 1979 Pontiac Firebird for your reference, which can be downloaded from the link provided at the end of this article. This article walks you through how to effectively use that diagram.
Purpose of the Wiring Diagram
The primary purpose of a wiring diagram is to provide a visual representation of the electrical circuits within the vehicle. This is essential for:
- Troubleshooting Electrical Issues: Pinpointing the source of electrical problems, such as shorts, opens, or faulty components.
- Performing Repairs: Accurately diagnosing and repairing damaged wiring or electrical components.
- Installing Aftermarket Accessories: Safely and correctly wiring new components, like stereos, alarms, or lighting systems.
- Modifying the Electrical System: Making modifications to improve performance or add features, such as converting to electronic ignition.
- Understanding the Car's Systems: Gaining a deeper understanding of how different components and systems interact.
Key Specs and Main Parts of the 1979 Firebird Electrical System
The 1979 Firebird, like most vehicles of its era, operates on a 12-volt DC (Direct Current) electrical system. This means the battery supplies a constant voltage of 12 volts, and all components are designed to operate within this range. Key parts of the system include:
- Battery: Provides the initial power for starting the engine and operates the electrical system when the engine isn't running. Typically a lead-acid battery.
- Alternator: Recharges the battery and supplies power to the electrical system when the engine is running. The alternator converts mechanical energy from the engine into electrical energy.
- Starter Motor: Cranks the engine to start it. A high-torque motor drawing significant current from the battery.
- Ignition System: Consists of the distributor, coil, spark plugs, and related wiring. Responsible for generating and delivering the spark to ignite the air-fuel mixture in the cylinders.
- Lighting System: Includes headlights, taillights, turn signals, and interior lights. Essential for visibility and safety.
- Gauges and Instruments: Monitor various engine and vehicle parameters, such as temperature, oil pressure, fuel level, and speed.
- Fuses and Circuit Breakers: Protect the electrical circuits from overloads and short circuits. A vital safety feature. These are your first stop when troubleshooting.
- Wiring Harness: A bundle of wires that connects all the electrical components. Organized to prevent damage and ensure proper routing.
- Relays: Electrically operated switches that allow a low-current circuit to control a high-current circuit. Used for things like headlights, starters, and horns.
Understanding Wiring Diagram Symbols
Wiring diagrams use a standardized set of symbols to represent electrical components, wires, and connections. Understanding these symbols is crucial for interpreting the diagram correctly. Some common symbols include:
- Solid Lines: Represent wires. Thicker lines may indicate wires carrying higher current.
- Dashed Lines: Often indicate shielded wires or wires that are part of a harness.
- Circles: Can represent lamps, gauges, or other circular components.
- Rectangles: Often represent relays, switches, or control modules.
- Ground Symbol: Indicates a connection to the vehicle's chassis, which serves as the ground path for the electrical system.
- Resistor Symbol (Zig-zag line): Indicates a resistor, which limits current flow.
- Capacitor Symbol (Two parallel lines): Indicates a capacitor, which stores electrical energy.
- Diode Symbol (Triangle pointing to a line): Indicates a diode, which allows current to flow in only one direction.
Wire colors are also critical. The 1979 Firebird wiring uses a variety of colors, each corresponding to a specific circuit or function. For example, a red wire is often used for power, while a black wire is typically used for ground. Always refer to the color key on the wiring diagram to accurately identify each wire.
How the 1979 Firebird Wiring Works
The 1979 Firebird's electrical system is a network of interconnected circuits. Each circuit is designed to power a specific component or system. The circuits are protected by fuses or circuit breakers. When a fuse blows, it indicates an overcurrent condition, usually caused by a short circuit or a faulty component. Each circuit generally functions as a closed loop, starting from the positive terminal of the battery, passing through a switch or relay, powering the component, and returning to the negative terminal (ground) of the battery.
For example, let's consider the headlight circuit. When you turn on the headlight switch, it closes the circuit, allowing current to flow from the battery, through the switch, through the headlight filaments, and back to ground. The headlights then illuminate. If there's a short circuit in the wiring, the current will increase rapidly, causing the fuse to blow and breaking the circuit to protect the rest of the wiring and the headlight.
Real-World Use: Basic Troubleshooting Tips
When troubleshooting electrical problems on your 1979 Firebird, start with the basics:
- Check the Battery: Ensure the battery is fully charged and the terminals are clean and tight. Use a multimeter to check the voltage.
- Inspect Fuses and Circuit Breakers: Look for blown fuses or tripped circuit breakers. Replace blown fuses with the correct amperage rating. Never use a higher-rated fuse.
- Visually Inspect Wiring: Look for damaged, frayed, or corroded wires. Pay close attention to areas where wires pass through metal panels or near heat sources.
- Use a Multimeter: A multimeter is an essential tool for electrical troubleshooting. Use it to check for voltage, continuity, and resistance.
- Check Grounds: Ensure all ground connections are clean and tight. Poor grounds are a common cause of electrical problems.
- Isolate the Problem: If a circuit is not working, try to isolate the problem to a specific component or section of wiring.
For example, if your headlights are not working, check the headlight fuse first. If the fuse is good, check the headlight switch. If the switch is good, check the wiring between the switch and the headlights. Use the wiring diagram to trace the circuit and identify potential problem areas.
Safety Considerations
Working with electrical systems can be dangerous. Always take the following precautions:
- Disconnect the Battery: Before working on any electrical components, disconnect the negative terminal of the battery to prevent accidental shocks or short circuits.
- Use Insulated Tools: Use tools with insulated handles to protect yourself from electrical shock.
- Avoid Working in Wet Conditions: Never work on electrical systems in wet or damp conditions.
- Be Careful with High-Voltage Components: The ignition system contains high-voltage components that can deliver a painful and potentially dangerous shock. Avoid touching these components when the engine is running.
- Do not modify the wiring harness with out proper information.
The ignition system, particularly the ignition coil, is one of the riskiest components due to its high voltage. Always discharge the ignition system before working on it. A faulty alternator can also pose a risk, as it can produce excessive voltage. Use caution when working around the alternator.
With a clear understanding of the 1979 Pontiac Firebird wiring diagram, you'll be well-equipped to tackle any electrical repair or modification project. Remember to prioritize safety and take your time to accurately diagnose and resolve any issues. Good luck, and happy wrenching!
Remember: Electrical work can be complex and potentially dangerous. If you are not comfortable working with electrical systems, consult a qualified mechanic.
The complete wiring diagram for the 1979 Pontiac Firebird is available for download here: [Insert Download Link Here]. Use this valuable resource to guide you through your electrical projects and keep your Firebird running strong.