1984 Chevy G10 Van Cluster Wiring Diagram Pdf
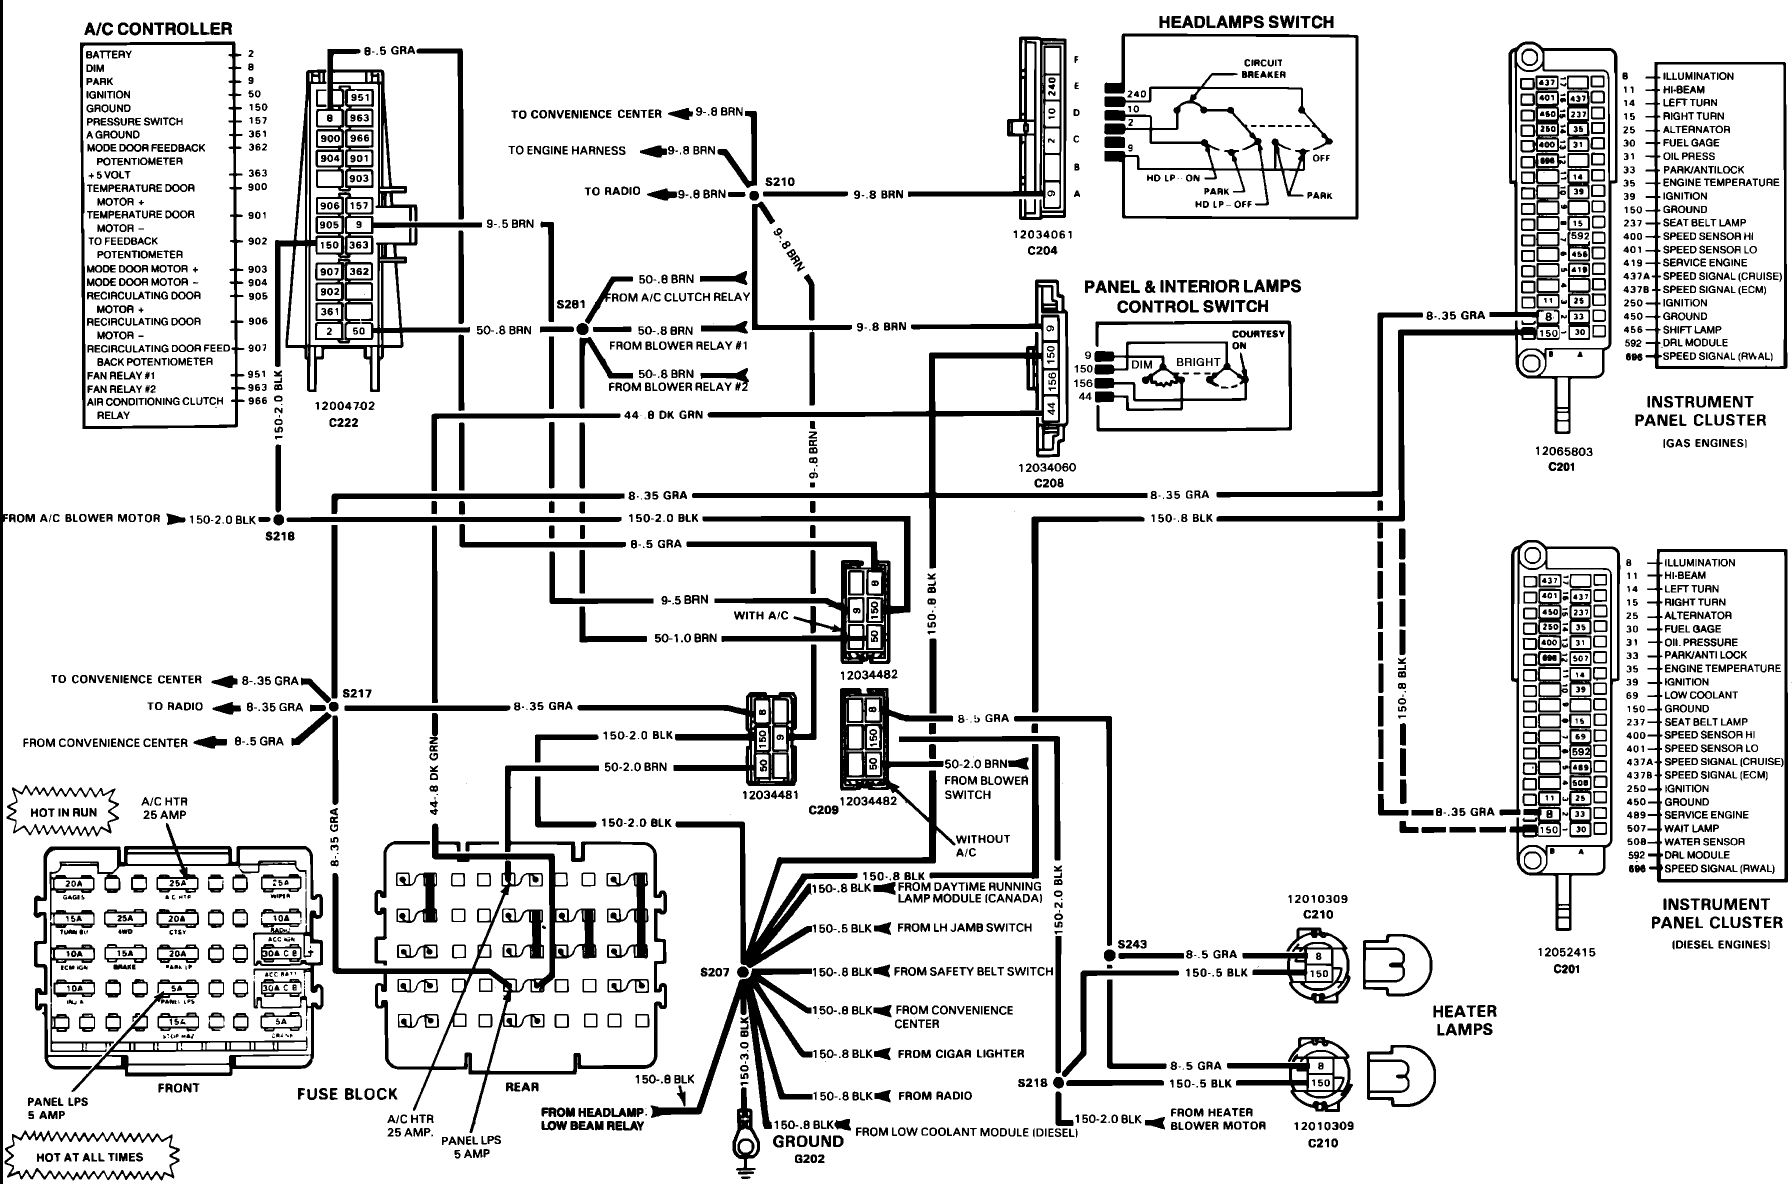
Alright, let's dive into the 1984 Chevy G10 Van instrument cluster wiring diagram. If you're a DIY mechanic tackling electrical issues, modifying your van's dashboard, or simply trying to understand its inner workings, this diagram is your absolute best friend. We're going to break down everything from the key specs to troubleshooting tips, so you can confidently work on your G10's cluster.
Purpose: Your Map to Electrical Success
Why bother with a wiring diagram in the first place? Well, the instrument cluster is a critical component, displaying vital information about your van's operation – speed, fuel level, engine temperature, and more. The wiring diagram is essentially a road map for the electrical system feeding that cluster. It allows you to:
- Diagnose Electrical Problems: Pinpoint shorts, opens, or faulty connections that cause gauges to malfunction or lights to fail.
- Perform Repairs: Identify the correct wires to repair or replace without guesswork.
- Make Modifications: Safely add aftermarket gauges, alarms, or other accessories that integrate with the cluster.
- Understand the System: Gaining a deep understanding of how the cluster and its associated circuits operate.
Key Specs and Main Parts
Before we dissect the diagram, let's identify the main players. The 1984 Chevy G10 van instrument cluster generally includes the following:
- Speedometer: Displays vehicle speed, typically driven by a cable from the transmission or, in later models, an electronic sensor.
- Fuel Gauge: Indicates the fuel level in the tank, reading data from the fuel sending unit.
- Temperature Gauge: Shows the engine coolant temperature, vital for preventing overheating.
- Voltmeter (or Ammeter): Measures the electrical potential (volts) or current (amps) in the charging system. Some G10s had ammeters, which can be problematic.
- Oil Pressure Gauge (or Warning Light): Indicates engine oil pressure, crucial for lubrication.
- Indicator Lights: Various warning lights such as brake, high beam, turn signals, and check engine (if equipped with early ECM).
- Printed Circuit Board: A flexible or rigid board containing conductive traces that connect the various components and provide a common ground.
- Connector(s): Plugs that provide the electrical interface between the cluster and the vehicle's wiring harness.
The wiring diagram will show how each of these components is connected, including the wire gauges (thickness), colors, and connector pin assignments.
Decoding the Diagram: Symbols, Lines, and Colors
Understanding the symbols is crucial for interpreting the diagram. Here's a breakdown:
- Lines: Represent wires. Thicker lines usually indicate wires carrying higher current.
- Colors: Each wire has a specific color, indicated by abbreviations (e.g., BRN for brown, BLU for blue, BLK for black). These colors are critical for identifying the correct wires during repair. A key, usually found at the bottom of the diagram, will list the color codes.
- Symbols for Components: Each component (gauge, light, resistor, etc.) has a specific symbol. Common symbols include:
- Resistor: A zig-zag line.
- Ground: Usually represented by three lines getting shorter, resembling an inverted pyramid.
- Connector: Often shown as a circle or square with lines extending from it.
- Fuse: A line with a small "S" shape in the middle.
- Splices: Where multiple wires connect together. These are often indicated by a dot where the lines intersect. Be careful with these! They are frequent sources of corrosion and problems.
Important Note: Pay close attention to wire gauge. The diagram will specify the appropriate gauge for each wire. Using a smaller gauge wire can lead to overheating and fire hazards. A larger gauge wire is usually okay, but may be unnecessarily bulky.
How It Works: The Electrical Flow
The instrument cluster receives power from the vehicle's electrical system, typically through the ignition switch and a fuse. The wiring diagram shows how power is distributed to each component within the cluster.
For example, the fuel gauge circuit typically includes the following:
- Power Source: Voltage from the ignition switch.
- Fuse: Protection against overcurrent.
- Instrument Cluster: The fuel gauge itself.
- Fuel Sending Unit: A variable resistor located in the fuel tank that changes its resistance based on fuel level.
- Ground: Completes the circuit.
The resistance of the fuel sending unit affects the current flowing through the fuel gauge, which in turn causes the needle to move and indicate the fuel level.
The other gauges and indicator lights work on similar principles, with varying sensors and control signals. The wiring diagram illustrates how these circuits are interconnected and how they receive their necessary inputs.
Real-World Use: Troubleshooting Basics
Here's how you can use the wiring diagram for troubleshooting:
- Gauge Malfunction: If a gauge isn't working, use the diagram to trace the circuit from the power source to the gauge and back to ground. Use a multimeter to check for voltage and continuity at each point.
- Light Failure: If a light isn't working, check the bulb first. If the bulb is good, use the diagram to trace the circuit from the power source to the light and back to ground, checking for voltage and continuity.
- Connector Issues: Inspect connectors for corrosion or damage. Use the diagram to identify the correct pin assignments and test for continuity between the connector and the component.
- Ground Problems: Bad grounds are a common cause of electrical problems. Use the diagram to identify ground locations and ensure they are clean and secure. A poor ground can cause erratic readings or complete failure of a circuit.
Example: Suppose your fuel gauge is reading empty even though you know the tank is full. Using the wiring diagram, you can:
- Check the fuse for the fuel gauge circuit.
- Test the voltage at the fuel gauge connector.
- Check the continuity of the wire between the fuel gauge and the fuel sending unit.
- Inspect the fuel sending unit and its ground connection in the fuel tank.
Safety First: Handle with Care!
Working with electrical systems can be dangerous. Here are some safety precautions:
- Disconnect the Battery: Always disconnect the negative battery cable before working on any electrical circuits. This prevents accidental shorts and potential electrical shocks.
- Use Proper Tools: Use insulated tools to prevent shocks.
- Be Careful with the Printed Circuit Board: The printed circuit board is fragile. Avoid bending or scratching it, as this can damage the conductive traces.
- Avoid Working in Wet Conditions: Water conducts electricity, increasing the risk of shock.
- Be Aware of Capacitors: Older clusters may have capacitors that can store a charge even after the battery is disconnected. Discharge them carefully before handling.
A faulty ammeter (if equipped) can be a significant fire hazard. If your G10 has an ammeter, seriously consider converting to a voltmeter or bypassing the ammeter circuit entirely for safety.
Understanding the 1984 Chevy G10 van cluster wiring diagram is crucial for anyone working on the vehicle's electrical system. By familiarizing yourself with the symbols, components, and circuits, you can effectively diagnose and repair electrical problems, make modifications, and gain a deeper understanding of your van's inner workings.
Now that you're armed with this knowledge, you're ready to tackle your G10's electrical challenges! Remember to always prioritize safety and double-check your work. Happy wrenching!
Disclaimer: This information is for educational purposes only and should not be considered a substitute for professional advice. Always consult a qualified mechanic for complex electrical repairs.
We have the 1984 Chevy G10 Van Cluster Wiring Diagram PDF file available for download. Get it and start your work!