1988 Ford F150 Fuel Pump Relay Wiring Diagram
Alright, let's dive into the fuel pump relay wiring diagram for the 1988 Ford F150. This is a crucial piece of information whether you're battling a no-start condition, planning modifications, or simply trying to better understand your truck's fuel system. Knowing how the fuel pump circuit is wired can save you a ton of time and money compared to blindly replacing parts.
Purpose of Understanding the Wiring Diagram
Why bother with this diagram? The most common reason is troubleshooting a fuel pump failure. If your F150 cranks but doesn't start, a faulty fuel pump, or more often, a problem in its control circuit, is a prime suspect. The wiring diagram helps you pinpoint the issue, whether it's a bad relay, a blown fuse, a broken wire, or a faulty ground connection. Beyond troubleshooting, understanding the wiring is essential for tasks like installing aftermarket fuel pumps, modifying the fuel system for performance upgrades, or adding security features that might interrupt the fuel pump circuit.
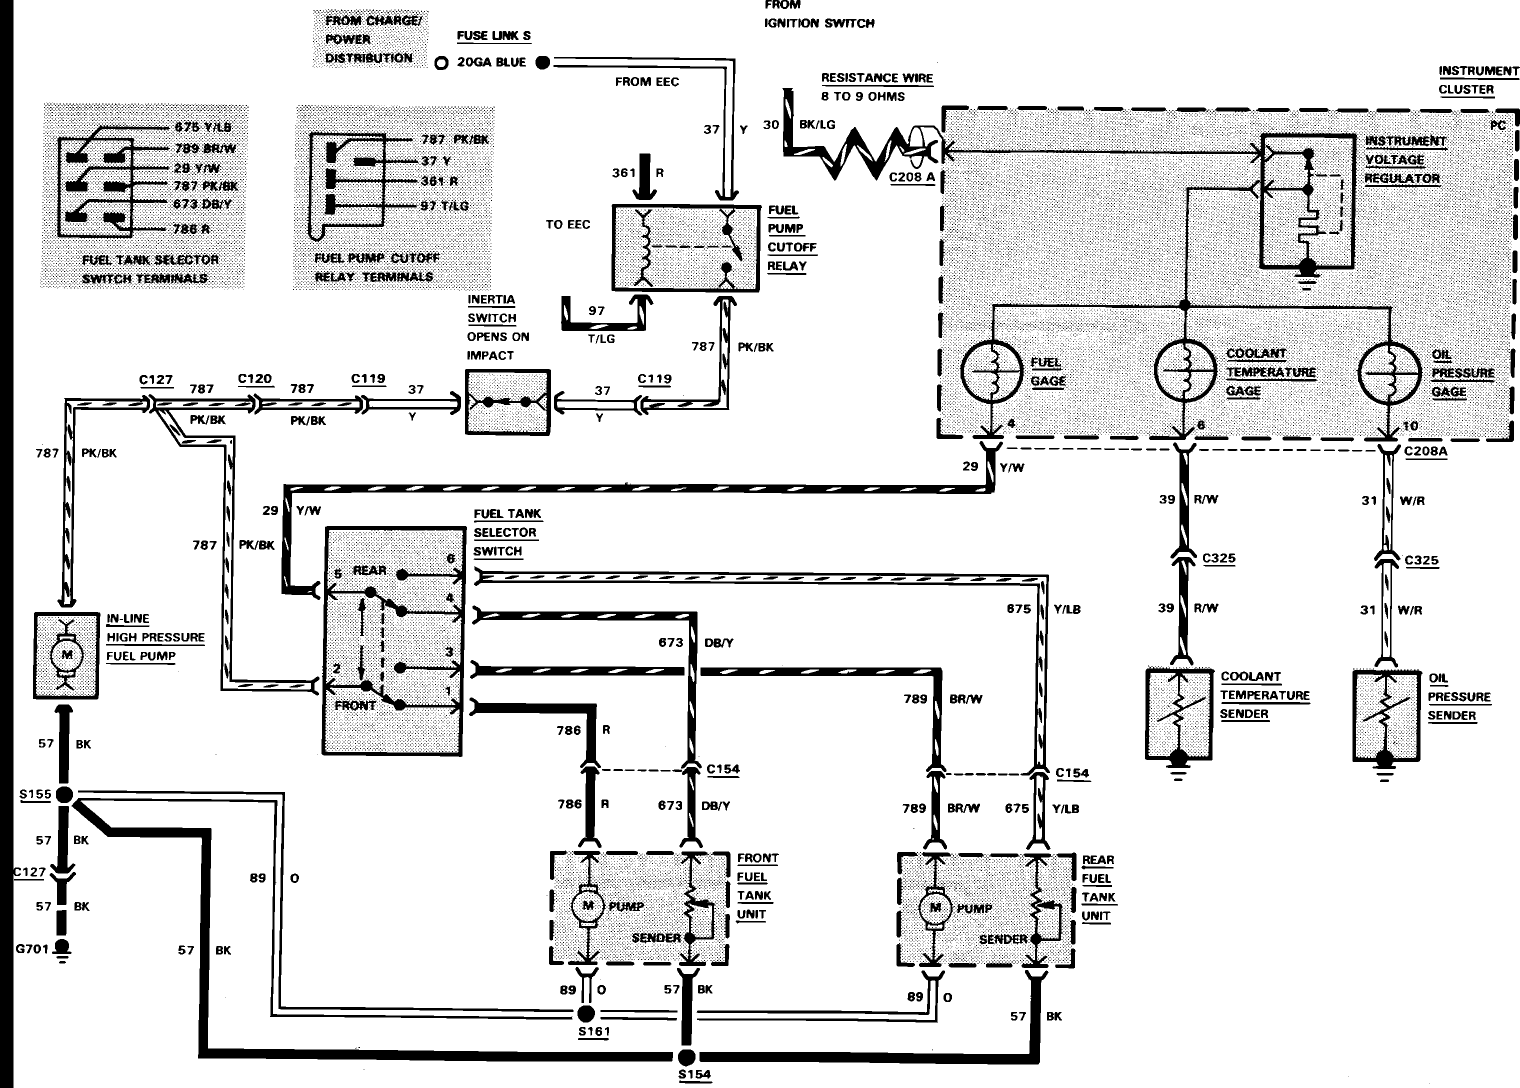
Key Specs and Main Parts of the Fuel Pump Circuit
Before we get to the diagram itself, let's identify the key components and their roles in the 1988 F150 fuel pump circuit:
- Fuel Pump Relay: This is the heart of the system. It's an electromechanical switch that controls power to the fuel pump. It's a single-pole, single-throw (SPST) relay in most cases, meaning it has one input, one output, and one set of contacts.
- Fuel Pump: Located in the fuel tank, this electric pump draws fuel from the tank and sends it to the engine's fuel rail. It's a 12V DC motor.
- Inertia Switch (Fuel Cutoff Switch): A safety device designed to shut off the fuel pump in the event of a collision. It's typically located in the passenger footwell or behind the glove box.
- EEC (Electronic Engine Control) Relay: This relay provides power to the EEC-IV computer, which in turn controls the fuel pump relay.
- EEC-IV Computer: The brain of the system. It controls the fuel pump relay based on various inputs, including engine RPM and throttle position.
- Fuel Pump Fuse: A safety device that protects the fuel pump circuit from overcurrent. It's usually located in the fuse box.
- Wiring Harness: The network of wires that connect all the components together.
- Ground Connections: Crucial for completing the electrical circuits. Poor grounds are a common cause of fuel pump problems.
Understanding Wiring Diagram Symbols
A wiring diagram is a symbolic representation of the electrical circuit. It uses standardized symbols to represent different components and connections. Here's a breakdown of the common symbols you'll encounter in the 1988 F150 fuel pump relay wiring diagram:
- Solid Lines: Represent wires. The thickness of the line doesn't usually indicate wire gauge, but it can in some diagrams.
- Dashed Lines: Can represent shielding, ground connections, or wires that are part of a multi-wire cable.
- Circles: Often represent connections, splices, or test points.
- Rectangles: Typically represent components like relays, switches, or sensors. The internal markings of the rectangle will indicate the specific component.
- Relay Symbol: A coil with a switch. The coil represents the electromagnet that activates the switch. The switch shows the normally open or normally closed contacts.
- Ground Symbol: Looks like a series of decreasing horizontal lines connected to a vertical line. Indicates a connection to the vehicle's chassis ground.
- Fuse Symbol: Zigzag line inside a rectangle.
- Colors: Wires are often color-coded in the diagram (and in the actual wiring harness). For example, Red (RD) might indicate a power wire, Black (BK) a ground wire, and Light Green (LG) a signal wire. Pay close attention to color codes, as they are crucial for identifying the correct wires.
How the Fuel Pump Circuit Works
Here's a simplified explanation of how the 1988 F150 fuel pump circuit works:
- When the ignition switch is turned to the "ON" position, the EEC relay is energized, providing power to the EEC-IV computer.
- The EEC-IV computer, upon receiving a signal that the engine is cranking or running (from the distributor or crankshaft position sensor), sends a signal to the fuel pump relay.
- This signal energizes the coil in the fuel pump relay, causing its contacts to close.
- Closing the fuel pump relay contacts completes the circuit, allowing power from the battery (protected by the fuel pump fuse) to flow to the fuel pump.
- The fuel pump then starts pumping fuel to the engine.
- If the inertia switch is tripped (due to a collision), it breaks the circuit between the fuel pump relay and the fuel pump, shutting off the fuel supply.
Real-World Use: Basic Troubleshooting Tips
Using the wiring diagram, you can perform several basic troubleshooting steps:
- Check the Fuel Pump Fuse: Use a multimeter to check for continuity across the fuse. A blown fuse indicates a short circuit in the fuel pump circuit.
- Check the Fuel Pump Relay: You can test the relay by swapping it with a known good relay (like the horn relay) or by manually applying power and ground to the relay coil and listening for a click. You can also use a multimeter to check for continuity across the relay contacts when the coil is energized.
- Check the Inertia Switch: Make sure the inertia switch is reset. It usually has a reset button on top.
- Check for Power at the Fuel Pump: Use a multimeter to check for 12V at the fuel pump connector when the ignition is in the "ON" position. Be extremely careful when working with fuel. Ensure proper ventilation and avoid sparks or open flames.
- Check Ground Connections: Ensure that all ground connections in the fuel pump circuit are clean and tight. Use a wire brush to clean any corrosion.
- Voltage Drop Test: If you suspect a bad wire, perform a voltage drop test. This involves measuring the voltage drop across a wire while the circuit is under load. A high voltage drop indicates excessive resistance in the wire.
Safety Considerations
Working with the fuel system requires caution. Here are some important safety tips:
- Disconnect the Battery: Always disconnect the negative battery terminal before working on any electrical components.
- Fuel is Flammable: Work in a well-ventilated area and avoid sparks or open flames. Keep a fire extinguisher nearby.
- Fuel Pressure: Be aware that the fuel system is pressurized. When disconnecting fuel lines, relieve the pressure first. There are specific procedures for doing this; consult your repair manual.
- Wiring Damage: Be careful not to damage any wiring while working on the fuel system. Damaged wiring can cause shorts and other problems.
- Fuel Vapors: Avoid breathing fuel vapors.
Diagram Availability
Having a copy of the correct wiring diagram for your 1988 F150 is essential. You can typically find it in your truck's repair manual (like a Haynes or Chilton manual). Aftermarket resources, like online databases and forums dedicated to Ford trucks, are also excellent sources. To make it easier, we have a downloadable version of the 1988 Ford F150 fuel pump relay wiring diagram readily available for you.
With a solid understanding of the fuel pump circuit and the right tools, you can confidently diagnose and repair fuel pump problems on your 1988 Ford F150.