1991 Ford F150 Starter Solenoid Wiring Diagram
Alright, let's dive into the starter solenoid wiring diagram for your 1991 Ford F150. Whether you're dealing with a crank-no-start situation, planning some electrical upgrades, or just want a better understanding of your truck's charging system, knowing how this circuit is wired is essential. This isn't just about fixing things; it's about empowering you to troubleshoot and maintain your classic Ford with confidence.
Purpose of the Starter Solenoid Wiring Diagram
A wiring diagram is your roadmap to the electrical system. Specifically, the starter solenoid wiring diagram shows you how all the components related to starting your 1991 F150 are connected. It's vital for:
- Troubleshooting Starting Issues: Pinpointing breaks in the circuit, identifying faulty components (solenoid, starter motor, ignition switch, etc.), and tracing voltage drops.
- Performing Repairs: Correctly replacing damaged wiring or components while ensuring proper connections and avoiding shorts.
- Electrical Modifications: Integrating aftermarket accessories, like remote start systems or upgraded starters, requires understanding the existing wiring to prevent conflicts.
- General System Understanding: Knowing the layout enhances your overall knowledge of your F150's electrical system, making future repairs easier.
Key Specs and Main Parts
The 1991 Ford F150 starter system is relatively straightforward. Here are the key components you'll find in the wiring diagram:
- Battery: The source of power (typically 12V DC). The diagram will show the positive (+) and negative (-) terminals.
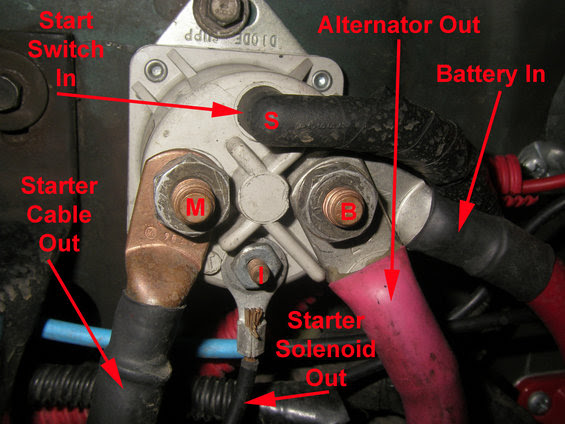
- Starter Solenoid (or Starter Relay): This is an electromagnetic switch that uses a small current from the ignition switch to control a larger current to the starter motor. It's usually mounted on the inner fender or firewall.
- Starter Motor: The device that physically cranks the engine. It requires a very high current draw to operate.
- Ignition Switch: The switch activated by the key to initiate the starting sequence.
- Neutral Safety Switch (NSS) / Park/Neutral Position (PNP) Switch: Found on automatic transmission models, this switch prevents the engine from starting unless the transmission is in Park or Neutral. It adds a layer of safety.
- Fuses/Fusible Links: Overcurrent protection devices that protect the wiring and components from damage.
- Wiring Harness: The bundle of wires connecting all the components. The diagram shows the color-coding of these wires.
Understanding Wiring Diagram Symbols
Wiring diagrams use standardized symbols to represent components and connections. Here's a breakdown of what you'll commonly see:
- Solid Lines: Represent wires. The thickness of the line doesn't necessarily indicate wire gauge.
- Dashed Lines: May represent ground connections or sometimes shielded wiring.
- Circles: Often represent connections or splices in the wiring.
- Rectangles: Typically represent components like relays, switches, or the solenoid itself.
- Zig-zag Lines: Usually indicate a resistor or a similar component that limits current flow.
- Color Codes: Wire colors are abbreviated (e.g., "RED" or "RD," "BLK" or "BK," "WHT" or "WH," "GRN" or "GN," "BLU" or "BU," etc.). Pay close attention to these – they're crucial for identifying the correct wires. Sometimes you will see a primary color and a stripe color, like "RD/WH" for red with a white stripe.
- Ground Symbol: A series of horizontal lines decreasing in length, indicating a connection to the vehicle's chassis ground. A good ground is essential for proper operation.
How the Starter Circuit Works
Here’s a simplified explanation of how the starter circuit functions in your '91 F150:
- Key Turned to "Start": When you turn the ignition key to the "Start" position, it sends a small electrical current to the starter solenoid.
- Solenoid Activation: This small current energizes the solenoid's coil, creating an electromagnetic field.
- Plunger Engagement: The electromagnetic field pulls a plunger inside the solenoid, closing a heavy-duty electrical contact.
- High-Current to Starter: This closed contact allows a very high current to flow directly from the battery, through the solenoid, and to the starter motor.
- Starter Motor Cranks Engine: The starter motor engages and spins the engine's flywheel, initiating the combustion process.
- Neutral Safety Switch (Automatic Transmission): In vehicles with automatic transmissions, the Neutral Safety Switch is in series with the ignition switch and solenoid. It prevents the small current from reaching the solenoid *unless* the gear selector is in "Park" or "Neutral".
Real-World Use: Basic Troubleshooting Tips
Here's how you can use the wiring diagram to diagnose common starting problems:
- No Click, No Crank: If you turn the key and hear nothing, check the battery voltage first. If the battery is good (above 12.4V), use a multimeter to test for voltage at the small terminal of the starter solenoid when the key is in the "Start" position. If there's no voltage there, the problem could be the ignition switch, the neutral safety switch (if applicable), or the wiring between them. If you *do* have voltage, but still no crank, the solenoid itself is likely faulty.
- Click, No Crank: If you hear a single "click" from the solenoid but the starter doesn't engage, the solenoid might be making contact but not passing enough current. This could indicate worn contacts inside the solenoid. Alternatively, the starter motor itself could be faulty (worn brushes, damaged armature, etc.). You can try tapping the starter motor with a hammer (gently!) while someone tries to start the truck. If it starts after tapping, it's a strong indicator that the starter motor is the issue.
- Slow Crank: A slow cranking speed usually indicates a weak battery, poor connections (especially at the battery terminals or ground points), or a failing starter motor. Clean and tighten all connections, and have the battery load-tested.
- Continuously Cranking: If the starter motor keeps cranking even after you release the key, the solenoid is likely stuck in the "engaged" position. This can damage the starter motor, so address it immediately. Disconnecting the battery will stop the cranking.
Testing the Solenoid: To test the solenoid, disconnect the small wire from the solenoid (the one coming from the ignition switch). Use a jumper wire to connect the solenoid's small terminal directly to the battery's positive (+) terminal. If the starter engages, the solenoid is working. If it doesn't, the solenoid is likely bad.
Safety Considerations
Working with the starter circuit involves high currents, so safety is paramount:
- Disconnect the Battery: Always disconnect the negative (-) battery cable before working on the electrical system to prevent accidental shorts and potential shocks.
- High Current Components: The starter solenoid and starter motor carry very high currents. Avoid touching these components with bare hands while the circuit is energized.
- Fuel Lines: Be mindful of fuel lines in the engine compartment. Avoid creating sparks near fuel lines, as this could lead to a fire.
- Protective Gear: Wear safety glasses to protect your eyes from debris.
- Double-Check Connections: Before reconnecting the battery, carefully double-check all wiring connections to ensure they are secure and properly insulated.
- Fusible Links: Be aware of fusible links – these are wires designed to melt and break the circuit under overload conditions. Replace them with the correct amperage rating to maintain protection. Bypassing a fusible link can lead to serious damage.
Important Note about Grounds: A poor or corroded ground connection can mimic many different electrical problems. Always ensure that the battery ground cable is securely attached to the engine block or chassis and that the connection points are clean and free of corrosion. Similarly, inspect the ground connections for the starter motor and solenoid.
Remember: Always refer to the specific wiring diagram for your 1991 Ford F150. There might be slight variations depending on the engine and options installed on your truck. Using the correct diagram ensures accurate troubleshooting and repair.
With a little patience and a good wiring diagram, you can tackle most starter system issues on your 1991 Ford F150. Remember to take your time, double-check your work, and prioritize safety.
I have the complete wiring diagram file ready for you. Feel free to download it and keep it handy for future reference. It will be your best friend when diagnosing electrical issues!