1993 Chevy 1500 Radio Wiring Harness
Alright, let's dive into the wiring harness of the 1993 Chevy 1500 radio. Understanding this system is crucial whether you're replacing a busted factory head unit, upgrading your speakers, diagnosing a power issue, or just trying to learn more about your truck's electrical system. This guide will give you a solid foundation, but remember, electrical work requires patience and a methodical approach. We'll break down the diagram, discuss its components, and offer some troubleshooting tips.
Purpose and Importance
Why bother understanding the radio wiring harness? Several reasons. The most common is radio replacement. The factory radio might be outdated or malfunctioning. An aftermarket unit offers enhanced features like Bluetooth, USB connectivity, or improved sound processing. However, directly splicing into the factory harness without understanding the wiring is a recipe for disaster – blown fuses, short circuits, or even damage to the vehicle's electrical system.
Another reason is system upgrades. You might want to add an amplifier, subwoofer, or new speakers. Knowing the wiring layout allows you to tap into the correct power and signal lines without cutting into the factory wiring indiscriminately. Finally, it's invaluable for troubleshooting. If your radio isn't working, you need to systematically check power, ground, and speaker connections. A wiring diagram is your roadmap.
Key Specs and Main Parts
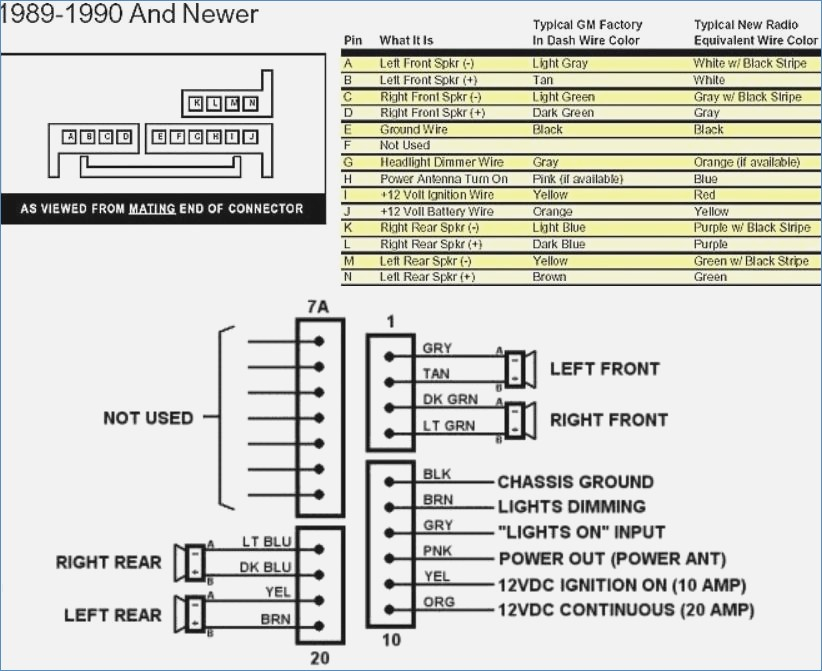
The 1993 Chevy 1500's radio wiring harness isn't overly complex, but it's important to understand the key circuits involved. We can broadly categorize them as follows:
- Power Supply: This provides the necessary voltage to operate the radio. Typically, there are two power wires:
- Constant 12V (Battery): This wire provides power even when the ignition is off, allowing the radio to retain memory settings.
- Switched 12V (Ignition): This wire only provides power when the ignition switch is in the 'ACC' or 'ON' position, turning the radio on and off with the vehicle.
- Ground: A solid ground connection is essential for proper operation. This is usually a black wire connected to the vehicle's chassis.
- Speaker Outputs: These wires carry the amplified audio signal from the radio to the speakers. There are typically four pairs of wires – front left, front right, rear left, and rear right. Each pair consists of a positive (+) and negative (-) wire.
- Antenna Connection: This is usually a coaxial cable that connects the radio to the antenna.
- Illumination Wire (Dimmer): This wire is connected to the vehicle's lighting system and dims the radio's display when the headlights are turned on.
Inside the radio itself, you'll find components like:
- Fuse: Protects the radio's internal circuitry from overcurrent.
- Amplifier: Boosts the audio signal to drive the speakers.
- Tuner: Receives and decodes radio signals.
- Pre-amp: An initial amplification stage to boost the signal before it goes to the main amplifier.
Understanding Wiring Diagram Symbols
A wiring diagram is a symbolic representation of the electrical circuit. Let's decode some common symbols:
- Solid Lines: Represent wires. Thicker lines might indicate wires carrying higher current.
- Dashed Lines: Often indicate shielded cables or grounding paths.
- Circles: Typically represent connectors or terminals.
- Squares/Rectangles: Can represent components like switches, fuses, or relays.
- Color Codes: Wires are usually identified by color codes (e.g., Red, Black, Blue, Yellow). These codes are standardized, but it's always a good idea to double-check with the diagram. Common colors include:
- Red: Usually indicates constant 12V power.
- Yellow: Usually indicates switched 12V power.
- Black: Usually indicates ground.
- White: Often used for speaker wires.
- Ground Symbol: Looks like an upside-down Christmas tree or a series of descending lines. Indicates a connection to the vehicle's chassis ground.
- Fuse Symbol: A squiggly line inside a rectangle. Indicates a fuse.
Also, look for annotations on the diagram. These will label each wire with its function and sometimes its gauge (wire thickness).
How It Works: The Circuit Flow
Let's trace the flow of electricity through a simplified radio circuit:
- The constant 12V wire from the battery provides continuous power to the radio, allowing it to retain its memory settings (presets, clock, etc.). This power is typically routed through a fuse to protect the circuit.
- The switched 12V wire, connected to the ignition switch, provides power only when the key is in the 'ACC' or 'ON' position. This turns the radio on and off with the vehicle.
- The ground wire provides a return path for the current to the battery, completing the circuit. A poor ground connection can cause all sorts of issues, including weak sound, buzzing, or no power at all.
- When the radio is turned on, the tuner receives radio signals via the antenna.
- The tuner decodes the radio signal and sends it to the pre-amp, which amplifies the signal to a level suitable for further processing.
- The pre-amplified signal is then sent to the main amplifier, which boosts the signal to a level capable of driving the speakers.
- The amplified audio signal is sent to the speaker outputs, which are connected to the speakers.
- The illumination wire receives a signal from the vehicle's lighting system when the headlights are turned on, dimming the radio's display to reduce glare at night.
Real-World Use: Troubleshooting Tips
Here are some basic troubleshooting tips when working with your 1993 Chevy 1500's radio wiring:
- No Power:
First, check the radio fuse. Use a multimeter to test for continuity across the fuse. If the fuse is blown, replace it with one of the same amperage rating. If the fuse blows repeatedly, there's a short circuit somewhere in the wiring.
Next, check for voltage on the constant and switched 12V wires using a multimeter. Make sure you have a good ground connection for your multimeter. If there's no voltage, trace the wires back to their source to find the break.
Verify the ground connection. Ensure the ground wire is securely attached to a clean, metal surface on the vehicle's chassis.
- Weak Sound or Distortion:
Check the speaker wires for loose connections or damage. Make sure the speaker wires are properly connected to the radio and the speakers.
Inspect the speakers for damage. If the speakers are blown, they'll need to be replaced.
Check the antenna connection. A loose or damaged antenna connection can result in weak radio reception.
- Buzzing or Hissing:
This is often caused by a ground loop. Ensure all audio components (radio, amplifier, etc.) share a common ground point.
Check for interference from other electrical components. Try moving the radio wiring away from other wires to see if the noise disappears.
Safety Precautions
Working with electrical systems can be dangerous. Here are some crucial safety precautions:
- Disconnect the Battery: Always disconnect the negative battery terminal before working on any electrical components. This prevents accidental short circuits and potential electric shock.
- Use a Multimeter: A multimeter is your best friend when troubleshooting electrical problems. It allows you to safely measure voltage, current, and resistance.
- Never Cut Wires Blindly: Always identify the wire's function before cutting it. Refer to the wiring diagram.
- Insulate Connections: Use heat shrink tubing or electrical tape to properly insulate all wire connections. This prevents short circuits and corrosion.
- Work in a Well-Lit Area: Good lighting is essential for seeing what you're doing.
- Don't Work When Tired: Fatigue can lead to mistakes.
Remember, some components, like the radio's internal capacitor, can store a charge even after the battery is disconnected. Avoid touching internal components unless you know what you're doing.
We have the full 1993 Chevy 1500 radio wiring diagram available. You can download it to get the complete, detailed view and make your radio project easier and safer. Armed with this information and a bit of patience, you'll be able to tackle most radio-related issues on your classic Chevy pickup.