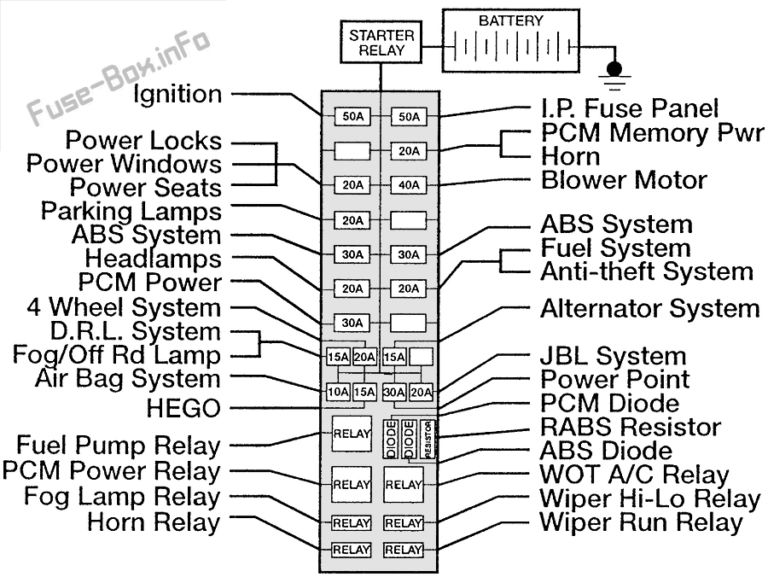
1995 Ford Ranger Fuse Box Diagram Under Hood
Alright, let's dive into the 1995 Ford Ranger's under-hood fuse box diagram. Understanding this layout is crucial for anyone who wants to tackle electrical repairs, modifications, or even just gain a better understanding of their truck. Consider this your roadmap to the Ranger's electrical heart.
Purpose: Why You Need This Diagram
Why bother with a fuse box diagram? Several reasons:
- Troubleshooting Electrical Problems: A blown fuse is often the first sign of an electrical issue. The diagram identifies which fuse controls which circuit, allowing you to quickly pinpoint the problem.
- Modifications and Add-ons: Planning to install aftermarket lights, a new stereo, or a trailer brake controller? Knowing the fuse box layout allows you to safely tap into the electrical system without overloading circuits.
- Preventative Maintenance: Understanding the function of each fuse can help you identify potential problems before they become major headaches.
- General Knowledge: Simply put, knowing your vehicle's electrical system empowers you to diagnose and fix issues yourself, saving you time and money at the shop.
Key Specs and Main Parts
The 1995 Ford Ranger's under-hood fuse box (also sometimes referred to as a power distribution box) is typically located on the driver's side of the engine compartment, near the firewall. Inside, you'll find:
- Fuses: These are the sacrificial links in the electrical system. When a circuit draws too much current (amperage), the fuse melts, breaking the circuit and preventing damage to other components.
- Relays: Electrically operated switches that control high-current circuits, such as the starter motor, headlights, and fuel pump. A relay allows a low-current signal from a switch (like your headlight switch) to control a much higher-current circuit.
- Circuit Breakers: Similar to fuses, but resettable. Instead of melting, they trip and break the circuit when overloaded. They can then be reset manually. The '95 Ranger uses mainly fuses in the under-hood box, but some models and years might have a few circuit breakers, particularly for high-draw items.
- Wiring Harness Connectors: These connect the fuse box to the rest of the vehicle's electrical system.
- Cover with Diagram: Usually, the inside of the fuse box cover has a diagram that labels each fuse and relay. If yours is missing or damaged, the diagram we provide is invaluable.
Symbols: Decoding the Diagram
Understanding the symbols on the fuse box diagram is essential. Here's a breakdown of common elements:
- Fuses: Typically represented as a rectangle with a number inside, indicating the amperage rating (e.g., "20" for a 20-amp fuse). Different manufacturers might use a slightly different shape, but the number is the key.
- Relays: Usually shown as a square or rectangle with internal symbols depicting the coil and contacts of the relay. These can be more difficult to interpret without specific knowledge of relay circuitry.
- Lines: Solid lines represent wires. Dashed lines might indicate ground connections or shielded wires. Line thickness usually doesn’t indicate wire gauge on these diagrams, but it could on some aftermarket diagrams.
- Colors: Wire colors are sometimes indicated on more detailed diagrams. Common colors include red (power), black (ground), and various other colors to differentiate circuits. For the '95 Ranger fuse box diagram, wire colors may not always be explicitly stated but are crucial for tracing wires in real-world troubleshooting.
- Icons: Small icons might represent the component the fuse protects, such as a headlight, turn signal, or radio. These are helpful but aren't always present or standardized.
Remember that a legend will be provided with the complete fuse box diagram, which explicitly defines the symbols and their meanings. This is crucial for accurate interpretation.
How It Works
The fuse box is the central distribution point for electrical power in your Ranger. The battery provides the main power source, and the fuse box distributes this power to various circuits throughout the vehicle. Each circuit is protected by a fuse or circuit breaker of the appropriate amperage rating.
When a component needs power, the circuit is completed by closing a switch or relay. If there's a short circuit (e.g., a wire chafes and grounds out) or an overload (e.g., too many accessories are plugged into a single circuit), the fuse blows, preventing damage to the wiring and components.
Relays are used to control high-current devices with low-current signals. For example, when you turn on your headlights, a small current flows through the headlight switch to activate a relay. The relay then closes a high-current circuit, allowing power to flow to the headlights.
Real-World Use: Basic Troubleshooting Tips
Here's how to use the fuse box diagram to troubleshoot common electrical problems:
- Identify the Problem: Determine which component is not working (e.g., the radio, headlights, wipers).
- Consult the Diagram: Locate the fuse that protects the circuit for that component. The diagram will tell you the fuse number and amperage rating.
- Inspect the Fuse: Remove the fuse from the fuse box and visually inspect it. A blown fuse will have a broken filament. You can also use a multimeter to test for continuity. If the multimeter shows no continuity, the fuse is blown.
- Replace the Fuse: Replace the blown fuse with a new fuse of the same amperage rating. Never use a fuse with a higher amperage rating, as this can overload the circuit and cause a fire.
- Test the Component: After replacing the fuse, test the component to see if it now works. If the fuse blows again immediately, there is a short circuit in the wiring or component. Further investigation is required.
- Relay Issues: If a component isn't working and its fuse is fine, the relay could be the culprit. You can try swapping the relay with a known good relay of the same type to see if that resolves the issue. Relay testing can also be done with a multimeter, but it’s more involved.
Important Note: If a fuse keeps blowing repeatedly, it indicates a more serious underlying problem. Do not simply keep replacing the fuse. Find the source of the short circuit or overload before doing further damage.
Safety: Highlight Risky Components
Working with automotive electrical systems can be dangerous. Here are some safety precautions:
- Disconnect the Battery: Before working on any electrical component, disconnect the negative terminal of the battery to prevent accidental shocks or short circuits. This is critical.
- Use Proper Tools: Use insulated tools designed for automotive electrical work.
- Avoid Water: Never work on electrical systems in wet conditions.
- Be Aware of High-Current Circuits: The starter motor and alternator circuits carry very high current. Avoid touching these components while the engine is running or the battery is connected.
- Airbag Systems: Exercise extreme caution when working near airbag systems. Refer to the vehicle's service manual for specific instructions on disabling the airbag system before working on it. Accidental deployment can cause serious injury.
Warning: Incorrectly diagnosing or repairing electrical problems can lead to further damage, fire, or even injury. If you are not comfortable working with electrical systems, consult a qualified mechanic.
We have a detailed, high-resolution 1995 Ford Ranger Under-Hood Fuse Box Diagram available for download. This diagram provides a clear and comprehensive overview of the fuse box layout, making it an invaluable resource for any DIY mechanic or car enthusiast. With this resource in hand, you'll be well-equipped to tackle a wide range of electrical repairs and modifications on your 1995 Ford Ranger.