1996 Jeep Cherokee Under Hood Fuse Box Diagram
The 1996 Jeep Cherokee is a legend, known for its ruggedness and simplicity, which also extends to its electrical system. As an experienced DIYer or aspiring mechanic, understanding the under-hood fuse box is crucial for troubleshooting electrical problems, performing modifications, and generally maintaining your Jeep. This article will provide a detailed look at the 1996 Jeep Cherokee under-hood fuse box diagram, covering its components, function, and practical applications. We also have the diagram available for download at the end of the article, so you can have it handy while you work.
Purpose of Understanding the Fuse Box
The under-hood fuse box diagram is essentially a roadmap to your Cherokee's electrical system. It serves several critical purposes:
- Troubleshooting Electrical Issues: When an electrical component fails (e.g., headlights, wipers, radio), the fuse box diagram helps you quickly identify the corresponding fuse and determine if it has blown.
- Performing Modifications: If you're adding aftermarket accessories like auxiliary lights, a winch, or a sound system, you need to understand the fuse box to safely tap into the electrical system and protect your new components.
- Preventative Maintenance: Regularly inspecting fuses for signs of corrosion or damage can help prevent future electrical problems.
- Understanding System Architecture: It provides a basic understanding of how different circuits in your Cherokee are powered and protected.
Key Specs and Main Parts
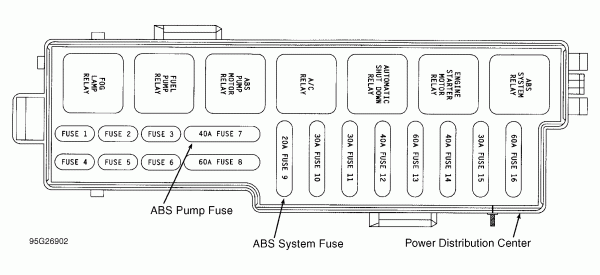
The 1996 Jeep Cherokee fuse box is typically located on the driver's side of the engine compartment, near the battery. It's a black plastic box with a removable cover. Inside, you'll find an array of fuses and relays. Here’s a breakdown of the key components:
- Fuses: These are sacrificial devices designed to protect electrical circuits from overcurrent. They contain a thin wire that melts and breaks the circuit when excessive current flows through it. Fuses are rated in amperes (amps), which indicates the amount of current they can handle before blowing. Common ratings include 5A, 10A, 15A, 20A, 25A, and 30A.
- Relays: Relays are electrically operated switches that allow a low-current circuit to control a high-current circuit. They are used to power components that require a significant amount of current, such as headlights, the starter motor, and the fuel pump.
- Circuit Breakers: Circuit breakers are similar to fuses, but they can be reset after tripping. They are typically used for circuits that are prone to temporary overloads, such as the power windows.
- Fuse Puller: A small plastic tool used to safely remove and replace fuses without damaging them or the fuse box.
Understanding Symbols and Diagram Conventions
The fuse box diagram uses specific symbols and conventions to represent different components and circuits. Understanding these is crucial for interpreting the diagram correctly.
- Lines: Solid lines represent electrical wires connecting the various components.
- Boxes: Boxes typically represent fuses, relays, or circuit breakers.
- Numbers: Numbers usually indicate the fuse amperage rating (e.g., "15" means a 15-amp fuse).
- Icons: Icons are used to represent the component that the fuse or relay protects (e.g., a headlight icon for the headlight circuit). Common icons include:
- Headlight
- Windshield Wiper
- Radio
- Horn
- Turn Signal
- Fuel Pump
- Starter Motor
- Colors: Wire colors are often indicated on the diagram. While not directly on the diagram itself, knowing Jeep's common wire color codes can be helpful when tracing circuits.
The diagram will also often include a legend that explains the meaning of each symbol and abbreviation used.
How It Works: The Electrical Circuit
To fully understand the fuse box, it's important to grasp the basics of an electrical circuit. A circuit is a closed loop that allows electricity to flow from a power source (the battery) to a load (e.g., a light bulb) and back. The fuse is placed in series within this circuit. Here's the breakdown:
- Power Source: The battery provides the electrical energy.
- Wiring: Wires carry the electrical current from the battery to the various components.
- Switch: A switch controls the flow of current to the component.
- Load: The component that uses the electrical energy (e.g., a light bulb).
- Fuse: Protects the circuit by interrupting the flow of current if it exceeds a safe level. If too much current flows through the circuit (due to a short circuit or overload), the fuse wire melts, breaking the circuit and preventing damage to the component and wiring.
- Ground: Provides a return path for the current back to the battery, completing the circuit.
When a fuse blows, it indicates that there is a problem in the circuit that caused excessive current to flow. Simply replacing the fuse without addressing the underlying issue will likely result in the new fuse blowing as well.
Real-World Use: Basic Troubleshooting Tips
Here are some basic troubleshooting tips using the fuse box diagram:
- Identify the Problem: Determine which electrical component is not working.
- Consult the Diagram: Locate the corresponding fuse or relay for that component in the under-hood fuse box diagram.
- Inspect the Fuse: Visually inspect the fuse. If the wire inside the fuse is broken or blackened, the fuse is blown. You can also use a multimeter to test the fuse for continuity. A good fuse will show continuity (a reading of 0 ohms).
- Replace the Fuse: If the fuse is blown, replace it with a new fuse of the same amperage rating. Never use a fuse with a higher amperage rating, as this could damage the wiring and components.
- Test the Component: After replacing the fuse, test the component to see if it is working.
- If the Fuse Blows Again: If the new fuse blows immediately, there is a more serious problem in the circuit, such as a short circuit. Further troubleshooting is required to identify and repair the fault. This might involve tracing wires, checking for damaged insulation, or testing components with a multimeter.
- Relay Troubleshooting: Relays can also fail. If you suspect a relay is faulty, you can try swapping it with an identical relay from a less critical circuit (e.g., swapping the horn relay with the windshield wiper relay) to see if the problem is resolved.
Safety Precautions
Working with electrical systems can be dangerous. Here are some important safety precautions:
- Disconnect the Battery: Always disconnect the negative battery cable before working on the electrical system to prevent accidental shocks or short circuits.
- Use Insulated Tools: Use tools with insulated handles to minimize the risk of electric shock.
- Do Not Bypass Fuses: Never bypass a fuse by using a wire or other conductive material. This can overload the circuit and cause a fire.
- Identify Risky Components: Be particularly careful when working with components that carry high voltage or current, such as the ignition system or the starter motor.
- Refer to the Service Manual: Consult the Jeep Cherokee service manual for specific instructions and safety precautions related to the electrical system.
Important: The fuel injection system can be extremely dangerous if handled incorrectly. If you are uncomfortable or unsure about any aspect of working with the electrical system, consult a qualified mechanic.
Understanding the 1996 Jeep Cherokee under-hood fuse box diagram is an invaluable skill for any owner. By familiarizing yourself with the components, symbols, and troubleshooting techniques outlined in this article, you can confidently diagnose and repair electrical problems, perform modifications, and keep your Cherokee running smoothly for years to come.
As promised, you can download the 1996 Jeep Cherokee Under Hood Fuse Box Diagram file here.