1996 Toyota 4runner Fuse Box Diagram
The 1996 Toyota 4Runner, a legend in its own right, is a popular choice for off-roading and daily driving alike. Whether you're restoring one, adding aftermarket accessories, or simply trying to diagnose an electrical issue, understanding its fuse box diagram is absolutely crucial. This article aims to equip you, the experienced DIYer, with the knowledge you need to confidently navigate the 4Runner's electrical system using the fuse box diagram.
Purpose of the Fuse Box Diagram
Why bother with the fuse box diagram? Simply put, it's your roadmap to the vehicle's electrical system. It serves several key purposes:
- Troubleshooting Electrical Problems: When a component stops working (e.g., headlights, wipers, radio), the fuse box is often the first place to check. The diagram identifies which fuse protects that particular circuit, allowing you to quickly pinpoint a blown fuse.
- Installing Aftermarket Accessories: When adding electrical accessories like lights, amplifiers, or a winch, you need to tap into the vehicle's power system safely. The diagram shows available circuits and their amperage ratings, allowing for proper fuse selection and wiring to prevent overloads.
- Understanding the Vehicle's Electrical System: Even without a specific problem, the diagram helps you learn how different components are interconnected and protected. This deeper understanding makes you a more capable owner and DIY mechanic.
- Restoration and Modification: During a restoration or significant modification, the fuse box may need to be reorganized or rewired. The diagram is essential for ensuring everything is connected correctly and safely.
Key Specs and Main Parts
The 1996 4Runner typically has two main fuse box locations:
- Under the Hood (Engine Compartment): This box usually houses fuses and relays for critical engine and vehicle functions like the fuel pump, ignition system, headlights, and ABS. It's often a black plastic box clearly labeled with a diagram on the inside of the lid.
- Inside the Cabin (Driver's Side): This box typically protects circuits for interior components like the radio, power windows, power locks, and interior lighting. It's usually located under the dashboard, near the driver's side kick panel.
Key specs you need to pay attention to include:
- Fuse Amperage Rating: Fuses are rated in amperes (amps or A), indicating the maximum current they can handle before blowing. Common ratings include 5A, 7.5A, 10A, 15A, 20A, 25A, and 30A. Always replace a blown fuse with one of the exact same amperage rating unless otherwise specified by a professional.
- Fuse Type: The 1996 4Runner primarily uses blade-type fuses, also known as spade fuses. These are characterized by their plastic body and two metal prongs that plug into the fuse box.
- Relay Type: Relays are electromagnetic switches that allow a low-current circuit to control a high-current circuit. They come in various sizes and configurations (e.g., SPST, SPDT). The diagram identifies which relay controls each circuit.
Symbols, Lines, Colors, and Icons
Understanding the symbols used in the fuse box diagram is key to deciphering its information:
- Lines: Lines represent wires connecting different components. Thicker lines often indicate higher-current circuits.
- Colors: Wire colors are often indicated on the diagram (e.g., BLU for blue, RED for red, GRN for green). This helps you trace wires in the vehicle.
- Icons: Icons represent specific components. Common icons include:
- Light Bulb: Headlights, taillights, interior lights
- Motor: Windshield wiper motor, power window motor
- Coil/Winding: Relay coil
- Battery: Battery symbol
- Resistor: Represents a resistor in the circuit.
- Fuse Symbol: Typically shown as a jagged line inside a rectangle.
- Relay Symbol: Often depicted as a square with connections to the coil and the switch contacts.
A typical fuse box diagram will show each fuse or relay position, its amperage rating (if applicable), and the component it protects or controls. It may also include notes or abbreviations to clarify specific functions.
How It Works: The Electrical Circuit
To fully grasp the fuse box's role, it's important to understand how an electrical circuit works in your 4Runner:
- Power Source: The battery provides the electrical energy.
- Wiring: Wires carry the current from the battery to the various components.
- Switch: A switch (e.g., headlight switch, ignition switch) controls the flow of current.
- Fuse: The fuse is a safety device in the circuit. It's a thin wire designed to melt and break the circuit if the current exceeds its rating. This protects the component and wiring from damage due to overloads or short circuits.
- Component: The component is the device that uses the electricity (e.g., headlight, motor).
- Ground: The circuit needs a complete path back to the battery. The ground provides this return path, typically through the vehicle's chassis.
When a fuse blows, it means there was an excessive current flow in that circuit. This can be caused by:
- Short Circuit: A direct connection between a power wire and ground, bypassing the intended component.
- Overload: Too many components drawing power from the same circuit, exceeding the fuse's capacity.
- Component Failure: A faulty component drawing excessive current.
Real-World Use: Basic Troubleshooting Tips
Here's how to use the fuse box diagram for basic troubleshooting:
- Identify the Problem: Determine which component isn't working.
- Locate the Fuse Box Diagram: Usually found inside the fuse box cover or in the owner's manual.
- Find the Correct Fuse: Use the diagram to identify the fuse that protects the malfunctioning component.
- Inspect the Fuse: Visually inspect the fuse. A blown fuse will have a broken filament inside.
- Replace the Fuse: Replace the blown fuse with a new fuse of the same amperage rating.
- Test the Component: Turn on the component and see if it works.
If the new fuse blows immediately: This indicates a persistent short circuit or overload. Do not keep replacing fuses without investigating the underlying cause. Seek professional help if you're not comfortable troubleshooting electrical issues.
Example: Your headlights aren't working. You check the fuse box diagram and find that fuse #12, rated at 15A, protects the headlights. You inspect fuse #12 and see that the filament is broken. You replace it with a new 15A fuse, and the headlights now work. Problem solved!
Safety: Highlight Risky Components
Working with electrical systems can be dangerous. Keep the following safety precautions in mind:
- Disconnect the Battery: Always disconnect the negative battery terminal before working on any electrical components. This prevents accidental short circuits and electrical shocks.
- Use Proper Tools: Use insulated tools designed for electrical work.
- Don't Exceed Fuse Ratings: Never replace a fuse with one of a higher amperage rating. This can damage the wiring and components, potentially leading to a fire.
- Be Careful Around Airbags: Airbags are triggered by electrical signals. Refer to your owner's manual or a repair manual for proper airbag disabling procedures before working near airbags. Mishandling airbags can cause serious injury.
- Fuel System: Fuses related to the fuel pump or fuel injection system require extra care. A short in these circuits could potentially cause a fuel leak or fire.
Disclaimer: This information is for general guidance only. Always consult your vehicle's owner's manual and a qualified mechanic for specific repair instructions. Electrical systems can be complex, and improper repairs can be dangerous. If you're not comfortable working on electrical systems, seek professional assistance.
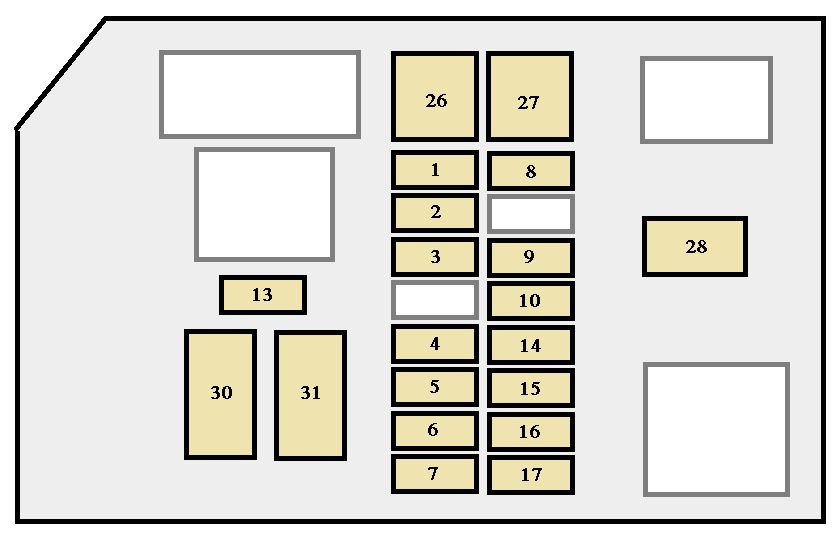
We have a copy of the 1996 Toyota 4Runner Fuse Box Diagram available for download. It provides a detailed and visual reference to assist you in your repairs and modifications.