1997 Chevy Silverado Radio Wiring Harness Diagram
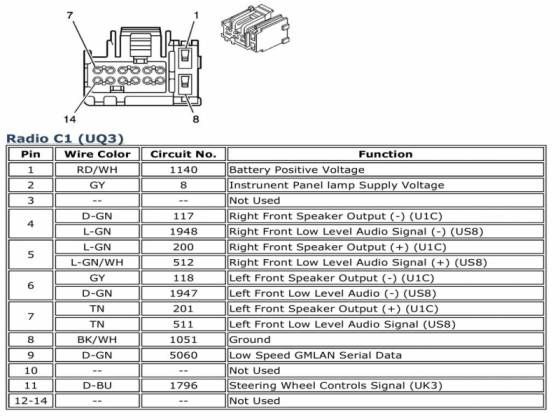
Alright, let's dive into the 1997 Chevy Silverado radio wiring harness diagram. If you're contemplating swapping out your factory head unit, troubleshooting audio problems, or even adding an amplifier, understanding this diagram is absolutely crucial. Think of it as the roadmap for your truck's audio system – it lays out every connection, wire color, and function in precise detail. Without it, you're essentially working blind, increasing the risk of shorts, damage, and a whole lot of frustration.
Purpose: Navigating the Audio Labyrinth
This diagram isn't just a pretty picture; it's an essential tool for several key tasks:
- Aftermarket Radio Installation: Installing a new head unit often requires adapting the factory wiring to the aftermarket unit's harness. The diagram identifies each wire, allowing you to connect the correct wires to the correct pins on the new harness.
- Troubleshooting Audio Issues: Experiencing no sound, distorted audio, or a dead radio? The diagram allows you to systematically trace the wiring, pinpointing breaks, shorts, or faulty components.
- Adding Amplifiers and Other Components: Integrating aftermarket amplifiers, subwoofers, or other audio enhancements requires tapping into the existing wiring. The diagram ensures you tap into the correct wires without damaging other systems.
- Learning and Understanding: For those interested in automotive electrical systems, studying the diagram provides valuable insight into how a car radio is wired and integrated into the vehicle's electrical system.
Key Specs and Main Parts of the 1997 Silverado Radio Wiring Harness
The 1997 Chevy Silverado, like many vehicles of its era, uses a fairly straightforward wiring harness for the radio. Here are the key components you'll encounter:
- Power Wire (+12V Constant): This wire provides constant power to the radio, allowing it to retain memory (presets, clock settings, etc.). Usually yellow, orange, or red.
- Ignition Wire (+12V Switched): This wire provides power only when the ignition is turned on. It's what turns the radio on and off with the key. Usually red.
- Ground Wire: Provides the return path for the electrical current. Usually black. Crucially, this wire must have a good connection to the vehicle's chassis ground for proper operation.
- Speaker Wires (Left Front, Right Front, Left Rear, Right Rear): These wires carry the audio signal from the radio to the speakers. Each speaker requires a positive (+) and a negative (-) wire. Typically, they come in pairs and can vary in colors, but often include white, gray, green and purple with or without stripes.
- Antenna Wire: Connects the radio to the antenna, allowing it to receive radio signals. This is usually a coaxial cable.
- Dimmer Wire: This wire dims the radio display when the headlights are turned on, reducing glare at night. Usually gray.
- (Optional) Amplifier Turn-On Wire (Remote Wire): If the truck has a factory amplifier or you're installing an aftermarket amplifier, this wire sends a +12V signal to turn the amplifier on when the radio is powered on. Typically blue.
- (Optional) Chime Module Interface: On some models with factory theft systems or warning chimes integrated into the radio, there may be additional wires for this module. These are more complex and best left alone unless you understand their specific functions.
Decoding the Diagram: Symbols, Lines, and Colors
Understanding the symbols and conventions used in the diagram is key to interpreting it correctly. Here's a breakdown:
- Lines: Solid lines represent wires, and their thickness doesn't necessarily indicate wire gauge (thickness). Dashed lines often represent shielded cables, like the antenna wire.
- Colors: Wire colors are usually abbreviated (e.g., "BLU" for blue, "GRN" for green, "YEL" for yellow). The diagram legend will provide a key to these abbreviations. Look closely – sometimes there are stripes indicated as well (e.g., "BLU/WHT" for blue with a white stripe).
- Symbols:
 (Ground): This symbol indicates a connection to the vehicle's chassis ground. A solid ground is crucial for proper circuit operation.
 (Speaker): Represents a speaker. The diagram will indicate which wires connect to each speaker.
- Fuse Symbol: Looks like a jagged line inside a rectangle or oval. Indicates a fuse for circuit protection. The amperage rating of the fuse is usually listed nearby.
- Connector Symbols: Shows the location and pin numbers of the various connectors in the wiring harness. This is essential for identifying the correct wires when making connections.
Important Note: Wire colors can sometimes vary slightly depending on the specific trim level and options of your truck. Always double-check the wire functions with a multimeter before making any connections.
How It Works: Following the Electrical Path
The radio wiring harness creates a closed electrical circuit. Power flows from the battery, through the fuse box (for protection), to the radio via the +12V constant and +12V switched wires. When the ignition is turned on, the +12V switched wire activates the radio. The radio then sends audio signals through the speaker wires to the speakers. Finally, the ground wire provides the return path for the electrical current, completing the circuit.
Think of it like a water pipe system: the battery is the water source (voltage), the wires are the pipes, the radio is a valve that controls the water flow, the speakers are sprinklers, and the ground is the drain that returns the water to the source.
Real-World Use: Troubleshooting and Repairs
Let's say your radio suddenly stops working. Here's how you can use the wiring diagram to troubleshoot the issue:
- Check the Fuses: Locate the radio fuse in the fuse box (the diagram will usually indicate its location). Use a multimeter to check for continuity across the fuse. If the fuse is blown, replace it with one of the same amperage rating.
- Verify Power and Ground: Use a multimeter to check for voltage on the +12V constant and +12V switched wires. You should see approximately 12 volts on both wires when the ignition is turned on. Also, check for continuity between the ground wire and the vehicle's chassis ground. A lack of power or a poor ground connection is a common cause of radio failure.
- Check Speaker Connections: If the radio powers on but you have no sound, check the speaker connections at the radio and at the speakers themselves. Look for loose connections or damaged wires. You can use a multimeter to check the continuity of the speaker wires.
- Isolate the Problem: If you suspect a specific speaker is the issue, disconnect it and see if the other speakers start working. This can help you narrow down the problem.
Safety First: Handling Risky Components
Working with electrical systems can be dangerous if you're not careful. Here are some safety precautions to keep in mind:
- Disconnect the Battery: Before working on any electrical wiring, disconnect the negative terminal of the battery. This will prevent accidental shorts and electrical shocks.
- Use Proper Tools: Use insulated tools designed for automotive electrical work.
- Avoid Working in Wet Conditions: Water and electricity don't mix.
- Be Careful Around the Airbag System: Some wiring may be near the airbag system. Avoid tampering with these wires, as accidental activation of the airbag can cause serious injury.
- Fuses are your friend! Never bypass a fuse or use a fuse with a higher amperage rating than specified. This can overload the circuit and cause a fire.
- If you are unsure, consult a professional. A mistake could cost you an entire electrical system.
Understanding the 1997 Chevy Silverado radio wiring harness diagram is a valuable skill for any DIY mechanic or car audio enthusiast. It empowers you to troubleshoot problems, install aftermarket equipment, and gain a deeper understanding of your vehicle's electrical system. With the right tools and precautions, you can tackle a wide range of audio-related projects with confidence.
We have the complete 1997 Chevy Silverado Radio Wiring Harness Diagram available for download. It's a valuable resource that you can use for all your audio-related projects on your Silverado.