1997 Dodge Ram 1500 Fuse Box Diagram
Alright, let's dive into the fuse box diagram for your 1997 Dodge Ram 1500. Whether you're chasing down a faulty tail light, installing a new sound system, or just trying to understand your truck's electrical system better, knowing your way around the fuse box is crucial. Consider this your definitive guide. We're going to break down everything you need to know, from the symbols used to real-world troubleshooting tips.
Why This Diagram Matters
Why bother understanding this diagram? Simple. It's your roadmap to electrical problem-solving. Without it, you're essentially guessing when a circuit malfunctions. The diagram helps you:
- Diagnose Electrical Issues: Quickly identify and replace blown fuses, saving time and money.
- Install Aftermarket Accessories: Safely tap into existing circuits for new devices (lights, stereos, etc.).
- Understand Your Truck's Systems: Gain a deeper knowledge of how different components are powered and protected.
- Perform Basic Repairs: Troubleshoot issues like non-functioning lights, wipers, or power windows.
Think of it as the Rosetta Stone for your truck's electrical language. Understanding it unlocks a whole new level of DIY capability.
Key Specs and Main Parts of the Fuse Box
The 1997 Dodge Ram 1500 typically has two main fuse box locations:
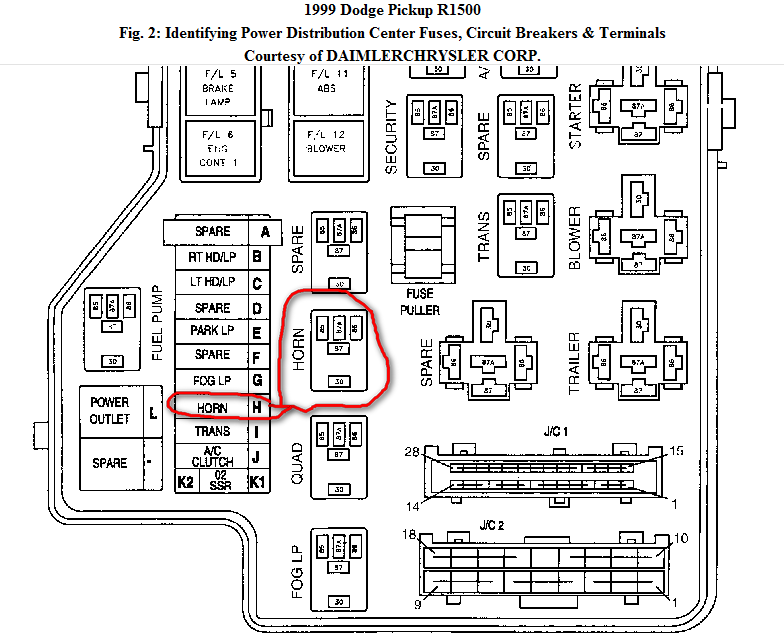
- Under the Hood (Power Distribution Center): This contains the higher amperage fuses and relays responsible for protecting critical systems like the engine, transmission, and ABS. It's the big kahuna.
- Under the Dash (Interior Fuse Box): This handles lower amperage circuits for accessories like lights, the radio, the cigarette lighter (or power outlet), and the instrument cluster.
Inside each box, you'll find:
- Fuses: These are sacrificial components designed to break a circuit when the current exceeds a safe level, preventing damage to wiring and components. They're rated in amperes (amps), indicating how much current they can handle before blowing.
- Relays: Electrically operated switches that allow a low-current circuit to control a high-current circuit. For example, a low-current switch on your dashboard can activate a relay that sends high current to your headlights.
- Circuit Breakers: Resettable protection devices that interrupt a circuit when overloaded. Unlike fuses, they can be reset and reused.
- Terminal Blocks: Connectors that allow multiple wires to be joined together.
Understanding these components is essential for interpreting the diagram and troubleshooting electrical problems.
Decoding the Symbols: Lines, Colors, and Icons
Fuse box diagrams aren't just a bunch of random lines and squares. They use standardized symbols to represent different components and connections. Here's a breakdown:
- Fuses: Typically represented by a squiggly line inside a rectangle. Sometimes, the amperage rating is printed next to it (e.g., "20A").
- Relays: Usually shown as a square or rectangle with terminals labeled with numbers or letters (e.g., 30, 85, 86, 87). These numbers correspond to the relay's terminals and their function (e.g., coil power, ground, normally open contact, normally closed contact).
- Circuit Breakers: Similar to fuses but often have a small reset button symbol next to them.
- Wires: Solid lines represent wires, and dashed lines may indicate shielded wires or grounding paths.
- Grounds: Typically depicted as a series of horizontal lines decreasing in length, resembling a comb. This indicates a connection to the vehicle's chassis, providing a return path for the current.
Color Coding: Wire colors are often indicated on the diagram, which can be incredibly helpful when tracing wires in the harness. Common colors include:
- Red: Typically indicates a constant power source.
- Black: Usually represents ground.
- Yellow: Often used for ignition-switched power.
- Blue: Can be used for various circuits, check the legend.
Icons: You might also see icons representing specific components like headlights, tail lights, the horn, or the radio. These icons help you quickly identify which fuse protects which system.
Always refer to the legend on the diagram itself for the most accurate interpretation of the symbols and color codes. This legend is crucial for understanding the specific conventions used in your '97 Ram 1500.
How It Works: From Battery to Bulb
The electrical system in your truck is a closed loop, starting with the battery, flowing through circuits, and returning to the battery. Fuses and relays play crucial roles in this process.
The Fuse's Job: Imagine a fuse as a weak link in a chain. It's designed to break if the current flowing through it exceeds its rating. This protects the more expensive and sensitive components in the circuit from damage. For example, if a short circuit occurs in your tail light wiring, the corresponding fuse will blow, preventing a fire or damage to the wiring harness.
The Relay's Role: Relays allow a low-current switch (like the headlight switch) to control a high-current circuit (like the headlights themselves). When you turn on the headlight switch, it sends a small current to the relay coil. This energizes the coil, which creates a magnetic field that pulls the relay's contacts together, completing the high-current circuit and turning on the headlights.
Understanding this basic flow is key to troubleshooting electrical problems. If a component isn't working, you can use the fuse box diagram to trace the circuit back to the power source, checking fuses, relays, and wiring along the way.
Real-World Use: Basic Troubleshooting Tips
Okay, let's get practical. Here are some troubleshooting tips using your fuse box diagram:
- Identify the Problem: What isn't working? (e.g., tail lights, radio, wipers).
- Consult the Diagram: Locate the fuse or relay that corresponds to the malfunctioning component.
- Check the Fuse: Visually inspect the fuse. If the filament inside is broken, it's blown. You can also use a multimeter to test for continuity. A good fuse will have continuity (a reading of 0 ohms).
- Replace the Fuse: Use a fuse with the exact same amperage rating. Never use a higher amperage fuse, as this could overload the circuit and cause a fire.
- Test the Component: If the fuse blows again immediately, there's likely a short circuit in the wiring or the component itself. Further investigation is needed.
- Check the Relay (If Applicable): Relays can fail too. You can often swap a known good relay with the suspect relay to see if that resolves the issue. You can also test relays with a multimeter.
- Inspect Wiring: Look for damaged, corroded, or loose wiring connections. Pay close attention to areas where the wiring might be rubbing against the chassis.
Remember to always disconnect the negative battery cable before working on the electrical system to prevent accidental shorts.
Safety First: Handling Risky Components
Working with electrical systems can be dangerous if you're not careful. Here are some key safety precautions:
- Disconnect the Battery: Always disconnect the negative battery cable before working on any electrical components. This prevents accidental shorts and shocks.
- Use Proper Tools: Use insulated tools designed for electrical work.
- Never Bypass Fuses: Never bypass a fuse with a wire or other conductive material. This eliminates the circuit protection and can lead to a fire.
- Be Careful Around High-Voltage Components: The ignition system and charging system operate at high voltages. Avoid touching these components while the engine is running.
- If in Doubt, Seek Professional Help: If you're not comfortable working on the electrical system, take your truck to a qualified mechanic.
Specifically, be extra cautious around the high-amperage fuses and relays in the under-hood power distribution center. These control critical systems like the fuel pump, starter, and alternator, and a fault in these circuits can have serious consequences.
By understanding your 1997 Dodge Ram 1500 fuse box diagram and following these safety guidelines, you can confidently tackle a wide range of electrical repairs and modifications. With the knowledge you've gained here, you're well on your way to becoming an electrical troubleshooting pro!
Remember, we have a downloadable PDF file containing the complete fuse box diagram for your 1997 Dodge Ram 1500. This resource will be invaluable as you work on your truck.