1997 Ford F250 4x4 Front Hub Assembly Diagram
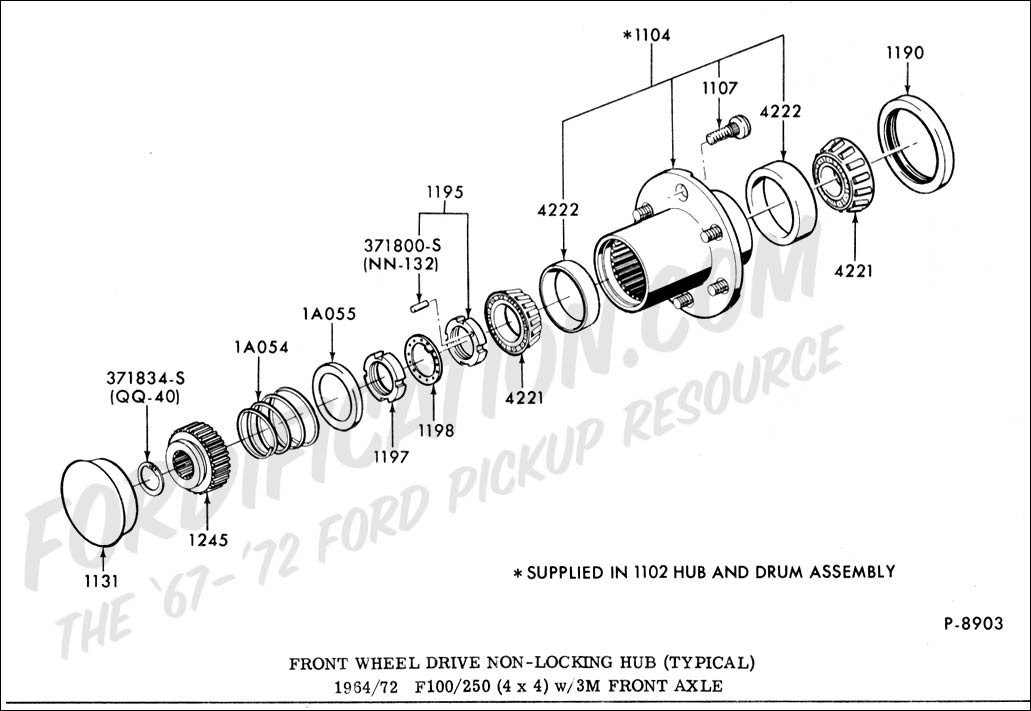
Alright folks, let's dive into the 1997 Ford F250 4x4 front hub assembly. This isn't just some pretty picture; it's your roadmap to understanding, troubleshooting, and maintaining one of the most critical parts of your truck's 4-wheel drive system. Whether you're tackling a bearing replacement, diagnosing a mysterious clicking noise, or simply want to understand how your hubs engage, having a good grasp of this diagram is essential.
Why Bother with the Diagram?
Think of this diagram as the X-ray of your hub assembly. It reveals the internal workings, allowing you to:
- Diagnose Problems: Pinpoint the source of noises, vibrations, or 4x4 engagement issues.
- Perform Repairs: Understand the order of assembly and the location of each component. This makes disassembly and reassembly significantly easier and reduces the risk of mistakes.
- Order Parts Correctly: Identify the specific part you need by its name and location. This prevents ordering the wrong components and wasting time and money.
- Increase Your Knowledge: Gain a deeper understanding of your truck's mechanics. This empowers you to perform more advanced repairs and modifications in the future.
- Preventative Maintenance: Use the diagram to identify wear points and plan preventative maintenance, prolonging the life of your hub assembly.
Key Specs and Main Parts of the 1997 F250 4x4 Front Hub Assembly
The 1997 F250 4x4 typically uses a manual locking hub assembly, though some models may have automatic hubs. This breakdown focuses on the manual type, as it's the more common and robust design. Here's a rundown of the core components:
- Hub Body: The main housing that contains all the other components. It's bolted to the wheel bearing assembly.
- Wheel Bearing Assembly: A critical component that allows the wheel to rotate smoothly. Typically a sealed unit with two bearings.
- Hub Lock Mechanism: This is the core of the manual locking hub. It's the part you turn to engage or disengage the front wheels from the axle. It typically consists of a locking dial, inner clutch gear, and outer clutch gear.
- Axle Shaft Spline: The splined end of the front axle that engages with the inner clutch gear of the hub lock mechanism.
- Snap Rings and Retaining Clips: These small but crucial components hold various parts in place within the hub assembly. Pay close attention to their location during disassembly.
- O-rings and Seals: These prevent water, dirt, and debris from entering the hub assembly and damaging the bearings and other components.
- Wheel Studs: These are pressed into the hub and secure the wheel to the hub assembly.
Key Specs: While a detailed spec sheet would be extensive, here are some critical points to remember:
- Torque Specifications: Always consult your truck's service manual for the correct torque specifications for the hub assembly bolts, wheel studs, and other fasteners. Overtightening can damage components, while undertightening can lead to loosening and failure.
- Bearing Preload: If your truck has adjustable wheel bearings (uncommon in 1997 F250s but worth checking), proper bearing preload is crucial for bearing life and performance.
- Grease Type: Use a high-quality, waterproof grease specifically designed for wheel bearings and hub assemblies.
Understanding the Symbols in the Diagram
Diagrams often use a variety of symbols to represent different components and features. Here's a general guide:
- Solid Lines: Typically represent the physical boundaries of components. Thicker lines often indicate larger parts.
- Dashed Lines: May indicate hidden features, such as internal passages or the location of parts behind other components.
- Arrows: Indicate the direction of movement or force. For example, arrows may show the direction of rotation of the axle shaft or the direction of force applied when engaging the hub lock.
- Callouts: Numbers or letters that correspond to a parts list. The parts list will provide the name and part number of each component.
- Hatching or Shading: Can indicate different materials or finishes.
- Colors: Color coding isn't always present, but if it is, it could signify different types of lubricants, seals, or other characteristics.
Always refer to the legend or key on the diagram itself for the specific meaning of each symbol.
How the Manual Locking Hub Works
The manual locking hub allows you to selectively engage or disengage the front wheels from the front axle. Here's a simplified explanation:
- Disengaged (Free) Position: When the hub lock is in the "Free" or "Unlocked" position, the inner clutch gear is disengaged from the axle shaft spline. This means the front wheels can rotate freely, and the front axle is not being driven by the engine.
- Engaged (Locked) Position: When you turn the hub lock to the "Locked" position, the inner clutch gear slides inward and engages with the axle shaft spline. This connects the front wheels to the front axle, allowing the engine to drive the front wheels.
- The Clutch Mechanism: Inside the hub, a clutching mechanism connects the wheel hub to the axle shaft. When locked, this mechanism ensures that any rotation of the wheel directly translates to rotation of the axle, and vice versa.
Real-World Use: Basic Troubleshooting
Here are a few common issues you might encounter and how the diagram can help:
- Hub Not Locking: If the hub lock won't turn or doesn't seem to engage properly, the diagram can help you identify the parts that might be causing the problem. Look for broken or worn clutch gears, damaged snap rings, or binding components.
- Clicking Noise: A clicking noise from the front hub area, especially when turning, could indicate a worn or damaged wheel bearing. The diagram will show you the location of the wheel bearing assembly, allowing you to inspect it for play or roughness. It could also be a sign of a partially engaged hub, indicating a need for cleaning and lubrication of the hub locking mechanism.
- 4x4 Not Engaging: If you engage the hubs and the 4x4 system still doesn't work, the problem could be in the transfer case, front differential, or even a broken axle shaft. However, the diagram can help you rule out problems with the hub assembly itself.
Troubleshooting Tip: Before diving into any repairs, always check for simple issues like loose hub lock bolts or a lack of lubrication. A little maintenance can often prevent more serious problems.
Safety First: Risky Components
Working on the front hub assembly involves dealing with potentially dangerous components:
- Wheel Bearing Assembly: If you suspect a wheel bearing is failing, be extremely cautious. A severely worn wheel bearing can cause the wheel to wobble or even detach, leading to a serious accident.
- Springs: Some hub assemblies contain small springs that can be under tension. Be careful when disassembling the hub to avoid injury.
- Sharp Edges: Many of the components in the hub assembly have sharp edges. Wear gloves to protect your hands.
- Always Secure the Vehicle: Before starting any work, make sure the vehicle is properly supported on jack stands. Never work under a vehicle that is only supported by a jack.
- Eye Protection: Wear safety glasses to protect your eyes from debris.
Important: If you're not comfortable working on the front hub assembly yourself, take your truck to a qualified mechanic. Your safety and the safety of others are paramount.
We have the detailed 1997 Ford F250 4x4 front hub assembly diagram file available for download. Click here to access it and get an even more granular view of this vital truck component.