
1997 Honda Accord Timing Belt Diagram
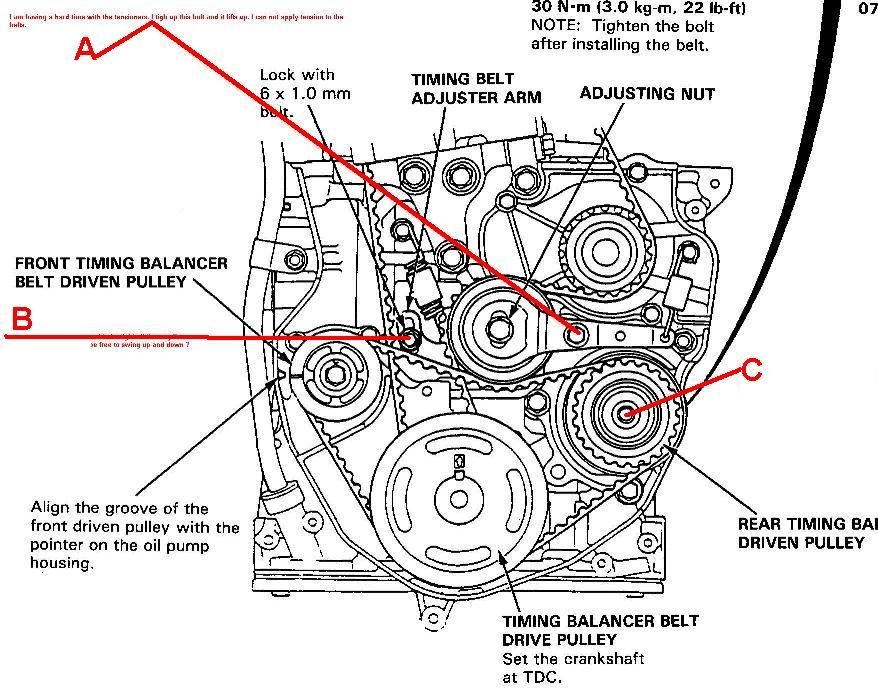
So, you're tackling the timing belt on your 1997 Honda Accord? Excellent! This is a job that, while involved, can save you a ton of money compared to a shop visit. But before you even think about reaching for a wrench, you need a solid understanding of the timing belt system and, most importantly, the timing belt diagram. This article will be your guide to deciphering that crucial piece of information.
Purpose: Why the 1997 Honda Accord Timing Belt Diagram Matters
The timing belt diagram isn't just a pretty picture; it's the Rosetta Stone for your engine's valve train. It's essential for several reasons:
- Repairs: Replacing the timing belt is preventative maintenance. A broken timing belt can lead to catastrophic engine damage (bent valves, damaged pistons – the works!). The diagram ensures you install the new belt correctly, aligning all timing marks precisely.
- Troubleshooting: If your engine is running rough, misfiring, or experiencing a loss of power, an incorrect timing belt installation is a potential culprit. The diagram allows you to verify the timing and diagnose any issues.
- Learning: Understanding the timing belt system deepens your understanding of how your engine operates. It's a valuable skill for any DIY mechanic.
- Peace of Mind: Knowing the belt is correctly installed eliminates a significant source of potential engine problems.
Simply put, without the diagram, you're working blind. It's the difference between surgery with a scalpel and swinging a hammer.
Key Specs and Main Parts of the 1997 Honda Accord Timing System
The 1997 Honda Accord (with either the F22B1 or F22B2 engine) uses an interference engine. This means that if the timing belt breaks, the valves and pistons can collide, causing severe damage. This is why timing belt maintenance is so critical. Here are the key components:
- Timing Belt: The toothed belt that connects the crankshaft and camshaft(s), ensuring they rotate in sync. This belt is subject to wear and tear and needs to be replaced at recommended intervals (typically every 90,000 - 105,000 miles).
- Crankshaft Pulley (Crank Pulley): Located at the bottom of the engine, driven directly by the crankshaft. It drives the timing belt and has a timing mark for alignment.
- Camshaft Pulley (Cam Pulley): Located at the top of the engine, connected to the camshaft. It's driven by the timing belt and has timing marks for alignment. The '97 Accord 2.2L has a SOHC (Single Over Head Cam) engine.
- Tensioner Pulley: A spring-loaded or adjustable pulley that maintains proper tension on the timing belt. Proper tension is crucial for belt life and accurate timing.
- Water Pump: Often driven by the timing belt. It's good practice to replace the water pump when replacing the timing belt, as the labor overlaps significantly, and a failing water pump can damage the new belt.
- Idler Pulley (if applicable): Some models may have an idler pulley to guide the timing belt.
- Timing Marks: Notches, arrows, or other indicators on the crankshaft and camshaft pulleys that must be aligned to ensure proper valve timing.
These parts are carefully orchestrated to ensure precise valve timing. The valve timing refers to the opening and closing of the intake and exhaust valves in relation to the piston's position in the cylinder. Incorrect timing can lead to decreased performance, poor fuel economy, and, ultimately, engine damage.
Decoding the Diagram: Symbols, Lines, and Icons
The timing belt diagram is a visual representation of the timing belt system. Understanding the symbols is key to using it effectively. Here's a breakdown:
- Lines: The solid line represents the timing belt itself, showing its path around the various pulleys. Pay close attention to the direction the belt travels.
- Circles/Pulleys: Circles represent the crankshaft and camshaft pulleys, as well as the tensioner and idler pulleys (if present). Each pulley should be clearly labeled.
- Timing Marks: These are usually represented by small notches, arrows, or dots on the pulleys and engine block. These marks *must* be aligned correctly. The diagram shows you where these marks are located on each pulley and where they should line up. Often, there will be a corresponding mark on the engine block.
- Arrows: Arrows often indicate the direction of rotation for the crankshaft and camshafts. This can be helpful when confirming the proper belt path.
- Text Labels: These identify the various components, such as "Crankshaft Pulley," "Camshaft Pulley," "Tensioner," and "Timing Mark."
- Color Coding: While not always present, some diagrams use color coding to highlight specific components or pathways. For example, the timing belt might be shown in a different color to distinguish it from the pulleys.
The best timing belt diagrams for the 1997 Honda Accord are available in the factory service manual. These are generally the clearest and most accurate.
How It Works: Putting the Diagram into Practice
The timing belt diagram is more than just a picture; it's a set of instructions. Here's how to use it when replacing the timing belt:
- Preparation: Disconnect the negative battery cable. Remove the timing belt covers to expose the timing belt system.
- Alignment: Rotate the crankshaft (usually using a socket on the crankshaft pulley bolt) until the timing marks on the crankshaft and camshaft pulleys align with their corresponding marks on the engine block. Important: Make sure the #1 cylinder is at Top Dead Center (TDC) on the compression stroke.
- Removal: Loosen the tensioner pulley to release the tension on the old timing belt. Remove the old belt.
- Installation: Install the new timing belt, ensuring that it's properly seated on all pulleys. Start at the crankshaft pulley and work your way around.
- Tensioning: Adjust the tensioner pulley to the correct tension. The service manual specifies the proper tensioning procedure, which might involve using a special tool. Over-tensioning or under-tensioning the belt can lead to premature failure.
- Verification: Rotate the crankshaft two full revolutions (720 degrees) *by hand* and recheck the alignment of the timing marks. If the marks are still aligned, you're good to go. If not, repeat steps 4 and 5.
- Reassembly: Reinstall the timing belt covers and any other components you removed. Reconnect the negative battery cable.
Real-World Use: Basic Troubleshooting Tips
Even with a diagram, things can go wrong. Here are some common troubleshooting scenarios:
- Engine Won't Start: If the timing marks are significantly misaligned, the engine may not start. Double-check the timing. A compression test can help diagnose valve timing issues.
- Rough Idle or Misfiring: Slightly misaligned timing can cause a rough idle or misfires. Verify the timing and check for other potential causes, such as faulty spark plugs or ignition coils.
- Timing Belt Noise: A squealing or chirping noise from the timing belt area could indicate an overtightened or undertightened belt, a failing tensioner pulley, or a worn timing belt.
- Oil Leaks: Oil leaks near the timing belt area can damage the belt. Inspect the crankshaft and camshaft seals for leaks and replace them if necessary.
Remember: Always refer to the service manual for the specific torque specifications and procedures for your 1997 Honda Accord.
Safety: Risky Components and Precautions
Working on the timing belt system involves some risks. Here are some important safety precautions:
- Disconnect the Battery: Always disconnect the negative battery cable before working on the electrical system.
- Support the Engine: When removing engine mounts to access the timing belt, properly support the engine with a jack and jack stands.
- Don't Overtighten: Overtightening bolts can damage threads and components. Use a torque wrench and follow the service manual's torque specifications.
- Rotating Assembly: Keep your hands and clothing away from rotating parts.
- Flammable Liquids: Be careful when working with flammable liquids such as gasoline.
- Eye Protection: Wear safety glasses to protect your eyes from debris.
The most significant risk comes from the potential for engine damage if the timing belt breaks or is incorrectly installed. Take your time, double-check your work, and don't hesitate to seek help from a professional if you're unsure about any step.
With a clear understanding of the timing belt diagram and careful attention to detail, you can successfully tackle this important maintenance task on your 1997 Honda Accord. Remember to consult your repair manual for the specific instruction.