1998 Chevy Silverado Emergency Brake Cable Diagram
Let's dive into the emergency brake system of the 1998 Chevy Silverado. Specifically, we're going to dissect the emergency brake cable diagram, understanding its components, how it functions, and how to diagnose common issues. This knowledge is crucial whether you're tackling a repair, customizing your rig, or simply expanding your automotive understanding. Having access to the diagram itself is invaluable, and we’ve got you covered – you can download the complete diagram [Link to Download - Placeholder].
Purpose of Understanding the Diagram
Why bother with the emergency brake cable diagram? Several reasons. Firstly, repairs. When your parking brake isn't holding, diagnosing the fault requires a solid understanding of the system. Is the cable stretched? Is a component seized? The diagram helps you pinpoint the problem. Secondly, customization and modification. If you're lifting your Silverado or swapping out components, you might need to adjust or reroute the e-brake cables. The diagram shows you the proper layout. Thirdly, general automotive knowledge. Understanding how systems work is just good practice for any DIY enthusiast.
Key Specs and Main Parts
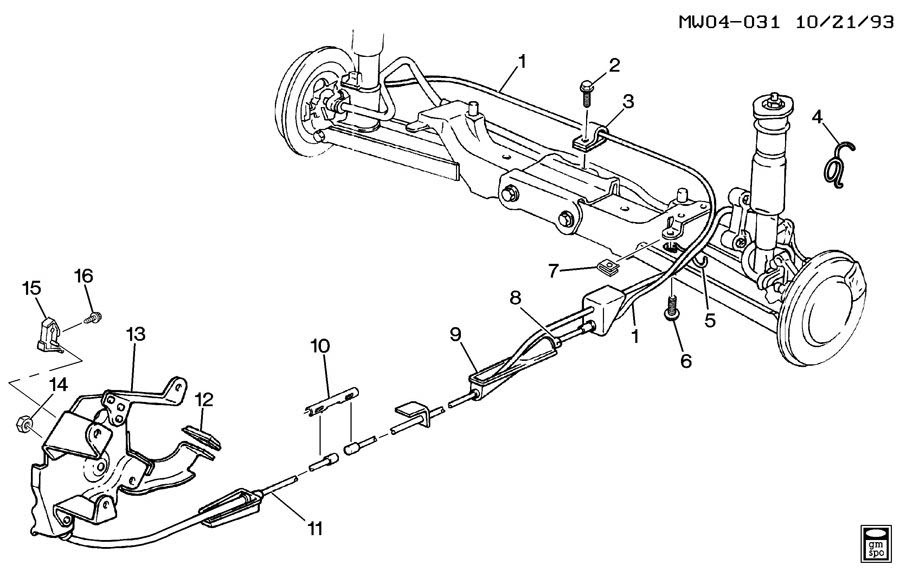
The 1998 Chevy Silverado's parking brake system is a mechanically actuated system. That means it relies on cables and levers, not hydraulics. Here's a breakdown of the key components:
- Parking Brake Pedal/Lever Assembly: Located inside the cab, this is the input point for the system. When you depress the pedal or pull the lever, it starts the process of engaging the brakes. It is connected to the equalizer bar using the primary cable.
- Primary Cable: Connects the parking brake pedal/lever assembly to the equalizer bar. This cable is typically heavier duty than the secondary cables.
- Equalizer Bar: This is a crucial component. It's a pivoting lever that distributes the braking force evenly between the two rear wheels. The equalizer bar helps compensate for slight differences in cable length or brake shoe adjustment.
- Secondary Cables: Two cables (one for each rear wheel) run from the equalizer bar to the brake shoes inside the rear brake drums (or rotors on some models).
- Rear Brake Assemblies: These are the actual mechanisms that apply the braking force. They contain the brake shoes (or pads), the parking brake lever, and the necessary hardware to engage the brake shoes against the brake drum (or rotor).
- Cable Sheaths/Conduits: These protect the cables from the elements and prevent them from kinking or snagging. They’re critical for smooth operation.
- Return Springs: These springs are located at various points in the system (typically at the brake shoes and the pedal assembly) and are responsible for releasing the parking brake when the pedal/lever is disengaged.
Understanding Diagram Symbols
The diagram uses standardized symbols, so learning them is essential. Here's a guide:
- Solid Lines: Generally represent the physical cables themselves. Thicker lines might indicate the primary cable, while thinner lines are often secondary cables.
- Dashed Lines: Could represent the cable sheaths or housings that protect the cables. They might also indicate a mechanical linkage, like a lever or pivot point.
- Circles/Dots: Often represent connection points or pivot points. For example, where a cable attaches to a lever or a bracket.
- Rectangles: May symbolize components like the equalizer bar or the parking brake lever assembly.
- Arrows: Indicate the direction of movement or force. For example, an arrow pointing from the pedal to the equalizer bar shows the direction of force applied when the pedal is pressed.
- Color Coding (if applicable): While not always present in older diagrams, color can sometimes differentiate cables or components. For example, red might indicate the primary cable and black the secondary. Consult the diagram's legend for specific color meanings.
Key technical terms to remember:
- Actuation: This refers to the process of putting the brake system into action, e.g. pressing the pedal, pulling the lever.
- Equalization: This means evenly distributing braking force across the rear axle.
- Sheath: This is a protective outer covering for the cable.
- Slack: This term refers to play or looseness in the cables. Too much slack means the brake won't engage properly.
How It Works
The 1998 Silverado's parking brake system is a straightforward but effective design. When you engage the parking brake (by pressing the pedal or pulling the lever), the following happens:
- The primary cable is pulled, transmitting the force from the pedal assembly to the equalizer bar.
- The equalizer bar pivots, dividing the force equally between the two secondary cables.
- The secondary cables pull on levers located inside the rear brake assemblies.
- These levers then force the brake shoes (or pads) against the inside of the brake drums (or rotors), creating friction and stopping the wheels from turning.
- When the parking brake is disengaged, the return springs pull the brake shoes away from the drums/rotors, releasing the braking force.
Real-World Use – Basic Troubleshooting
Here are some common parking brake problems and how to diagnose them using the diagram and your understanding of the system:
- Parking Brake Doesn't Hold: Possible causes include stretched cables, seized brake shoes, or a faulty equalizer bar. Start by visually inspecting the cables for excessive slack or damage. Check the equalizer bar for free movement. If the cables are too loose, they may need adjustment or replacement. Check the rear brakes for worn shoes or seized components.
A seized cable will prevent the parking brake from engaging properly.
- Parking Brake Pedal Goes to the Floor: This usually indicates a broken or severely stretched cable. Inspect the primary cable first. If that's intact, check the secondary cables.
- Parking Brake Stays Engaged: This could be due to a seized cable, a broken return spring, or corroded brake hardware. Inspect the cables for rust or kinks. Check the return springs for breakage or weakness. Lubricate the brake hardware to ensure free movement.
- Uneven Braking: This can happen if one of the secondary cables is stretched or damaged. It could also indicate a problem with one of the rear brake assemblies. Adjust the cables so they are pulling equally.
Remember to always consult the diagram while troubleshooting. It will help you identify the correct components and understand their relationship to each other.
Safety Considerations
Working on the emergency brake system involves some safety considerations:
- Eye Protection: Wear safety glasses to protect your eyes from debris, especially when working around rusted or corroded components.
- Gloves: Wear gloves to protect your hands from dirt, grease, and sharp edges.
- Wheel Chocks: Always chock the wheels opposite the ones you're working on to prevent the vehicle from rolling.
- Jack Stands: Never work under a vehicle supported only by a jack. Use jack stands to provide secure support.
- Spring Tension: Be careful when working around return springs, as they can be under tension and could cause injury if released suddenly.
- Corrosion: Be aware that cables and hardware may be corroded. Rust weakens components and can make them unpredictable.
Specifically, the brake shoe return springs can be dangerous if not handled correctly. Use a brake spring tool to safely remove and install these springs.
The emergency brake system is critical for safety. If you're not comfortable working on it yourself, take your Silverado to a qualified mechanic. However, with the right knowledge and tools, many e-brake repairs can be handled by a DIYer. And remember, we have the 1998 Chevy Silverado emergency brake cable diagram ready for you to download and use. Happy wrenching! [Link to Download - Placeholder]