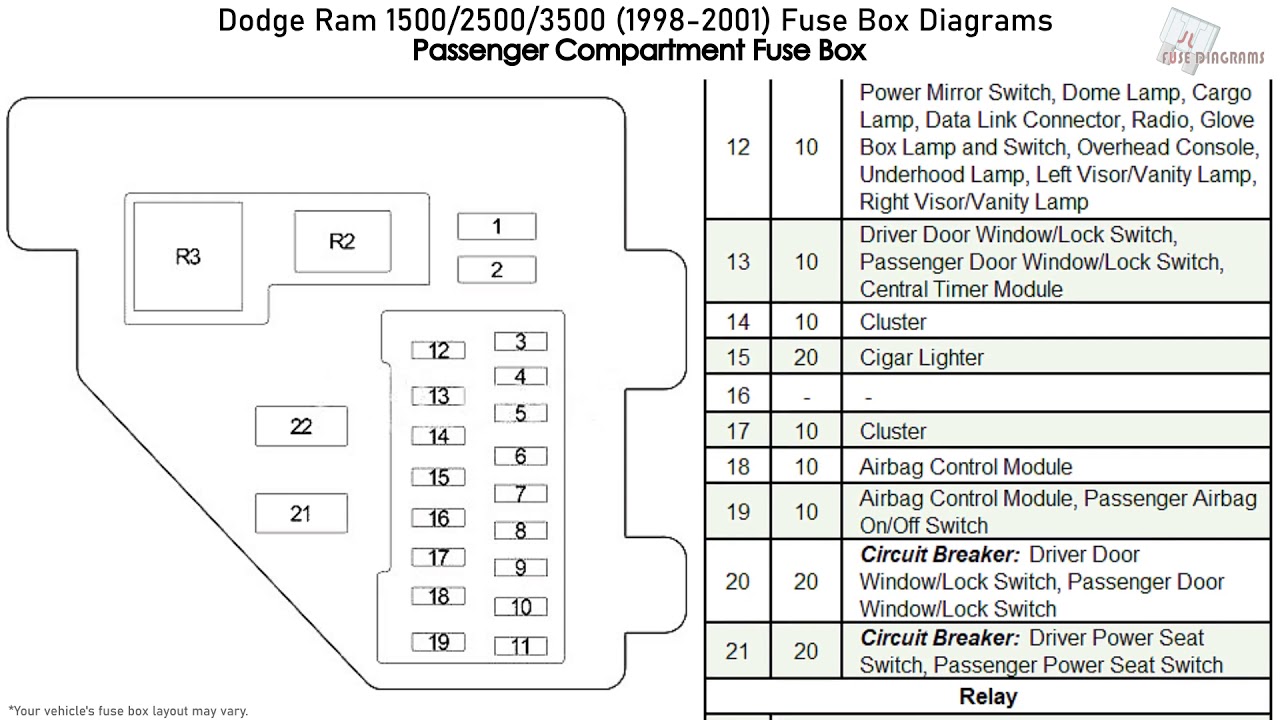
1999 Dodge Ram 1500 Fuse Box Diagram
The 1999 Dodge Ram 1500 is a robust and reliable truck, but like all vehicles, its electrical system relies heavily on a well-functioning fuse box. Understanding the fuse box diagram is crucial for diagnosing and resolving electrical issues, performing modifications, or even just expanding your knowledge of your vehicle's inner workings. This article serves as a comprehensive guide to the 1999 Dodge Ram 1500 fuse box diagram, designed for the experienced DIYer.
Purpose of Understanding the Fuse Box Diagram
Why bother with a fuse box diagram? The answer is multifaceted. Primarily, it’s essential for:
- Troubleshooting Electrical Problems: When a circuit malfunctions (lights don't work, power windows fail, etc.), the first place to check is the fuse box. The diagram tells you which fuse protects which circuit.
- Performing Repairs: Replacing a blown fuse is a simple repair, but you need to identify the correct fuse first.
- Adding Accessories: When installing aftermarket accessories like lights, stereos, or alarms, you may need to tap into existing circuits. The diagram shows you which circuits are available and their amperage ratings.
- General Vehicle Knowledge: Understanding the fuse box provides a deeper understanding of your truck’s electrical system.
Key Specs and Main Parts
The 1999 Dodge Ram 1500 actually has two primary fuse locations: the Power Distribution Center (PDC) under the hood and the fuse panel inside the cab. Each serves a distinct purpose.
Power Distribution Center (PDC)
Located under the hood, the PDC houses fuses and relays that control high-current circuits such as the starter, alternator, fuel pump, and various engine management systems. It's essentially the main power distribution hub for the vehicle.
Interior Fuse Panel
This panel, usually found on the driver's side, is responsible for protecting lower-current circuits like interior lights, the radio, the cigarette lighter (power outlet), and some instrument panel functions. Access is usually gained by removing a small panel or cover.
Key Specs to Consider:
- Fuse Amperage Ratings: Fuses are rated in amps (A). This indicates the maximum current the fuse can handle before blowing. Always replace a blown fuse with one of the same amperage rating. Using a higher-rated fuse can overload the circuit and cause damage or even a fire.
- Relay Types: The PDC contains various relays. Relays are electrically operated switches that control high-current circuits using a low-current signal. Common types include SPST (Single Pole Single Throw) and SPDT (Single Pole Double Throw).
Symbols and Conventions Explained
Understanding the symbols and conventions used in a fuse box diagram is critical for interpreting the information correctly. While specific layouts may vary slightly, certain common symbols and conventions apply.
- Lines: Lines represent electrical wires or circuits. Thicker lines may indicate heavier gauge wiring for higher current circuits.
- Colors: Wire colors are often indicated on the diagram (e.g., RED, BLU, GRN). These colors correspond to the actual wire colors in the vehicle.
- Icons: Icons represent specific components or systems. Common icons include:
- Lightbulb: Indicates a lighting circuit (headlights, taillights, etc.).
- Horn: Indicates the horn circuit.
- Radio: Indicates the radio circuit.
- Wiper Blade: Indicates the windshield wiper circuit.
- Engine Symbol: Often indicates engine management related circuits.
- Fuse Numbers/Labels: Each fuse is assigned a number or label that corresponds to a listing in the diagram. This listing specifies the circuit the fuse protects.
- Relay Symbols: Relays are typically represented by a rectangle with lines indicating the coil and switch contacts.
Most diagrams also include a legend that further explains the symbols and conventions used.
How It Works: The Electrical Flow
Understanding how the electrical system works in conjunction with the fuse box is key. The battery provides the initial power source. From the battery, power flows through the main wiring harness to the PDC. Inside the PDC, fuses protect individual circuits. If a circuit experiences an overcurrent (too much current flow), the fuse blows, interrupting the circuit and preventing damage to the wiring and components.
Relays, also located within the PDC and sometimes in the interior fuse panel, act as remote-controlled switches. A low-current signal from a switch (e.g., the headlight switch) activates the relay, which then closes a high-current circuit (e.g., the headlights). This allows a small switch to control a high-power device.
Real-World Use: Basic Troubleshooting Tips
Let's say your headlights aren't working. Here's how to troubleshoot using the fuse box diagram:
- Consult the Diagram: Locate the fuse box diagram (either under the hood or inside the cab).
- Identify the Headlight Fuse: Find the fuse labeled "Headlights" or "Lighting." The diagram will indicate its location and amperage rating.
- Inspect the Fuse: Remove the fuse. Visually inspect it. A blown fuse will have a broken filament.
- Replace the Fuse: Replace the blown fuse with a new fuse of the same amperage rating.
- Test the Circuit: Turn on the headlights to see if they now work.
Important Troubleshooting Considerations:
- Fuse Keeps Blowing: If the new fuse blows immediately, there's a short circuit in the wiring or a faulty component in the headlight circuit. You'll need to further investigate the wiring and components.
- Check the Relay: If the fuse is good but the headlights still don't work, the headlight relay might be faulty. Consult the diagram to locate the relay and test it.
Safety Considerations: Respect the Electrical System
Working with automotive electrical systems involves inherent risks. Always take precautions:
- Disconnect the Battery: Before working on any electrical circuit, disconnect the negative (-) battery cable. This prevents accidental shorts and electrical shocks.
- Use Proper Tools: Use insulated tools designed for automotive electrical work.
- Never Bypass a Fuse: Never use a piece of wire or a higher amperage fuse to bypass a blown fuse. This is extremely dangerous and can cause a fire.
- Be Cautious Around Relays: Relays can control high-current circuits. Be careful when working around them, especially with the battery connected.
- Airbags: Be extremely careful around airbag circuits. Improper handling can cause accidental airbag deployment, resulting in serious injury. If you are unsure, consult a professional.
High-Risk Components:
- Airbag Circuits: These are sensitive and potentially dangerous.
- Fuel Pump Circuit: This circuit carries fuel. Sparks can ignite fuel vapors.
- Ignition System: This circuit carries high voltage.
By understanding the 1999 Dodge Ram 1500 fuse box diagram and following these safety guidelines, you can effectively troubleshoot electrical problems, perform repairs, and enhance your knowledge of your vehicle's electrical system. Remember to always prioritize safety and consult a professional mechanic if you're unsure about any aspect of the repair.
We have the 1999 Dodge Ram 1500 fuse box diagram file available. Feel free to download it for your reference.