1999 Toyota Corolla Serpentine Belt Diagram
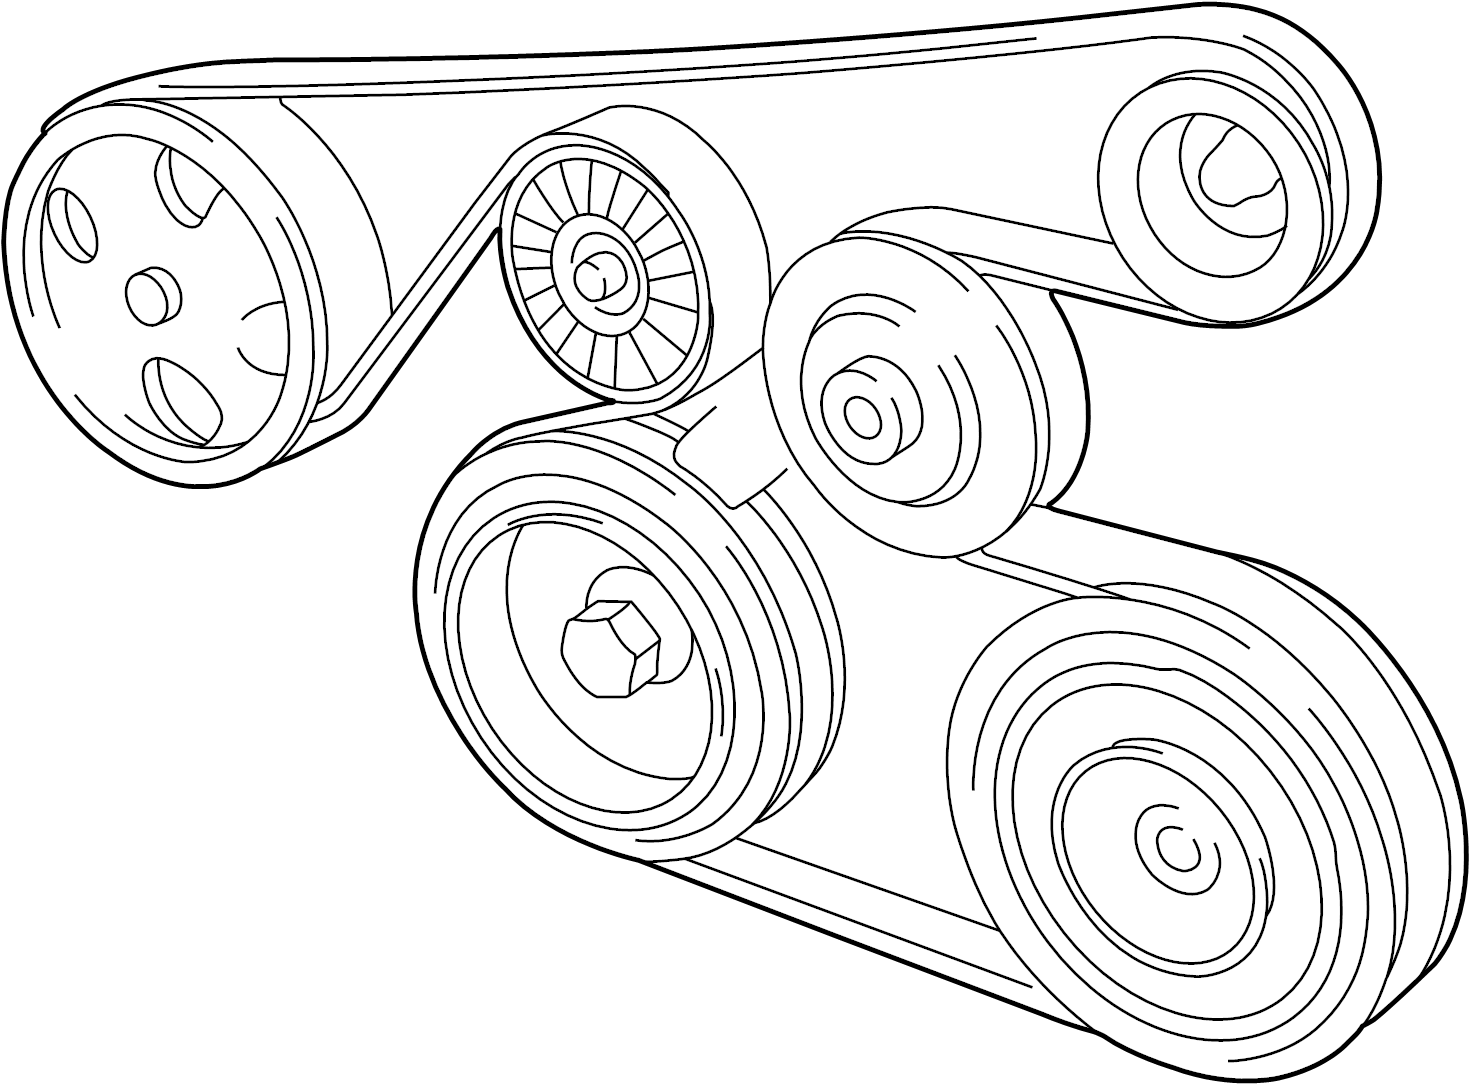
The serpentine belt diagram for a 1999 Toyota Corolla is an invaluable resource for anyone tackling maintenance or repairs on this reliable vehicle. Whether you're replacing a worn belt, diagnosing a charging issue, or simply trying to understand your engine's layout, a clear understanding of the belt's routing is crucial. This article will provide a comprehensive breakdown of the diagram, its components, and practical applications for the experienced DIY mechanic.
Purpose of the Serpentine Belt Diagram
The primary purpose of the serpentine belt diagram is to visually depict the routing of the serpentine belt around the various engine accessories. This is critical because the belt powers multiple essential components. Without the diagram, correctly installing a new belt or diagnosing issues related to belt tension and accessory function becomes significantly more challenging. Specific reasons for needing the diagram include:
- Belt Replacement: The most common use. When the belt shows signs of wear (cracks, fraying, glazing) it needs to be replaced. The diagram ensures the new belt is installed correctly.
- Accessory Troubleshooting: If you're experiencing issues with your alternator (no charging), power steering (hard steering), air conditioning (no cold air), or water pump (overheating), the diagram helps isolate the belt as a potential cause.
- General Understanding: Familiarizing yourself with the engine layout and the function of each accessory connected to the belt.
- Preventative Maintenance: Regular inspection of the belt and its components, guided by the diagram, can prevent breakdowns.
Key Specs and Main Parts
The 1999 Toyota Corolla typically came with two engine options, both of which utilize a serpentine belt: the 1.6L 4A-FE and the 1.8L 1ZZ-FE. While the accessories and general layout are similar, the exact routing of the belt can vary slightly. Therefore, it’s crucial to identify your engine type before consulting the diagram. Key components involved in the serpentine belt system include:
- Crankshaft Pulley (Harmonic Balancer): This is the main drive pulley connected directly to the engine's crankshaft. It's responsible for transferring engine power to the serpentine belt.
- Alternator Pulley: The alternator, responsible for charging the battery and powering electrical systems, is driven by the serpentine belt.
- Power Steering Pump Pulley: Powers the power steering system, assisting in steering the vehicle.
- Air Conditioning Compressor Pulley: Engages and disengages to power the air conditioning compressor, providing cold air.
- Water Pump Pulley: Circulates coolant throughout the engine, preventing overheating.
- Tensioner Pulley: A spring-loaded pulley that maintains proper tension on the serpentine belt. Proper tension is vital for efficient accessory operation and preventing belt slippage.
- Idler Pulley (Optional): Some configurations may include an idler pulley, which is a smooth pulley used to guide the belt around the engine and provide the necessary wrap angle on other pulleys.
The serpentine belt itself is a single, continuous belt made of reinforced rubber. It's designed to withstand high temperatures and constant flexing as it wraps around the various pulleys.
Symbols and Diagram Conventions
Understanding the symbols and conventions used in the serpentine belt diagram is essential for accurate interpretation:
- Solid Lines: Represent the path of the serpentine belt. The lines indicate the belt’s outer surface.
- Dashed Lines: May represent the inner surface of the belt as it wraps around a pulley, providing a clearer view of the belt’s path behind other components.
- Arrows: Indicate the direction of belt rotation around each pulley. This is crucial for ensuring the belt is routed correctly.
- Pulleys: Depicted as circles, often with an abbreviation indicating the component they are attached to (e.g., ALT for Alternator, P/S for Power Steering, A/C for Air Conditioning, WP for Water Pump, CRANK for Crankshaft).
- Tensioner: Usually shown as a spring-loaded mechanism with an arrow indicating the direction of tension.
- Labels: Each component is clearly labeled with its name or abbreviation.
Color coding is not typically used in these diagrams, but if present, different colors might denote different belt sections or components. Always refer to the diagram's key or legend for clarification on any color codes.
How the Serpentine Belt System Works
The crankshaft pulley, driven directly by the engine, is the driving force behind the entire serpentine belt system. As the crankshaft rotates, it turns the crankshaft pulley, which in turn drives the serpentine belt. The belt then transfers this rotational force to all the other pulleys connected to engine accessories. The alternator pulley spins, generating electricity to charge the battery and power electrical systems. The power steering pump pulley drives the pump, providing hydraulic assistance for steering. The air conditioning compressor pulley engages when the A/C is turned on, driving the compressor to cool the cabin. The water pump pulley circulates coolant, preventing the engine from overheating.
The tensioner pulley is crucial for maintaining the correct amount of tension on the belt. Too little tension results in belt slippage, leading to reduced accessory performance and potential damage. Too much tension can put excessive strain on the accessory bearings and the belt itself, shortening their lifespan.
Real-World Use and Troubleshooting
Here are some basic troubleshooting tips using the serpentine belt diagram:
- Squealing Noise: A squealing noise, especially during cold starts or when the engine is under load (e.g., turning the steering wheel at low speeds), often indicates a loose or worn serpentine belt. Check the belt tension and inspect the belt for signs of wear. Consult the diagram to ensure the belt is properly routed.
- Accessory Malfunction: If one or more accessories are not functioning correctly (e.g., weak A/C, hard steering, battery not charging), check the serpentine belt for proper routing and tension. A slipped or broken belt can cause these issues. Use the diagram to trace the belt's path and identify which accessories are affected.
- Belt Inspection: Regularly inspect the serpentine belt for cracks, fraying, glazing (a shiny, hardened surface), and missing chunks. Replace the belt if any of these conditions are present. The diagram helps you identify the entire length of the belt for a thorough inspection.
- Tensioner Check: Inspect the tensioner pulley for smooth operation. It should move freely without excessive play or noise. A faulty tensioner can cause belt slippage or premature belt wear.
Safety Precautions
Working on the serpentine belt system can be hazardous if proper safety precautions are not taken:
- Disconnect the Battery: Before working on any electrical components, disconnect the negative battery cable to prevent accidental short circuits.
- Engine Cool Down: Allow the engine to cool down completely before working on the serpentine belt system. The engine and its components can become very hot, posing a burn risk.
- Avoid Moving Parts: Never put your hands or tools near the serpentine belt or pulleys while the engine is running. The rotating parts can cause serious injury.
- Tensioner Release: When removing or installing the serpentine belt, use the correct tool to release the tension on the tensioner pulley. Follow the manufacturer's instructions carefully.
- Eye Protection: Wear safety glasses to protect your eyes from debris.
The crankshaft pulley is a particularly risky component because it's directly connected to the rotating crankshaft and has significant rotational inertia. Exercise extreme caution when working near this pulley.
By understanding the serpentine belt diagram and following these safety precautions, you can confidently tackle serpentine belt-related maintenance and repairs on your 1999 Toyota Corolla. The knowledge gained will not only save you money on labor costs but also provide a deeper understanding of your vehicle's engine and its components.
We have the serpentine belt diagram file for the 1999 Toyota Corolla readily available. You can download it [link to download - replace with actual link here]. This will provide you with a clear and detailed visual reference for your repairs and maintenance.