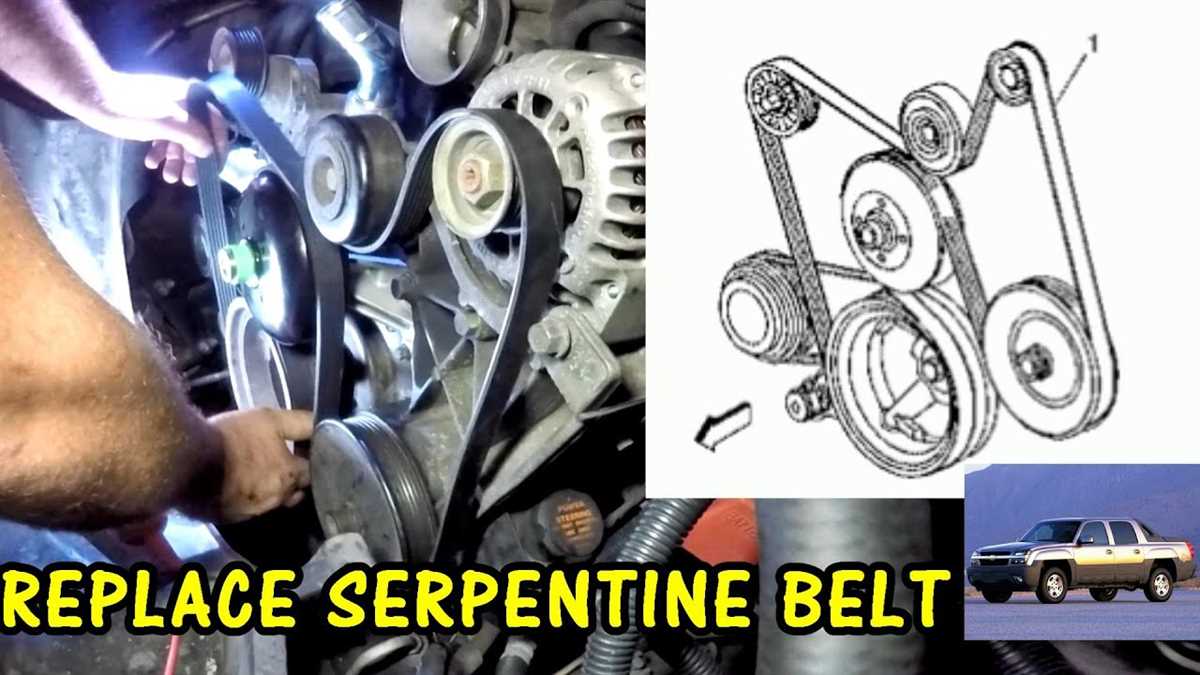
2000 Chevy Silverado 1500 5.3 Serpentine Belt Diagram
Alright, let's dive into the serpentine belt diagram for your 2000 Chevy Silverado 1500 with the 5.3L engine. Understanding this diagram is crucial for several reasons. Whether you're planning on replacing the belt yourself, diagnosing a squealing noise, or just wanting a deeper understanding of your truck's engine, this guide will provide the knowledge you need. We'll break down the diagram step-by-step, so you'll be ready to tackle those repairs with confidence. And don't worry, we have the complete diagram available for you to download.
Purpose of the Serpentine Belt Diagram
The serpentine belt diagram is essentially a roadmap for the belt's path around various engine accessories. Its main purposes include:
- Replacement Guidance: The primary use is to ensure correct installation of a new serpentine belt. Incorrect routing can lead to component damage and belt failure.
- Troubleshooting: The diagram helps you identify which accessory a noisy or slipping belt is affecting. For instance, a slipping belt on the power steering pump can cause hard steering.
- Preventative Maintenance: Familiarity with the diagram enables you to visually inspect the belt for wear, cracks, or fraying and identify potential problems before they escalate.
- Engine Component Awareness: Understanding the belt path helps you learn about the location and function of various engine accessories.
Key Specs and Main Parts of the Serpentine Belt System
The serpentine belt system on your 2000 Silverado 1500 5.3L comprises several key components. Understanding their function is essential for proper diagnosis and repair.
- Serpentine Belt: A single, continuous belt made of reinforced rubber that drives multiple engine accessories. The *material* of the belt is usually EPDM (Ethylene Propylene Diene Monomer) rubber due to its durability and resistance to heat and cracking.
- Crankshaft Pulley (Harmonic Balancer): Attached to the crankshaft, this pulley is the driving force of the serpentine belt. It also helps dampen engine vibrations.
- Alternator Pulley: The alternator converts mechanical energy from the engine into electrical energy to charge the battery and power electrical systems.
- Power Steering Pump Pulley: The power steering pump provides hydraulic pressure to assist steering.
- Air Conditioning (A/C) Compressor Pulley: The A/C compressor circulates refrigerant to cool the cabin air.
- Water Pump Pulley: The water pump circulates coolant through the engine to regulate its temperature.
- Idler Pulley(s): Smooth pulleys that guide the belt's path and provide necessary tension or clearance.
- Tensioner Pulley: A spring-loaded pulley that maintains proper tension on the serpentine belt. This is crucial for preventing slippage and ensuring efficient operation of all accessories. The tensioner usually has an indicator showing whether the belt is stretched too far.
Symbols and Conventions in the Diagram
Serpentine belt diagrams often use specific symbols and conventions to represent the belt's path and the components involved. Here's a breakdown:
- Solid Lines: Indicate the path of the outer surface of the serpentine belt. This is the side of the belt that makes contact with grooved pulleys.
- Dashed Lines: (Less common, but sometimes used) Might indicate the path of the inner surface of the belt, if the diagram is showing the belt wrapped around a smooth idler pulley on its back side.
- Arrows: Indicate the direction of rotation for each pulley. It's crucial to understand the direction of rotation because it determines which side of the belt (grooved or smooth) makes contact with the pulley.
- Component Labels: Each pulley is labeled with its corresponding component (e.g., ALT for alternator, P/S for power steering).
- Tensioner Indicator: The diagram may show the location of the tensioner and a mark indicating the acceptable tension range. If the tensioner is beyond this range, it indicates either a stretched belt or a failing tensioner.
How the Serpentine Belt System Works
The serpentine belt system operates on a simple principle: the rotational force of the engine is transferred to various accessories via a single, continuous belt. The crankshaft pulley, driven by the engine's rotation, powers the serpentine belt. The belt then snakes around each accessory pulley, transferring rotational force to the alternator, power steering pump, A/C compressor, and water pump.
The tensioner pulley plays a crucial role in maintaining the correct belt tension. It automatically adjusts to compensate for belt stretch and wear, ensuring consistent power delivery to all accessories. Without proper tension, the belt can slip, leading to reduced performance, overheating (due to water pump slippage), and charging issues (due to alternator slippage).
Understanding this flow of power is key to diagnosing serpentine belt issues. For example, if your power steering is failing, you should check the belt's condition and tension to ensure the power steering pump is receiving adequate rotational force.
Real-World Use and Basic Troubleshooting Tips
Here's how you can use the serpentine belt diagram to troubleshoot common issues:
- Squealing Noise: A common symptom of a slipping belt. Inspect the belt for cracks, glazing (shiny surface), or fraying. Check the tensioner to ensure it's applying adequate pressure. Misalignment of pulleys can also cause squealing. A temporary fix (though not recommended long term) is belt dressing. If this works, this indicates that belt is old and needs to be replaced.
- Battery Not Charging: If the alternator pulley is slipping due to a loose or damaged belt, the battery may not charge properly. Use a multimeter to check the alternator output voltage.
- Overheating: A slipping belt on the water pump pulley can reduce coolant circulation, leading to overheating. Check the engine temperature gauge and look for signs of overheating.
- Hard Steering: A slipping belt on the power steering pump pulley can cause hard steering. Check the power steering fluid level and inspect the belt.
- A/C Not Cooling: A slipping belt on the A/C compressor pulley can prevent the compressor from operating effectively, resulting in poor cooling performance.
Simple Troubleshooting Steps:
- Visually inspect the belt for wear and damage.
- Check the tensioner pulley for proper operation and alignment.
- Ensure all pulleys are free from excessive dirt and debris.
- Compare the belt's routing with the diagram to ensure it's correctly installed.
Safety Precautions
Working on the serpentine belt system involves inherent risks. Here's what you need to know to stay safe:
- Disconnect the Battery: Always disconnect the negative battery terminal before working on the serpentine belt system to prevent accidental electrical shock.
- Engine Must Be Cool: Never work on the engine while it's hot. Allow it to cool completely before proceeding.
- Keep Hands and Clothing Clear: The serpentine belt system contains moving parts that can cause serious injury. Keep your hands, clothing, and tools clear of the belt and pulleys while the engine is running or being turned over.
- Tensioner Safety: Be extremely careful when releasing the tensioner. The spring is under high tension and can cause injury if released improperly. Use the correct tool to relieve the tension and control the release.
- Eye Protection: Wear safety glasses to protect your eyes from debris.
Risky Components:
- Rotating Pulleys: When the engine is running (or even when cranking), these parts can cause serious injury.
- Tensioner Assembly: The spring is under high load, and if released improperly, the tensioner can snap back violently.
By understanding the serpentine belt diagram and following these safety precautions, you'll be well-equipped to tackle any serpentine belt-related issues on your 2000 Chevy Silverado 1500 5.3L.
We have the full serpentine belt diagram file ready for you. Click here to download it and keep it handy for your future maintenance and repair needs.