2000 Chevy Silverado Stereo Wiring Diagram Color Code
Understanding the stereo wiring in your 2000 Chevy Silverado is crucial for a variety of reasons. Whether you're upgrading your head unit, installing aftermarket speakers, diagnosing audio problems, or simply trying to learn more about your truck's electrical system, a reliable wiring diagram is an invaluable tool. This guide will provide a detailed explanation of the 2000 Silverado's stereo wiring color codes, their functions, and how to use this information effectively. We'll break down the complexities, ensuring you can confidently tackle your audio projects.
Purpose of the Wiring Diagram
A wiring diagram, in this case for your 2000 Silverado's stereo, is a visual representation of the electrical circuits within the audio system. It shows how all the components – the head unit, speakers, amplifier (if equipped), antenna, and related wiring – are interconnected. Knowing how these components are connected allows you to:
- Perform Repairs: Identify and fix broken or damaged wires, ensuring proper signal flow.
- Install Aftermarket Components: Integrate new stereos, amplifiers, or speakers, connecting them correctly to the existing wiring.
- Troubleshoot Audio Issues: Diagnose problems like no sound, distorted audio, or improper speaker function.
- Understand the System: Gain a deeper knowledge of how your Silverado's audio system works.
- Avoid Costly Mistakes: Incorrect wiring can damage your head unit, speakers, or the vehicle's electrical system.
Key Specs and Main Parts of the 2000 Silverado Stereo System
Before diving into the wiring diagram, let's consider the key components typically found in a 2000 Chevy Silverado's stereo system:
- Head Unit (Radio/Receiver): The brain of the system, responsible for receiving radio signals, playing CDs (if equipped), and controlling audio output.
- Speakers: The devices that convert electrical signals into audible sound. A 2000 Silverado typically has speakers in the front doors and rear of the cab.
- Wiring Harness: A bundle of wires that connect the head unit to the vehicle's electrical system and speakers.
- Antenna: Receives radio signals.
- Ground Wire: Provides a return path for electrical current. A good ground is essential for proper system function.
- Power Wire: Supplies power to the head unit. Typically, there are two power wires: one for constant power (keeping presets and clock alive) and one for switched power (turning the unit on/off with the ignition).
Understanding the Wiring Diagram Symbols
A wiring diagram uses standardized symbols to represent electrical components and connections. Key elements to understand are:
- Lines: Represent wires. The thickness of the line generally doesn't indicate wire gauge in this type of diagram.
- Colors: Each wire is identified by a specific color or a combination of colors. This is crucial for identifying the function of each wire. We'll provide a detailed color code list below.
- Dots: A dot where two or more lines intersect indicates a connection. If lines cross without a dot, it usually means they are simply passing over each other without being electrically connected.
- Component Symbols: Specific symbols represent components like resistors, capacitors, diodes, and connectors. While you may not need to deeply understand every symbol for basic stereo wiring, recognizing the connector symbols will help you identify where different wiring harnesses plug in.
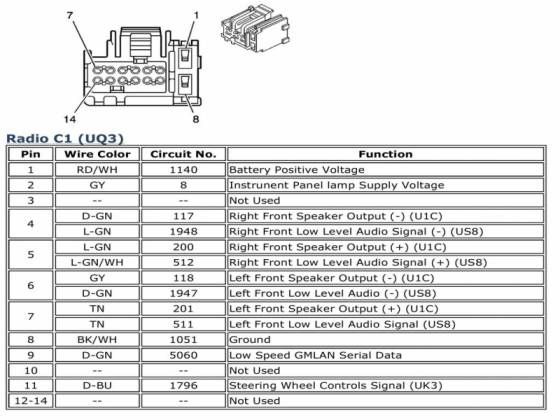
2000 Chevy Silverado Stereo Wiring Color Code
This is the most important part! Knowing the color codes allows you to identify the function of each wire. Remember that wire colors can sometimes vary slightly depending on the trim level and specific options of your Silverado. However, this list is a good starting point:
- Constant 12V+ (Battery): Orange
- Switched 12V+ (Ignition): Yellow
- Ground: Black
- Illumination: Gray
- Power Antenna: Pink
- Left Front Speaker (+): Tan
- Left Front Speaker (-): Gray
- Right Front Speaker (+): Light Green
- Right Front Speaker (-): Dark Green
- Left Rear Speaker (+): Brown
- Left Rear Speaker (-): Yellow (sometimes Dark Blue)
- Right Rear Speaker (+): Dark Blue
- Right Rear Speaker (-): Light Blue
Note: Always double-check with your specific wiring diagram, as variations can occur.
How It Works: Following the Signal Path
The stereo system works by sending electrical signals from the head unit to the speakers. Here's a simplified overview:
- Power Supply: The head unit receives power from two sources: the constant 12V+ (orange wire) which keeps the memory and clock alive, and the switched 12V+ (yellow wire) which turns the unit on and off with the ignition.
- Ground Connection: The black wire provides a ground connection, completing the electrical circuit.
- Signal Generation: The head unit processes audio signals from the radio, CD player, or auxiliary input.
- Signal Amplification (Optional): If an amplifier is present, the audio signal is amplified before being sent to the speakers.
- Speaker Output: The amplified audio signal is sent to the speakers via the speaker wires (identified by the color codes above). The speakers convert the electrical signal into sound waves.
Real-World Use: Basic Troubleshooting
Here are a few common troubleshooting scenarios and how the wiring diagram can help:
- No Power to Head Unit: Check the constant 12V+ (orange) and switched 12V+ (yellow) wires with a multimeter. Ensure they are receiving the correct voltage. Also, verify the ground connection is secure.
- No Sound from One Speaker: Check the speaker wires for that speaker (positive and negative) for continuity. Ensure they are properly connected to the head unit or amplifier. A break in the wire or a loose connection can cause this.
- Distorted Sound: Could be a speaker issue, but also check for damaged speaker wires or a bad connection. Ensure the speaker wires are not shorted to ground.
- Head Unit Turns Off and On: Check both power wires (constant and switched) and the ground connection. Intermittent power issues often stem from loose or corroded connections.
Using a multimeter to test for voltage and continuity is crucial for effective troubleshooting. Continuity tests ensure that a wire is intact and not broken internally. Voltage tests confirm that power is reaching the correct points in the circuit.
Safety Precautions
Working with automotive electrical systems can be dangerous. Always take these precautions:
- Disconnect the Battery: Before working on any electrical components, disconnect the negative terminal of the battery to prevent shorts and electrical shocks.
- Use Proper Tools: Use insulated tools to avoid accidental shorts.
- Consult the Diagram: Always refer to the wiring diagram to ensure you are connecting wires correctly.
- Avoid Damaging Wires: Be careful not to damage or cut wires during installation or repair.
- Secure Connections: Ensure all connections are secure and properly insulated.
The constant power wire (orange) is always live, even with the ignition off. This is why disconnecting the battery is so important. Accidentally shorting this wire to ground can cause significant damage.
Disclaimer: This guide provides general information and should not be considered a substitute for professional advice. If you are not comfortable working with automotive electrical systems, consult a qualified technician.
Next Steps
Now that you have a good understanding of the 2000 Chevy Silverado stereo wiring diagram color codes, you can begin your project with confidence. Remember to take your time, double-check your connections, and prioritize safety.
To further assist you, we have the complete, high-resolution wiring diagram file available for download. This diagram will provide even more detailed information and specific connection points for your 2000 Silverado.
Important Reminder: Always verify the information with the specific wiring diagram for your vehicle's year, make, and model, as variations may exist.