2000 Honda Civic Under Dash Fuse Box Diagram
The 2000 Honda Civic is a reliable workhorse, but like any vehicle, its electrical system can experience hiccups. Understanding your under-dash fuse box is crucial for diagnosing and resolving common electrical issues. This article delves into the intricacies of the 2000 Honda Civic's under-dash fuse box diagram, providing you with the knowledge to troubleshoot, repair, and even customize your Civic's electrical systems safely and effectively.
Purpose: Why Understanding Your Fuse Box Matters
The fuse box is the central protection unit for your car's electrical circuits. Each fuse protects a specific circuit from overcurrent. Think of it as a miniature circuit breaker in your home. When a circuit draws too much current – due to a short, a faulty component, or an overload – the fuse blows, interrupting the flow of electricity and preventing damage to more expensive components. Knowing the fuse box layout and the function of each fuse is essential for:
- Troubleshooting Electrical Issues: Quickly identify and replace a blown fuse, restoring functionality to the affected circuit.
- Performing Repairs: Access the fuse related to a specific component you're repairing.
- Adding Aftermarket Accessories: Safely tap into existing circuits for adding accessories like aftermarket stereos, lighting, or other electronic devices. Always consult your service manual or a trusted professional before modifying any vehicle electrical system.
- General Vehicle Knowledge: Understanding your car's electrical system empowers you to be a more informed and proactive owner.
Key Specs and Main Parts
The 2000 Honda Civic's under-dash fuse box is typically located on the driver's side, underneath the dashboard, often behind a small access panel. The fuse box itself is a plastic enclosure housing a series of fuses and sometimes relays. Here's a breakdown of the key components:
- Fuses: These are the sacrificial components designed to protect individual circuits. They are rated in amperes (A), indicating the maximum current they can handle before blowing. Common ratings include 5A, 7.5A, 10A, 15A, 20A, 30A, and higher.
- Relays: Relays are electromechanical switches that control high-current circuits using a low-current signal. They are often used to switch on headlights, the fuel pump, or the air conditioning compressor.
- Fuse Puller: A small plastic tool used to safely remove and install fuses. Most fuse boxes include a fuse puller on the inside of the cover.
- Fuse Box Cover: This cover protects the fuses from dirt, debris, and accidental contact. It usually has a diagram indicating the function of each fuse.
- Terminal Block: The base of the fuse box where the fuses and relays are connected to the vehicle's wiring harness.
Understanding Fuse Box Symbols and the Diagram
The fuse box diagram is your roadmap to understanding the electrical system. It's usually found on the inside of the fuse box cover or in the owner's manual. The diagram uses symbols and sometimes colors to represent different circuits and fuse ratings. Here's a breakdown of common elements:
- Numbers: Each fuse location is typically numbered. These numbers correspond to the list of circuits in the diagram.
- Abbreviations: Common abbreviations include:
- ACC: Accessory
- IGN: Ignition
- HTR: Heater
- ENG: Engine
- PWR: Power
- DEF: Defogger
- Icons/Symbols: These represent the components protected by the fuse. Examples include:
- Lightbulb: Headlights, taillights, interior lights
- Fan: Blower motor, radiator fan
- Horn: Horn circuit
- Windshield Wiper: Windshield wiper motor
- Radio: Audio system
- Clock: Clock/Memory power
- Lines/Colors (if applicable): Some diagrams use lines or colors to indicate different voltage levels or circuit types. However, this is less common in simpler diagrams like those found on the 2000 Civic.
The key to reading the diagram is to identify the number of the fuse you suspect is blown, then locate that number on the diagram to determine the circuit it protects. The diagram also shows the required amperage for that fuse. It's crucial to replace a blown fuse with one of the same amperage rating. Using a higher amperage fuse can overload the circuit and cause a fire. A lower amperage fuse will likely blow prematurely.
How It Works: The Fusing Process
The fuse is a simple device. Inside the fuse casing is a thin strip of metal. When the current flowing through the circuit exceeds the fuse's rating, this strip of metal heats up and melts, breaking the circuit and stopping the flow of electricity. This protects the wiring and components downstream from the fuse.
When a fuse blows, it's usually an indication of a problem in the circuit it protects. The problem could be a short circuit (where a wire is touching ground), an overloaded circuit (too many devices drawing power), or a faulty component. It is important to identify the cause of the blown fuse. Do not just replace it. If the same fuse blows again, there is an underlying problem that needs to be addressed.
Real-World Use: Basic Troubleshooting Tips
Here's a basic troubleshooting process for dealing with a blown fuse:
- Identify the Problem: What stopped working? This will help you narrow down the possible fuses to check.
- Locate the Fuse Box: Open the under-dash fuse box cover.
- Consult the Diagram: Find the fuse associated with the non-functional component.
- Inspect the Fuse: Use the fuse puller to remove the fuse. Visually inspect it. A blown fuse will typically have a broken or melted filament.
- Replace the Fuse: Replace the blown fuse with a new fuse of the same amperage rating.
- Test the Circuit: Turn on the component that wasn't working. If it works, you've solved the problem.
- If the Fuse Blows Again: If the new fuse blows immediately or shortly after, there's a more serious problem. You'll need to further diagnose the circuit, looking for shorts, damaged wiring, or faulty components. This may involve using a multimeter to test for continuity and voltage. Consider consulting a qualified mechanic at this point.
Safety: Important Considerations
Working with automotive electrical systems can be dangerous. Here are some crucial safety precautions:
- Disconnect the Battery: Before working on any electrical system, disconnect the negative terminal of the battery to prevent accidental shorts.
- Use the Correct Fuse: Always replace a blown fuse with one of the same amperage rating. Using a higher amperage fuse can overload the circuit and cause a fire.
- Avoid Water: Never work on electrical systems in wet conditions.
- Be Careful with Wires: Avoid pulling or tugging on wires. Damaged wiring can cause short circuits and fires.
- Know Your Limits: If you're not comfortable working with electrical systems, consult a qualified mechanic. Some components, like the airbag system, are particularly dangerous and should only be serviced by trained professionals. The airbag system contains an explosive charge, and improper handling can result in serious injury.
Specifically, be aware of circuits powering systems like the airbag. Tampering with these circuits can be incredibly dangerous and is best left to qualified professionals.
Understanding your 2000 Honda Civic's under-dash fuse box is an invaluable skill for any DIY car enthusiast. By following these guidelines and prioritizing safety, you can confidently troubleshoot and repair common electrical issues, saving time and money. Remember that if you ever feel overwhelmed or uncertain, seeking professional help is always the best course of action.
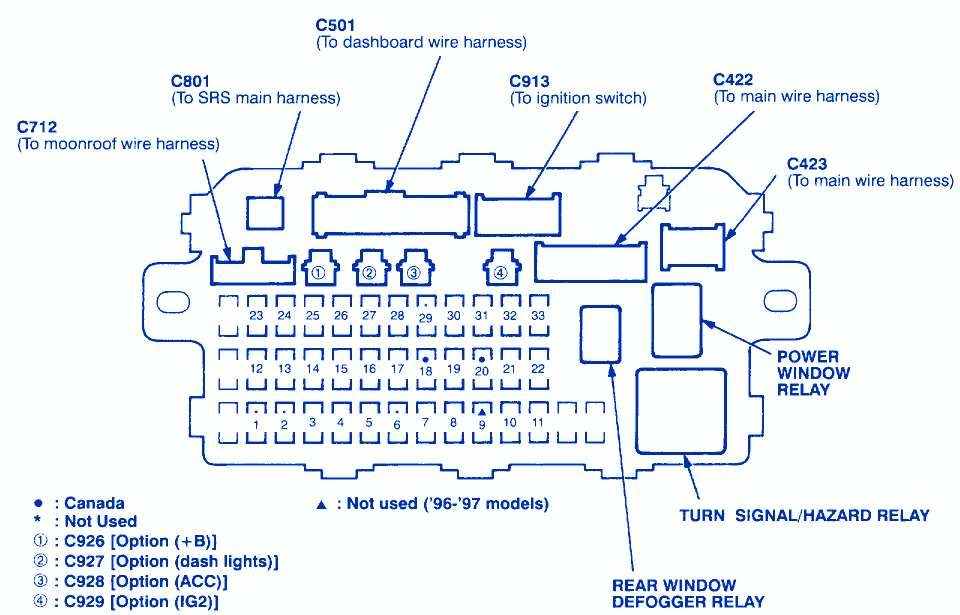
We have a downloadable diagram of the 2000 Honda Civic Under-Dash Fuse Box available. You can find it [link to the file - REPLACE THIS WITH ACTUAL LINK]. This diagram will provide a visual aid to help you understand the location and function of each fuse.