2000 Jeep Cherokee Interior Fuse Box Diagram
The 2000 Jeep Cherokee (XJ) is a rugged and reliable SUV, but like any vehicle of its age, electrical issues can arise. Understanding the interior fuse box diagram is crucial for diagnosing and repairing problems, performing modifications, and generally maintaining your XJ. This guide provides a detailed look at the 2000 Cherokee's interior fuse box, enabling you to tackle common electrical issues with confidence.
Why You Need This Diagram
The interior fuse box diagram isn't just a pretty picture; it's your roadmap to the electrical system inside your Cherokee. Here's why it's essential:
- Troubleshooting: When an electrical component stops working (e.g., interior lights, radio, power windows), the first thing you should check is the corresponding fuse. The diagram identifies which fuse protects which circuit.
- Repairing: Identifying the correct fuse is vital before replacing it. Using the wrong fuse amperage can damage electrical components or even cause a fire.
- Modifications: If you're adding aftermarket accessories like a new sound system, auxiliary lights, or a CB radio, you'll need to tap into the existing electrical system safely. The diagram helps you locate suitable power sources.
- Understanding: Familiarizing yourself with the fuse box layout helps you understand how your vehicle's electrical system is designed and protected.
Key Specs and Main Parts
The interior fuse box in the 2000 Jeep Cherokee is typically located under the dashboard, often behind a small access panel on the driver's side. The precise location can vary slightly, so consult your owner's manual if you're unsure.
Main Components:
- Fuses: These are sacrificial components designed to protect electrical circuits from overcurrent. They contain a thin wire or metal strip that melts and breaks the circuit if the current exceeds a certain amperage. The amperage rating is usually printed on the fuse itself.
- Relays: Relays are electromagnetic switches that allow a low-current circuit to control a high-current circuit. They're used for components like the horn, headlights, and fuel pump. They're generally larger than fuses and often have a specific part number printed on them.
- Fuse Box Housing: This is the plastic enclosure that holds the fuses and relays. It's usually labeled with a diagram showing the function and amperage rating of each fuse and the location of relays. This housing protects the fuses and relays from damage and provides a central location for accessing them.
- Connectors and Wiring: These components distribute power from the battery and alternator to the various circuits in the vehicle.
Fuse Types:
The 2000 Cherokee primarily uses two types of fuses in its interior fuse box:
- Blade Fuses (ATO/ATC): These are the most common type. They are flat, rectangular fuses with two prongs that plug into the fuse box. They come in various amperage ratings, typically from 1 to 30 amps.
- Mini Blade Fuses (ATM): Smaller versions of the blade fuse, often used in newer circuits or where space is limited.
Decoding the Fuse Box Diagram
Understanding the diagram is key to using it effectively. Fuse box diagrams are typically simplified representations, but they use standard symbols and conventions. Here's what to look for:
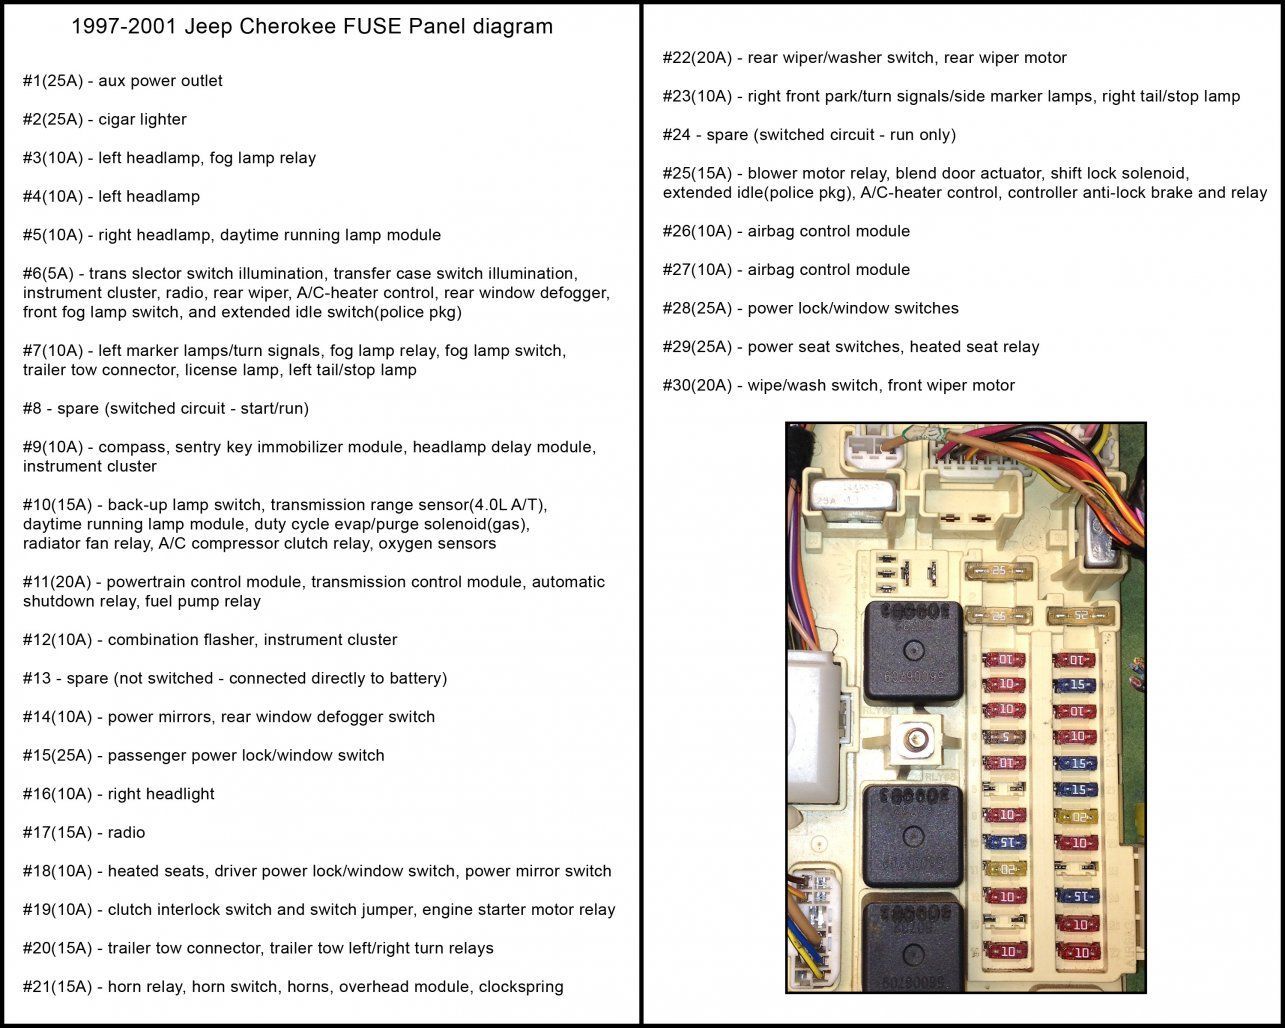
- Fuse Number/Identifier: Each fuse is usually assigned a number or identifier on the diagram. This corresponds to a label on the fuse box itself.
- Circuit Description: The diagram will list the function of each fuse. For example, "Cigar Lighter," "Radio," or "Power Windows."
- Amperage Rating (A): This indicates the maximum current that the fuse can handle before blowing. It's usually expressed in amps (e.g., 10A, 15A, 20A). Never replace a fuse with one of a higher amperage rating than specified, as this could damage the circuit.
- Relay Locations: The diagram shows the position of relays and identifies their function (e.g., "Headlight Relay," "Fuel Pump Relay").
- Line Types: While less common on simplified diagrams, some may use different line styles to indicate wire gauge or circuit type (e.g., dashed lines for ground wires).
How It Works
The interior fuse box is a central distribution point for electrical power within the passenger compartment. Power from the battery, regulated by the alternator when the engine is running, is routed to the fuse box. From there, individual fuses protect various circuits. When a circuit draws excessive current (due to a short circuit, overloaded component, or faulty wiring), the corresponding fuse blows, breaking the circuit and preventing damage to other components.
Relays act as remotely controlled switches. A low-current signal from a switch (e.g., headlight switch) activates the relay, which then closes a high-current circuit to power the corresponding component (e.g., headlights). This prevents high current from flowing through the switch itself, which could damage it.
Real-World Use: Basic Troubleshooting Tips
Here's how to use the fuse box diagram to troubleshoot common electrical problems:
- Identify the Problem: Determine which electrical component isn't working.
- Consult the Diagram: Locate the fuse that corresponds to the malfunctioning component. The fuse box diagram will tell you which fuse controls that component.
- Inspect the Fuse: Visually inspect the fuse. Look for a broken or melted filament. If the filament is intact, the fuse is likely good. A blown fuse will have a visible break in the thin wire or metal strip.
- Test the Fuse: Use a multimeter to test the fuse for continuity. A good fuse will have continuity (a reading of 0 ohms or a beep on the continuity setting). A blown fuse will have no continuity.
- Replace the Fuse: If the fuse is blown, replace it with a new fuse of the exact same amperage rating.
- Test the Component: After replacing the fuse, test the component to see if it's working. If the new fuse blows immediately, there's likely a short circuit or overload in the circuit.
Troubleshooting Further: If a new fuse blows immediately, further investigation is needed. Common causes include:
- Short Circuit: Damaged wiring is often the culprit. Inspect the wiring harness for signs of damage, such as frayed wires, pinched insulation, or corrosion.
- Overloaded Circuit: Too many devices plugged into a single circuit can overload it. Try disconnecting some devices and see if the fuse still blows.
- Faulty Component: The component itself may be faulty and drawing excessive current. This requires more advanced diagnostic techniques to pinpoint.
Safety Precautions
Working with electrical systems can be dangerous. Here are some essential safety precautions:
- Disconnect the Battery: Before working on the fuse box or any electrical component, disconnect the negative (-) battery cable. This prevents accidental short circuits and electrical shocks.
- Use Proper Tools: Use insulated tools to avoid electrical shocks.
- Never Replace a Fuse with a Higher Amperage: This is the most important safety rule! Using a higher amperage fuse can bypass the circuit protection and cause a fire.
- Avoid Working in Wet Conditions: Water conducts electricity and increases the risk of electrical shock.
- Be Careful Around Relays: Relays control high-current circuits. Handle them with care and avoid touching the terminals while the circuit is powered.
High-Risk Components: The starter motor, alternator, and fuel pump are high-current components that can pose a greater risk if mishandled. Always disconnect the battery before working on these components.
Disclaimer
This article provides general information and guidance. Electrical systems can be complex, and improper repairs can be dangerous. If you're not comfortable working on electrical systems, consult a qualified mechanic.
To further assist you, we have the 2000 Jeep Cherokee Interior Fuse Box Diagram available for download. With this diagram, you can be more confident in your ability to diagnose and troubleshoot any electrical issues you may encounter.